

 Published sources
 Product details checked
Your cat is standing at the door, the flap stays locked, and the first thought is usually: the microchip reader has failed. Sometimes that is the answer. More often, the flap is dealing with weak batteries, hair over the sensor, a cat that is not far enough inside the tunnel, an incorrectly saved chip, or an installation that reduces the reader’s range.
The quickest fix is to work through those possibilities in order:
- Power: Replace every battery with a fresh set of the specified type.
- Optics: Remove hair and dirt from the lenses, tunnel, and flap.
- Position: Bring the target cat’s head straight into the reader zone.
- Memory: Re-learn the correct cat without another cat nearby.
- Installation: Check metal doors, wall depth, adapters, and tunnel alignment.
- Reset: Power-cycle or reset the flap only according to its model instructions.
This guide follows the model-specific support information published by Sure Petcare and Closer Pets. It also explains when a replacement flap or installation accessory makes sense, so you do not buy a new reader when the actual problem is a battery or scan position.
First, identify what is actually failing
The symptom tells you which check to do first. Do not treat every locked flap as a failed microchip.
| What you see | Most likely next check | Avoid jumping to |
|---|---|---|
| No light, click, or response | Batteries, orientation, and battery contacts | Blaming your cat’s chip |
| One cat is recognized but another is not | Scan position, learning mode, and chip compatibility | Buying a replacement flap immediately |
| The flap worked until it was moved to a metal door or wall | Installation material, reader range, and the correct adapter | Assuming the electronics suddenly failed |
| Red indicator activity, repeated scanning, or fast battery drain | Hair, dirt, the sensor lenses, and the flap’s draft excluder | Replacing batteries over and over |
| The cat is recognized but the flap still does not open | Lock setting, physical flap, catch, or motor | Re-programming the same chip repeatedly |
The details differ between models. A SureFlap, a Cat Mate or Closer Pets 360, and a PetSafe door do not use identical buttons, time-outs, or chip formats. Keep the exact manual open while you work through the final reset step.
The fastest troubleshooting order
Use this sequence as a short diagnostic flow:
- Power: Replace every battery with a fresh set of the specified type.
- Optics: Remove hair and dirt from the lenses, tunnel, and flap.
- Position: Bring the target cat’s head straight into the reader zone.
- Memory: Re-learn the correct cat on its own, with every other cat out of reach.
- Installation: Check metal, wall thickness, tunnel length, adapters, and nearby electrical interference.
- Reset: Start with a power cycle; use a factory reset only when the model’s instructions call for it.
- Chip: If only one cat still fails, have a veterinarian scan the implanted chip and confirm its format.
1. Replace and check the batteries first
Weak batteries can make a cat flap appear selective: the lock may still move, but the reader may not have enough stable power to scan reliably. For the standard SureFlap Microchip Cat Flap, Sure Petcare lists four AA batteries and up to 12 months of battery life. Closer Pets gives model-specific guidance for its 360 flap and says its red LED can flash every 30 seconds when the batteries are low.
During the test:
- Check the polarity symbols rather than relying on the old battery positions.
- Use cells from the same fresh pack and do not mix old and new batteries.
- Use alkaline cells if the manufacturer specifies them. Do not use rechargeables as your first diagnostic test unless your manual explicitly supports them.
- Inspect the contacts for white residue, corrosion, or a spring that is no longer pressing firmly.
- Wipe dry contacts with a clean cloth. Do not put liquid into the battery compartment.
For a straightforward battery swap, the useful part of this purchase is the fresh, matching set of the correct size, not the brand itself.
Check current price on Amazon →If the flap has no indicator or mechanical response after a correct battery change and a contact check, stop repeatedly buying batteries. The next possibilities are a contact fault, a power switch problem, or an electronic failure.
2. Clean the sensor lenses, tunnel, and flap
Microchip flaps read through a small area around the tunnel rather than through the whole doorway. Hair or dust over the lenses can make the reader scan constantly, miss a chip, or drain batteries faster. Sure Petcare’s support videos cover cleaning, battery indicators, and replacing the door or catch pad.
Remove the batteries before cleaning. Then:
- Use a dry or very lightly damp lint-free cloth or cotton swab.
- Clean the sensor lenses under the top section of the tunnel, close to the flap.
- Remove hair from the tunnel edges, the clear flap, the lower track, and the top draft excluder.
- Wipe away dirt from the base and any reflective or sealing surface around the opening.
- Let everything dry fully before reinstalling the batteries.
- After power is restored, wait for the model’s startup period before testing. Classic SureFlap guidance uses about 10 seconds.
Do not spray cleaner into the flap, scrape the lenses with a hard object, or flood the tunnel. If the clear flap is scratched, warped, or no longer closes, the mechanical problem can be separate from the reader problem.
3. Test the scan position
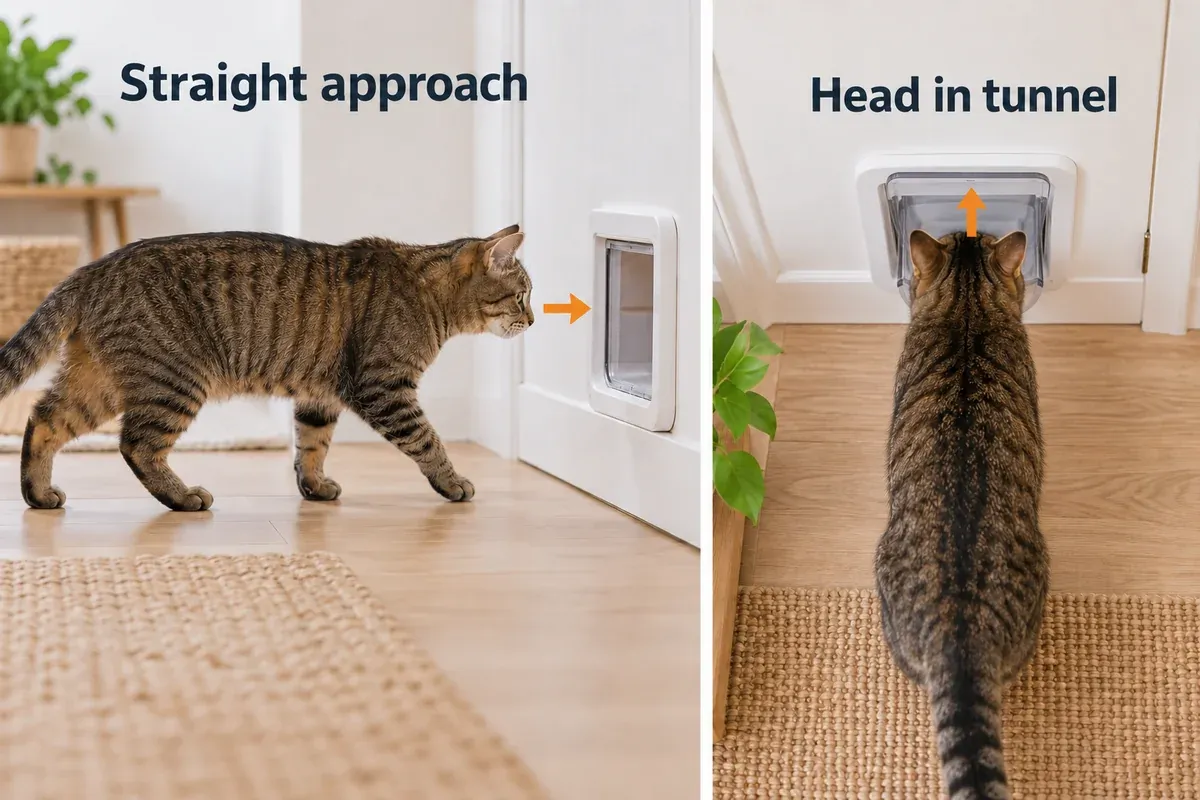
A cat standing outside the door is not necessarily in the reading zone. Hold the cat calmly, or use a compatible test tag, and bring the head straight into the tunnel from the side the reader is designed to scan. The nose and chip area need to pass close to the sensor; waving a chip several inches away from the flap does not reproduce a normal entry.
For a fair test:
- Remove extra collar tags or metal accessories temporarily.
- Keep the cat centered and approach straight rather than sideways.
- Let the cat’s head reach the tunnel before expecting the lock to release.
- Do not force a nervous cat against the flap. Use treats or a training mode if the model provides one.
- Test at least three approaches from the normal entry side.
Some flaps read an implanted chip more reliably from one direction than the other. The reader location and the usable scan area depend on the model, so follow the diagram in the manual rather than assuming every cat flap scans from both sides.
If a compatible collar tag works but the implanted chip does not, that is useful evidence: the flap may be healthy while the chip is positioned farther from the reader than expected. A vet can scan the chip directly.
4. Re-learn the correct cat without learning the wrong one
Microchip flaps can save the wrong animal when more than one cat is close during learning mode. This is especially easy to miss when the flap gives only a short confirmation light or click.
Re-learn one cat at a time:
- Put the other cats in another room.
- Start the model’s learn procedure.
- Bring only the target cat’s head into the reader area.
- Wait for the confirmation signal before moving the cat away.
- Test that cat several times.
- Repeat the process for every other cat.
Battery removal normally does not erase the learned IDs on the standard SureFlap system, and Closer Pets also says its stored chip information remains after a battery change. A memory wipe or factory reset is different: it can remove every saved animal. That is why a reset should not be the first response to one failed scan.
If a cat was recently microchipped, or if its chip was replaced, ask a veterinarian to scan the exact ID. A flap may support common 9-, 10-, or 15-digit chips while still not supporting every chip format or a damaged implant.
5. Check the door, wall, and tunnel installation
If the flap stopped reading after installation, relocation, or a door replacement, inspect the installation before buying electronics. Metal panels can reduce the effective reader range. Closer Pets specifically warns that metal doors may affect reading and recommends the correct adapters or liners for difficult installations.
The tunnel also needs to put the cat in the intended reading zone. A wall installation that is too deep, a tunnel that is not aligned, or a flap mounted at an awkward height can make a cat stop short of the sensor. Check:
- Whether the door, security panel, or surrounding trim contains metal.
- Whether the tunnel is level and firmly connected.
- Whether the cat can put its head fully inside without the wall or trim blocking it.
- Whether a glass or wall installation uses the accessory specified for that model.
- Whether another RFID reader, strong electrical noise, or flickering lighting is close to the flap.
A tunnel extension changes the physical approach length; it does not boost the RFID signal.
Check current price on Amazon →Sure Petcare lists 50 mm per extender for this family, but measure the wall and confirm the exact model before ordering.
For glass, metal, or a large existing opening, a mounting adapter can solve the installation geometry. It is not a universal fix for poor scan range.
Check current price on Amazon →Then compare its compatibility with the flap’s model number. Have a glazier handle glass cutting rather than forcing a standard door cutout.
6. Reset in the right order
“Reset” can mean three different things:
- Power cycle: Remove the batteries for the period specified by the manufacturer, then reinstall fresh cells. This restarts the electronics without intentionally deleting the saved IDs.
- Re-learn: Add one or more cats to the reader’s memory again.
- Factory or memory reset: Delete saved IDs and return the unit to a setup state.
Start with the least disruptive option. On classic SureFlap documentation, removing the batteries for at least two minutes is used for a full power reset, while the exact sequence is model-specific. Closer Pets gives different timing for some battery and training procedures, including a longer battery removal period for certain troubleshooting situations. Do not combine button sequences from a SureFlap manual with a Cat Mate manual.
The safe order is:
- Take a photo of the current settings and note which cats are saved.
- Remove the batteries for the time stated in the exact manual.
- Reinstall a fresh set and wait through startup.
- Test the known target cat in the correct scan position.
- Re-learn that cat if the model still does not recognize it.
- Use a factory reset only if the saved memory is clearly wrong or the official instructions recommend it.
- After a memory wipe, learn one cat at a time and test each one immediately.
The Sure Petcare support page links to model-specific downloads and videos. Use it instead of a generic button combination copied from a different SureFlap generation.
7. When the chip itself needs checking
If fresh batteries, a clean reader, a correct scan position, and a clean re-learn fix every cat except one, the implanted chip becomes a reasonable suspect. That does not mean the chip is definitely defective.
Ask a veterinarian to:
- Scan the cat and write down the complete chip ID.
- Check whether the chip has migrated from the usual shoulder area.
- Confirm that the chip format matches the cat flap.
- Compare the result with a known-working cat or a compatible test tag.
The standard SureFlap product information supports common 9-, 10-, and 15-digit microchips. The PetSafe Microchip Cat Door is a different replacement design and lists 15-digit FDX-B, 977, and 985 compatibility, up to 40 programmed pets, and four locking modes. These figures are not interchangeable across brands.
If the flap reads a compatible tag but not the implanted chip, investigate the chip position and format. If it reads no compatible chip or tag after the installation checks, the reader or electronics are more likely to be at fault.
A 10-minute test you can repeat
Run this short test before deciding that the cat flap needs replacing:
- Confirm that the lock setting permits the cat to enter.
- Fit a fresh, matching set of the correct alkaline batteries.
- Clean the lenses, tunnel, flap, and draft excluder.
- Wait through the model’s startup time.
- Keep other cats away.
- Bring the target cat’s head straight into the reader zone.
- Re-learn only that cat, then test it three times.
- Test a second known-working cat or compatible tag.
- Note the indicator light, clicking, scan behavior, and battery drain.
- Inspect metal, wall depth, tunnel alignment, and nearby electrical equipment.
- If only one cat fails, arrange a veterinary chip scan.
Write down the result of each step. A simple record prevents you from repeating a factory reset or ordering a second set of batteries without learning anything from the first attempt.
Products that solve the specific failure
These are troubleshooting purchases, not a generic list of “best” cat flaps.
-
Amazon Basics 48-Pack AA Alkaline Batteries
Amazon Basics
48-pack of 1.5V AA alkaline batteries for a complete, like-for-like battery swap during troubleshooting.
- 48 AA alkaline cells
- 1.5V
- 10-year shelf life described
- Best for
- Testing a low-battery or dead cat flap
- Key feature
- Fresh alkaline battery swap
-
Sure Petcare SureFlap Microchip Cat Flap Tunnel Extender
Sure Petcare
Official Sure Petcare tunnel extender for SureFlap wall installations; each extender adds 50 mm according to the manufacturer.
- Adds 50 mm per extender
- Designed to stack for wall installs
- Fits the SureFlap tunnel system
- Best for
- Wall installations where the cat needs a longer approach tunnel
- Key feature
- 50 mm tunnel extension
-
SureFlap Microchip Cat Flap Mounting Adaptor
Sure Petcare
Mounting adapter for compatible SureFlap installations where the door or wall material requires the accessory; it is not a scan-range booster.
- Compatible accessory for selected SureFlap flaps
- Useful for glass and some difficult mounting situations
- Helps cover and secure the installation opening
- Best for
- Glass, metal, or oversized existing openings
- Key feature
- Mounting adapter
-
SureFlap Microchip Cat Flap
SureFlap
Proven RFID microchip cat flap that learns up to 32 IDs with simple one-button programming. Battery-powered with low battery indicator and 3-year warranty.
- Works with 9, 10, 15-digit microchips
- Learns up to 32 pet IDs
- Simple one-button programming
- Best for
- Selective entry when the issue is a setting, learned ID, or installation check
- Key feature
- Selective entry by microchip
-
PetSafe Microchip Cat Door
PetSafe
Battery-powered microchip cat door with four locking modes and support for up to 40 programmed pets; a replacement option, not a drop-in part for a SureFlap cutout.
- Reads 15-digit FDX-B, 977, and 985 chips per manufacturer
- Up to 40 pets
- Locked, unlocked, in-only, and out-only modes
- Best for
- Replacing a failed entry-only flap with a 4-way lock
- Key feature
- 4-way microchip access
Review the linked product page before purchasing.
Choose based on the diagnosis:
- Battery problem: Buy the correct size and chemistry, replace every cell, and keep the old batteries out of the test.
- Wall-depth problem: Add a compatible tunnel extender only after measuring the wall and confirming the model.
- Glass, metal, or cutout problem: Use the correct mounting adapter or professional installation. An adapter changes the fit; it is not a signal amplifier.
- Mechanical flap problem: Check the exact manufacturer’s replacement door or catch pad before replacing the electronics. The Sure Petcare support videos show model-specific replacement procedures.
- Reader or electronics problem: A complete replacement may be justified after the full checklist. The standard SureFlap Microchip Cat Flap is a direct-style option for a compatible installation, while the PetSafe model is a different product that may require a new cutout or adapter.
For more context on choosing a selective-entry door, see our microchip cat flap comparison. Do not assume that a new flap will fit the old opening: compare the cutout dimensions, door or wall material, tunnel depth, chip compatibility, and the direction of entry before ordering.
When to stop troubleshooting and replace the flap
Replacement is reasonable when all of these are true:
- The batteries are fresh, correctly installed, and making firm contact.
- The sensor area and tunnel are clean and dry.
- The cat has been tested in the correct scan position.
- The cat has been learned alone, without another chip nearby.
- The installation has no unresolved metal, wall-depth, or adapter issue.
- A power cycle and any model-specific re-learn procedure have failed.
Also stop and inspect the unit if you see battery leakage, corrosion, a cracked or warped flap, a catch that no longer moves, constant clicking, unusually fast battery drain, or no indicator after a contact check. If the unit is still under warranty, contact the manufacturer before opening it or buying a replacement.
Before choosing the replacement, match:
- The existing cutout and tunnel dimensions.
- Door, wall, glass, or metal installation requirements.
- Chip formats and the number of pets you need to save.
- Entry-only versus individual exit control.
- Indoor and outdoor weather exposure.
- Availability of the exact flap, catch pad, tunnel, and mounting accessories.
Sources and model differences
The strongest troubleshooting details in this article come from manufacturer support material:
- Sure Petcare Microchip Cat Flap support — model downloads, installation help, cleaning, learning, and replacement guidance.
- SureFlap Microchip Cat Flap product information — battery, memory, chip compatibility, and standard product details.
- Sure Petcare support videos — cleaning, battery indicators, learning, and door or catch-pad replacement.
- Closer Pets Cat Mate Microchip Cat Flap 360 FAQ — model-specific battery, training, metal-door, and replacement guidance.
- PetSafe Microchip Cat Door — chip formats, four-way locking, pet capacity, and installation accessories.
Use the source for the exact model in front of you. A reset time, LED pattern, supported chip, or replacement part for one product should not be treated as universal advice for every microchip cat flap.