

 Published sources
 Product details checked
Choose an aquarium chiller by the heat it can remove at your room and water temperatures. It needs enough capacity to handle the heat entering the water continuously, plus any extra capacity needed to bring warm water down to your target within a chosen time.
For the calculator’s starting example, 40 US gallons, a 7°F water temperature drop, 40 W of ongoing heat, and six hours of cooling require about 657 BTU/h, or 193 W of cooling capacity, including a 25% margin. That result covers the heat entered. Any unmeasured heat from the room or sunlight still needs to be allowed for.
Tank-volume labels and compressor HP help identify products, but they do not settle the size. Start with the cooling load below, then compare the exact model’s published capacity, test conditions, water flow, and installation requirements. If an existing unit is struggling, work through the aquarium chiller troubleshooting checks before buying a larger one.
Calculate your aquarium cooling load
Enter the circulating water volume, the drop from starting water temperature to target, and the heat entering the water. Compare the result with a chiller's capacity at your hottest room temperature.
Cooling capacity to compare
Water-only estimate: [(US gal × 8.34 × °F drop ÷ hours) + ((equipment W + other W) × 3.412)] × 1.25. Missing room or sunlight heat is excluded. The 25% margin cannot cover an unknown load or guarantee performance.
How to use the calculator
- Choose US or metric units. Switching converts the water volume, room temperature, target, and water temperature drop. Heat remains in watts and time remains in hours.
- Enter the actual circulating water volume. Include the display, sump, filter, and plumbing after allowing for rock, substrate, equipment, and empty space.
- Set the water temperature drop. Subtract your target from the starting water temperature. Use zero if you only want to examine the heat load while holding the target.
- Enter ongoing heat. Add the portion of equipment power that reaches the water and a separate estimate for other heat gain. If you have measured the total net heat gain, enter that total under “Other ongoing heat gain” and set equipment heat to zero.
- Choose a pull-down time. This is the time used to compare cooling capacity. It is not a recommendation for how quickly to change the temperature around live animals.
- Compare the result with manufacturer data. Give the supplier the hottest air temperature at the chiller intake, the target water temperature, and the flow you can actually deliver.
The calculator accepts 1–5,000 US gallons, equivalent metric volumes, room temperatures of 32–122°F / 0–50°C, and starting and target water temperatures of 32–104°F / 0–40°C. Pull-down times run from 0.5 to 48 hours; each heat input accepts 0–10,000 W. These are calculation limits, not suitable temperatures or cooling rates for every aquarium. Conditions outside them need a system-specific assessment.
Read the result without confusing energy and power
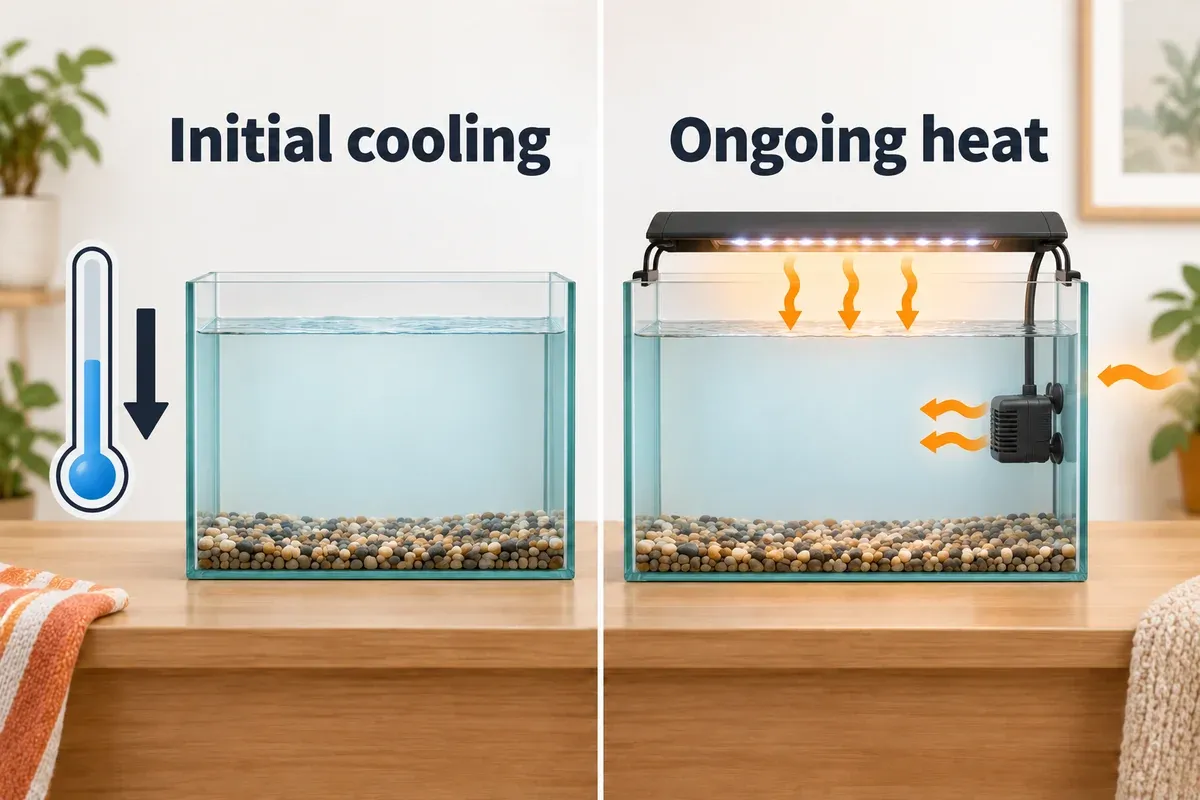
An aquarium holds a quantity of thermal energy. A chiller removes that energy at a rate. The difference explains why two tanks of equal volume can need different chillers.
| Result | What it tells you | How to use it |
|---|---|---|
| One-time water energy, in BTU and Wh | Heat removed to bring the starting water down to the target | This is an energy quantity; do not compare it directly with a BTU/h rating |
| Pull-down rate, in BTU/h and W | Average extra cooling needed to remove that energy over your chosen hours | Shortening the recovery time increases this part of the load |
| Ongoing heat / holding load | Heat entering the water from the sources you entered | This remains after the initial temperature drop is complete |
| Load before margin | Pull-down rate plus ongoing heat | This is the calculated load under the stated assumptions |
| 25% margin | One quarter of that calculated load | A planning allowance, not a measurement of missing heat |
| Capacity including margin | Cooling capacity to compare with a model’s usable output | The margin is already included; do not multiply the result by 1.25 again |
Cooling watts are different from electrical input watts. A chiller drawing 190 W from the socket does not necessarily remove 190 W from the aquarium. Refrigeration moves heat using electrical power, so the two ratings serve different purposes. The same applies to a compressor’s HP label.
The two tasks below explain why volume alone cannot size a chiller. Compare the initial temperature change with the heat load that remains after the target is reached.
Gather inputs that describe your aquarium
Count water, not the tank’s advertised capacity
Use the normal operating water level. Add the display and connected sump, refugium, filter chambers, and filled external plumbing. Subtract displacement and any space above the waterline.
The amount of water added when filling a new system is a useful starting record. If you estimate from dimensions, calculate the filled interior volume and allow for the contents. Do not use the sump’s total capacity when only part of it contains water during normal operation.
A larger water volume needs more energy for a given temperature change. It does not, by itself, reveal how many watts enter through the walls, surface, lights, and pumps. A wide, shallow open aquarium and an insulated tank can have different ongoing heat loads even when their volumes match.
Separate starting water temperature from room temperature
The water temperature drop is starting water temperature minus target water temperature. If the water is 81°F and the target is 76°F, enter a 5°F drop. If the room is 85°F, keep 85°F as the room input; it does not turn the water drop into 9°F.
Room temperature matters in two ways: it affects heat exchange with the aquarium, and it affects the air into which the chiller rejects heat. Measure it near the chiller’s intake during the hottest conditions you expect. A thermostat reading in another room can miss the warm pocket behind a stand.
Use a separate thermometer in well-mixed aquarium water to establish the starting temperature. A probe beside a heater, under a lamp, or directly in a cold outlet stream can give a misleading picture of the whole system.
Choose the target before choosing the hardware
Use the temperature requirements of the actual fish, invertebrates, plants, and corals you keep. A thermostat’s lowest setting only describes its control range. It does not mean the connected chiller can maintain that temperature in your installation.
D-D’s guidance for temperate and coldwater aquariums makes this distinction explicit: achievable temperature depends on water volume, room conditions, insulation, heat sources, flow, and chiller placement. A coldwater aquarium maintained far below room temperature needs particular attention to ongoing heat gain and low-water-temperature performance.
Choose a recovery time that fits the situation
A six-hour input asks how much average cooling capacity would remove the entered water energy in six hours while the entered heat load continues. Reducing that input to three hours doubles the pull-down part of the calculation. It leaves the ongoing heat unchanged.
For routine holding at a stable target, use a zero water drop. For a new, unstocked system, a recovery calculation can help compare equipment. For a stocked aquarium, choose the temperature change and rate around the inhabitants’ requirements; a larger capacity number is not a reason to force a rapid correction.
The sizing formula and its limits
First calculate the heat stored in the water
The physical starting point is Q = m × c × ΔT: mass multiplied by specific heat capacity and the water temperature change. OpenStax explains this relationship and lists water’s specific heat at about 4,186 J/kg·°C.
For an aquarium planning estimate, the calculator uses the familiar rounded water approximation:
Water energy (BTU) = volume (US gal) × 8.34 × water drop (°F)This treats a US gallon of water as about 8.34 pounds and water’s specific heat as about 1 BTU per pound per °F. It models the water only. Saltwater properties, glass, rock, substrate, and other materials add uncertainty; those materials are not included as if they were extra gallons of water.
Then add the heat that keeps arriving
At a steady temperature, the chiller must remove the net heat entering the water. During pull-down, it must remove that incoming heat and the stored water energy. This is an application of the energy balance described by the first law of thermodynamics.
A useful outline is:
Net ongoing heat = equipment heat + room heat + absorbed sunlight
                   − evaporation and other passive heat losses

Cooling during pull-down = water energy ÷ hours + net ongoing heat
Cooling while holding temperature = net ongoing heat
The calculator adds your two heat inputs as a constant nonnegative load. It does not solve each environmental heat-transfer term. If you enter equipment estimates, passive heat losses are not deducted. If you enter an observed total net heat gain, those losses are already reflected in that measurement for its particular conditions.
For manual calculations in US units:
Cooling capacity (BTU/h)
= [(US gal × 8.34 × water drop in °F ÷ hours)
   + ((equipment W + other ongoing W) × 3.412)] × 1.25
In metric units, the same water approximation gives:
Cooling capacity (W)
≈ [(liters × 1.162 × water drop in °C ÷ hours)
   + equipment W + other ongoing W] × 1.25
The factor 1.162 is in Wh per liter per °C. The calculator retains more precision internally. NIST’s conversion tables support the unit conversions: one US gallon is approximately 3.785412 liters, and one BTU/h is approximately 0.293071 W. The calculator uses 3.412 BTU/h per watt.
Why the room-to-target gap cannot replace a heat calculation
The number of degrees between the room and the target is not a heat flow in watts. Heat flow also depends on exposed area, materials, insulation, air movement, and surface conditions. OpenStax’s conduction model shows why area, conductivity, thickness, and temperature difference all matter.
Two aquariums can sit in the same 85°F room and target 76°F while receiving different amounts of environmental heat. Replacing the entered water drop with the 9°F room gap cannot capture that difference. Nor does it account for evaporation or radiant heat from sunlight.
The room input therefore identifies a condition for the manufacturer’s capacity check. Changing room temperature alone does not change the calculator’s numerical load. Change the other heat input when your estimate or measurement of room heat changes. If that input remains zero, the result excludes environmental heat gain.
What the 25% margin can and cannot do
The fixed margin provides some allowance around the load you entered. It is a planning choice, not a universally validated aquarium sizing standard. It cannot guarantee recovery time, correct a restricted water path, overcome recirculated exhaust, or establish the heat gain from a sunlit tank.
If a key input is unknown, improve the measurement or ask the manufacturer to size the system. Multiplying an incomplete heat estimate by 1.25 does not make the missing heat known.
Worked examples you can reproduce
These are hypothetical calculations, not aquarium measurements or product tests. Equipment and other heat inputs are assumed constant during each example.
Example 1: the 40-gallon starting case
Assume 40 US gallons of water starting at 82°F, a 75°F target, 40 W of equipment heat, zero entered environmental heat, and a six-hour pull-down. The room input is 82°F.
Water drop:                 82 − 75 = 7°F
Water energy:               40 × 8.34 × 7 = 2,335.2 BTU
Pull-down rate:              2,335.2 ÷ 6 = 389.2 BTU/h
Ongoing equipment heat:      40 × 3.412 = 136.48 BTU/h
Load before margin:         389.2 + 136.48 = 525.68 BTU/h
25% margin:                 525.68 × 0.25 = 131.42 BTU/h
Capacity including margin:  525.68 + 131.42 = 657.10 BTU/h
                            ≈ 192.6 W of cooling
Written in one line, (40 × 8.34 × 7 ÷ 6 + 40 × 3.412) × 1.25 = 657.10 BTU/h. The 657 result already contains the margin.
This is an equipment-only heat estimate. If you add an assumed 60 W of room and other heat under the same conditions, the capacity rises to 913 BTU/h, about 268 W. That additional heat is a separate rate, not another temperature drop.
Example 2: a reef system with a larger ongoing load
Assume 75 US gallons, starting water at 81°F, a 76°F target, a peak room temperature of 85°F, 75 W of equipment heat, 50 W of other heat gain, and six hours of pull-down.
Water energy:               75 × 8.34 × 5 = 3,127.5 BTU
Pull-down rate:              3,127.5 ÷ 6 = 521.25 BTU/h
Ongoing heat:               (75 + 50) × 3.412 = 426.50 BTU/h
Load before margin:         521.25 + 426.50 = 947.75 BTU/h
Capacity including margin:  947.75 × 1.25 = 1,184.69 BTU/h
                            ≈ 347.2 W of cooling
The water drop remains 5°F. The 9°F room-to-target gap is relevant to the assumed 50 W environmental gain and to the manufacturer’s performance data, but it does not replace the water drop.
Once the water reaches 76°F, the entered holding load is 125 W. With the same 25% margin, a holding-only calculation gives 156.25 W / 533.13 BTU/h. The larger pull-down result reflects the recovery goal as well as the holding requirement.
Example 3: a 200-liter system
Assume 200 L, starting water at 28°C, a 24°C target, a 30°C peak room, 60 W of equipment heat, 40 W of other heat gain, and eight hours of cooling.
Using the rounded metric formula:
Water energy:               200 × 1.162 × 4 ≈ 929.6 Wh
Pull-down rate:              929.6 ÷ 8 ≈ 116.2 W
Ongoing heat:               60 + 40 = 100 W
Capacity including margin:  (116.2 + 100) × 1.25 ≈ 270.3 W
                            ≈ 922 BTU/h
The calculator gives about 270.3 W / 922.2 BTU/h with its retained conversion precision. Selecting US units converts 200 L to about 52.8344 US gallons, 28°C to 82.4°F, 24°C to 75.2°F, and the 4°C drop to 7.2°F. Those are the same physical inputs, so the cooling result stays the same.
Estimate ongoing heat without adding it twice
Pumps, filters, and other equipment
Use actual power at the operating setting where available. A variable-speed pump’s maximum wattage may be quite different from its normal consumption. Include the extra circulation pump needed for the chiller itself.
For a submerged pump, treating its electrical input as heat added to the aquarium is a practical conservative starting assumption. An external motor can release some heat into the room; full nameplate wattage should not automatically be assigned to the water. A pump’s hydraulic energy also dissipates through the circulating system.
For lighting, count the part that warms the water. Fixture heat removed into the room by airflow and light reflected away from the aquarium are not identical to water heat. When the fraction is uncertain, a temperature record is more useful than inventing a precise percentage.
Keep a small heat inventory:
| Source | Record | Treatment in the calculator |
|---|---|---|
| Submerged return, skimmer, filter, or chiller-loop pump | Operating watts and speed setting | Include the estimated heat reaching the water |
| External pump | Operating watts and motor location | Include the water-side portion; room-side heat belongs in the room conditions |
| Lighting | Power setting, schedule, canopy, and water-temperature response | Estimate absorbed water heat, not automatically the full fixture rating |
| Heater | Whether it energizes during the warm period | Count active heating; investigate heating and cooling that run against each other |
| Room and sunlight | Peak intake temperature, sun exposure, and an estimated or observed heat gain | Enter a separate other-heat value when known |
| Observed total net heat gain | Water volume and warming rate under recorded conditions | Enter the total once, with equipment heat set to zero |
If a measured total already includes a 30 W pump, adding that pump again produces a double count. The same applies when a manufacturer’s sizing worksheet already asks for your equipment load: send the raw inputs and identify whether your calculator result includes a margin.
Use an existing temperature log to estimate net heat gain
When water is warming naturally with no active cooling, its warming rate can give a rough estimate of net heat gain:
Observed net heat gain (W)
≈ liters × 1.162 × water rise in °C ÷ elapsed hours
For a hypothetical 200 L aquarium warming by 0.4°C in two hours, this gives about 46.5 W. That is the observed net gain under those conditions, including the effects of running equipment and passive losses. It is not a separate 46.5 W to add on top of the same equipment again.
Use an existing safe observation or an unstocked system. Do not turn off necessary cooling or let a stocked aquarium overheat to obtain a number. Record the room temperature, water temperature, lights, pump settings, lids, fans, and timing. Mixing replacement water, evaporation top-offs, sunlight changes, or a heating cycle can distort the estimate.
The result also reflects a water-only heat-capacity approximation. A slope measured near an already warm temperature can underestimate heat gain at a lower target, where the room-to-water difference is larger. Treat it as a condition-specific estimate and compare observations near the intended operating temperature.
Check the hottest period, not just the daily average
A lamp running for part of the day may overlap the hottest room conditions. Averaging it across 24 hours can hide the load during that overlap. For holding capacity, examine the heat that arrives while the aquarium needs the most cooling.
If the heat input changes sharply during the proposed pull-down, calculate more than one scenario. The constant-load result cannot predict a temperature trace through a changing afternoon, a room-air-conditioning cycle, and an evening lighting shutdown.
Compare BTU/h, cooling watts, and HP correctly
BTU/h and cooling watts describe heat removal. HP identifies a compressor power class. A universal conversion from compressor HP to aquarium cooling capacity does not exist because output also depends on the refrigeration system and its operating conditions.
The two 1/10 HP models below illustrate the difference. Use their manufacturer ratings to compare specifications, then match the conditions to your aquarium.
| Model | Documented cooling capacity | Capacity test conditions | Published water flow |
|---|---|---|---|
| Active Aqua AACH10HP, 1/10 HP | 1,020 BTU/h, about 299 W of cooling | Hydrofarm’s instructions specify 97°F / 36°C ambient and 190 W / 2.2 A operation for the BTU figure; the separate pull-down chart uses 88°F / 31°C ambient | 132–396 US GPH / 500–1,500 L/h |
| JBJ Arctica DBA-075, 1/10 HP | 1,270 BTU/h, about 372 W of cooling on the manual’s sample data label | The label gives “D.B.95°F / W.B.77°F”; it does not provide a complete aquarium water-temperature and flow test point | 240–960 US GPH on JBJ’s Aquarium Series page |
Sources: Hydrofarm AACH10HP instructions, page 3, JBJ Arctica manual, sample labels on printed page 3, and JBJ’s Aquarium Series specifications.
The ratings are not a controlled comparison under identical conditions. In particular, do not read the JBJ label’s W.B. figure as a specified aquarium water temperature. Ask for usable cooling output at your target water temperature, hottest intake-air temperature, and intended water flow.
In the 75-gallon worked example, 1,185 BTU/h is above the AACH10HP’s documented 1,020 BTU/h reference and below the DBA-075 manual’s 1,270 BTU/h reference. That arithmetic screens the first reference out of a simple rating comparison; it does not confirm that the second will deliver enough cooling under the aquarium’s conditions. A lower target, different product revision, or missing heat load can change the decision.
What to send the manufacturer
Provide the information needed for a useful answer:
- operating water volume and freshwater or saltwater use;
- starting and target water temperatures;
- hottest measured air temperature at the intended intake;
- estimated equipment and environmental heat in watts, including the circulation pump;
- desired recovery time and whether the calculation includes its 25% margin;
- proposed flow, hose size, and installation position.
Ask for cooling capacity at those conditions, the approved target-temperature range, and any minimum system volume or compressor cycling requirements. An “up to” gallon label does not answer those questions.
Two chillers to examine against the result
-
Active Aqua AACH10HP 1/10 HP Aquarium Chiller with Power Boost
Active Aqua
A compact titanium-evaporator chiller with a published 1,020 BTU/hr rating, a built-in thermostat, and a flow range that suits a separate aquarium pump.
- 1,020 BTU/h of cooling at the manual's 97°F ambient reference; 190 W electrical operation is a separate figure
- 132–396 US GPH / 500–1500 L/h water-flow range
- 1/2-inch and 3/4-inch hose fittings; compatible pump candidates include AAPW160, AAPW250, and AAPW400
- Useful comparison
- Freshwater or saltwater loops with a modest heat load and 132–396 GPH of delivered flow
- Cooling reference
- 1,020 BTU/h (about 299 W cooling); 97°F ambient manual reference
- Water flow
- 132–396 GPH / 500–1500 L/H
-
JBJ Arctica DBA-075 Aquarium Chiller, 1/10 HP
JBJ
A titanium heat-exchanger chiller with a 1,270 BTU/h manual capacity reference and a 1/10 HP compressor. Confirm usable cooling output at your water and room temperatures.
- 1,270 BTU/h cooling reference on the manual's sample label; 1/10 HP / 75 W describes the compressor
- Published flow range is 240–960 GPH with 1/2-inch, 5/8-inch, and 3/4-inch adapters
- Titanium heat exchanger and R134a refrigerant
- Useful comparison
- Aquarium loops delivering 240–960 US GPH with confirmed cooling output at the target temperature
- Cooling reference
- 1,270 BTU/h (about 372 W cooling); manual sample-label reference
- Water flow
- 240–960 GPH
Match the cooling reference to your room, target water temperature, and actual flow. Both models carry a 1/10 HP label.
Active Aqua AACH10HP
The AACH10HP has a titanium evaporator for fresh or salt water and a built-in temperature control. Its manual’s 1,020 BTU/h reference gives you a concrete capacity to examine for a modest heat load. It needs a separate circulation pump and the matching 1/2-inch or 3/4-inch connections.
Compare it when the calculated demand leaves room below its applicable output. For an aquarium that needs more than its documented reference, ask for a suitable larger model’s performance data before ordering. “Power Boost” is an operating feature, not an extra allowance to add to the published capacity yourself.
Check current price on Amazon →JBJ Arctica DBA-075
The DBA-075 combines a titanium heat exchanger with a broader published flow range and 1/2-inch, 5/8-inch, and 3/4-inch adapters. Its manual’s 1,270 BTU/h sample-label figure is a separate reference from its 1/10 HP / 75 W compressor description.
Examine it when your plumbing can deliver the required flow and the manufacturer confirms adequate output at your target. Match the model and revision to the supplied manual and data label; similar product names can outlast changes to hardware and specifications.
Check current price on Amazon →Make the water path match the chosen chiller
Measure the delivered flow
A pump’s headline flow describes a particular test point, often with little or no head. Hose, elbows, filters, vertical lift, and the chiller’s restriction change the delivered flow. Use the reef return-pump calculator when the route shares sump-return plumbing, then include the chiller’s manufacturer loss data and verify flow after installation.
A 250 GPH pump does not automatically suit every 1/10 HP chiller. It is close to the DBA-075’s published 240 GPH minimum before allowing for installation losses, while the AACH10HP has a lower minimum. Compare the pump curve and complete route with the selected unit’s range.
Where the installation permits a safe collection test, measure outlet volume over a known time:
US GPH = collected US gallons × 3,600 ÷ seconds
L/h    = collected liters × 3,600 ÷ seconds
Collecting two US gallons in 30 seconds corresponds to 240 US GPH. That is a hypothetical conversion example, not evidence that a particular pump delivers it. Avoid changing the outlet height or hose route so much that the test stops representing the normal installation. A suitable installed flow meter can be more practical.
Size the hose and fittings as a complete route
Match the hose’s inside diameter to the intended barb size. Distinguish 1/2-inch inside diameter from 1/2-inch outside diameter, and follow the manufacturer’s clamp or retaining method. Keep the route free of kinks and avoid unnecessary small-bore reducers.
A wider hose cannot remove a restriction inside a narrow fitting. A stronger pump can also push flow beyond the chiller’s approved range. Resolve the connection and flow requirements together.
A separate pump may be useful, with its heat included
Hydrofarm’s AACH10HP instructions name the AAPW160, AAPW250, and AAPW400 as recommended pump models. The AAPW250 is a 250 GPH submersible pump rated at 16 W. Check its delivered flow through the completed route before choosing it for a separate loop.
Include the extra pump’s operating heat in the calculation. A dedicated loop can simplify flow adjustment, but it creates another heat source and another component to maintain.
Check current price on Amazon →Give the chiller somewhere to release heat
A chiller rejects heat into its surroundings. That includes the heat removed from the water and energy used to run the refrigeration system. An enclosed stand can become much hotter than the room and feed warm exhaust straight back into the intake.
Use a location with a clear intake and an exhaust path that carries heat away. Hydrofarm’s instructions require ventilated placement and at least 12 inches / 30 cm from walls; JBJ’s manual requires at least a foot at the front and rear and explicitly excludes enclosed aquarium stands. Apply the instructions for the exact unit rather than treating one clearance as a rule for all chillers.
Log the intake-air temperature after the chiller has been running. If it rises well above the room reading, improve the location or airflow before assuming a larger compressor will solve the problem. TECO’s troubleshooting guidance also identifies excessive ambient temperature, dirty air filters, and blocked ventilation as causes of cooling problems.
Keep filters and exposed condenser airflow paths clean according to the manual. Do not cover vents with insulation. Insulating aquarium walls or approved plumbing can reduce heat transfer, but sealing the water surface can also change evaporation and gas exchange. Make that decision around the aquarium’s husbandry needs.
Temperature control, electricity, and running costs
Coordinate the heater and chiller
Use representative probe locations and compatible heating and cooling setpoints. Leave the manufacturer’s compressor delay and safety controls intact. A heater that energizes while the chiller is trying to cool adds a real load; investigate the controls rather than treating it as unavoidable background heat.
An external controller can provide independent alarms and switching. The Inkbird ITC-308S has heating and cooling outputs, compressor delay, and high/low alarms. Its stated maximum output is 10 A, with wattage dependent on supply voltage. For the 110 V reference, that is 1,100 W.
Use the aquarium-suitable probe for the version you buy. Confirm the chiller’s restart behavior and the controller’s suitability for its electrical load, including compressor starting requirements. A matching plug alone does not establish compatibility.
Check current price on Amazon →Estimate electricity from input power and runtime
Use measured electrical power or the applicable input rating, including the circulation pump. Do not calculate electricity cost from cooling watts or compressor HP.
Daily energy (kWh)
= electrical input watts × operating hours ÷ 1,000

Daily cost = daily kWh × your electricity price per kWh
For a hypothetical chiller averaging 200 W while running for eight hours, electricity use is 1.6 kWh per day. A separate 20 W pump running all day adds 0.48 kWh. Multiply the combined 2.08 kWh by your own tariff; actual chiller runtime changes with heat, target, airflow, and control settings.
Start the loop with water circulation and a leak check
Connect the water path and check circulation before enabling refrigeration, following the manual’s startup sequence. Inspect every connection while the pump runs. Use drip loops and keep power strips and controller sockets dry. JBJ’s manual specifically calls for circulating water and checking for leaks before powering the chiller.
If a socket or plug becomes wet, isolate power at the breaker before touching it. Refrigerant circuits, damaged electrical components, and repeated protective trips require qualified service. A sizing calculation cannot diagnose those faults.
Check performance after installation
Keep a short log during safe operation with the normal light schedule and pump settings:
| Time | Independent water temperature | Chiller display | Intake-air temperature | Compressor state | Lights and pumps | Flow or maintenance notes |
|---|---|---|---|---|---|---|
| Start | — | — | — | — | — | — |
| During cooling | — | — | — | — | — | — |
| At target | — | — | — | — | — | — |
| Hottest operating period | — | — | — | — | — | — |
Compare the water-temperature trend with the chiller’s display and the chosen recovery goal. Check holding during the hottest conditions separately. The fact that the tank cooled overnight does not establish that it can hold temperature through a hot afternoon.
If the compressor runs continuously and water remains above target, verify the thermometer, delivered water flow, intake temperature, filter condition, and exhaust path. Then revisit the heat estimate and manufacturer’s output. A unit that once worked and now fails also needs a fault check; use the step-by-step chiller diagnosis to separate installation problems from service needs.
Frequent brief compressor cycles also deserve attention. Check probe placement, permitted thermostat settings, flow, and minimum system-volume guidance. Avoid disabling protective delays to make a poorly matched installation respond faster.
Frequently Asked Questions
What size chiller do I need for a 40-gallon aquarium?
For the stated example of 40 US gallons, a 7°F water drop over six hours, and 40 W of ongoing heat, the result is about 657 BTU/h / 193 W including the margin. Additional room or sunlight heat increases it. Choose a model whose usable output covers your complete load at the target water and peak room temperatures.
Is a 1/10 HP chiller enough for 75 gallons?
The HP label cannot answer that. The hypothetical 75-gallon example needs about 1,185 BTU/h / 347 W for its six-hour recovery and entered heat. Compare the exact model’s performance at your conditions, not a universal gallon-to-HP chart.
Why does changing the room temperature leave the result unchanged?
The room reading is a condition for checking manufacturer performance. Temperature difference alone does not establish heat flow into the aquarium. Enter a separate estimate of environmental heat, or an observed total net heat gain, to change that part of the calculated load.
Does the 25% margin include all heat from the room?
No. It adds one quarter of the entered load. If environmental heat is missing, the margin cannot establish how large that missing load is. The result warning identifies when no other ongoing heat has been entered.
How do I calculate holding capacity without a pull-down?
Enter a zero water temperature drop. The one-time water energy and pull-down rate become zero, leaving the entered ongoing heat with the 25% margin. Changing the recovery time then has no effect.
How do I convert a Celsius drop to Fahrenheit?
Multiply a temperature difference by 1.8. A 4°C drop equals a 7.2°F drop. Add 32 only when converting an actual temperature, such as 24°C to 75.2°F. The unit selector applies these two conversions separately.
Can a fan replace a chiller?
Surface airflow can increase evaporative cooling, but the result depends on humidity, airflow, and the aquarium. Observe whether it maintains the required temperature during the hottest conditions, and manage evaporation and salinity appropriately. This calculator does not assign a cooling capacity to a fan.
Does a higher-capacity chiller always work better?
It needs the right water flow, airflow, control behavior, and system volume. Extra rated capacity does not repair a blocked filter or enclosed exhaust path. Follow the model’s cycling and minimum-volume guidance when considering a larger unit.
Can I connect the chiller to a canister filter or return pump?
Only when the equipment supports that route and the delivered flow stays within the chiller’s allowed range. Include the added restriction, inspect fittings, and measure flow after installation and as filters collect debris. A separate pump may be more suitable when the shared circuit cannot supply stable flow.
Can this calculator guarantee a coldwater aquarium’s target?
No. A low target needs manufacturer performance data at that water temperature, an environmental heat assessment, and suitable aquarium husbandry. The water-only approximation does not model condensation, evaporation, insulation, or a product’s low-temperature capacity.
Sources and further reading
- OpenStax: Heat, Specific Heat, and Heat Transfer — water heat capacity and Q = mcΔT.
- OpenStax: The First Law of Thermodynamics — energy balance for stored energy and ongoing heat.
- OpenStax: Conduction — why temperature difference alone does not determine environmental heat transfer.
- NIST: SI Conversion Factors — US gallons, liters, BTU/h, and watts.
- Hydrofarm: Active Aqua Chiller Instructions — AACH10HP rating conditions, flow, recommended pumps, installation, and compressor protection.
- Hydrofarm: AACH10HP — titanium evaporator and fresh/saltwater application.
- Hydrofarm: AAPW250 Pump — submersible operation, rated flow, and electrical input.
- JBJ: Arctica Aquarium Series Manual — sample capacity label, clearance, startup, and electrical precautions.
- JBJ: Arctica Aquarium Series — DBA-075 flow and adapter specifications.
- D-D: Sizing for Temperate and Coldwater Aquariums — achievable temperature, insulation, placement, and ambient conditions.
- TECO: Chiller Troubleshooting — ambient temperature, airflow obstruction, and maintenance faults.
- Inkbird: ITC-308S — heating/cooling outputs, alarms, delay protection, and electrical ratings.