

 Published sources
 Product details checked
Keep the next batch out of the salt-mixing container or top-off reservoir until you have checked it. Measure feed water, RO-only water before the DI cartridge, and final DI water during stable production. If RO rejection has fallen, investigate pressure, pretreatment and the membrane. If RO rejection matches the unit’s expected performance but final DI TDS has risen, inspect the resin cartridge and its seals first.
A high reading only at startup often points to TDS creep. A high reading that persists needs a different check. The measurements below help you separate those cases before buying a pump, membrane or resin.
Start with the three-point measurement sheet, then use the readings to check RO rejection and DI resin. The separate zero-TDS checks explain what the meter cannot confirm.
Read the system in three places
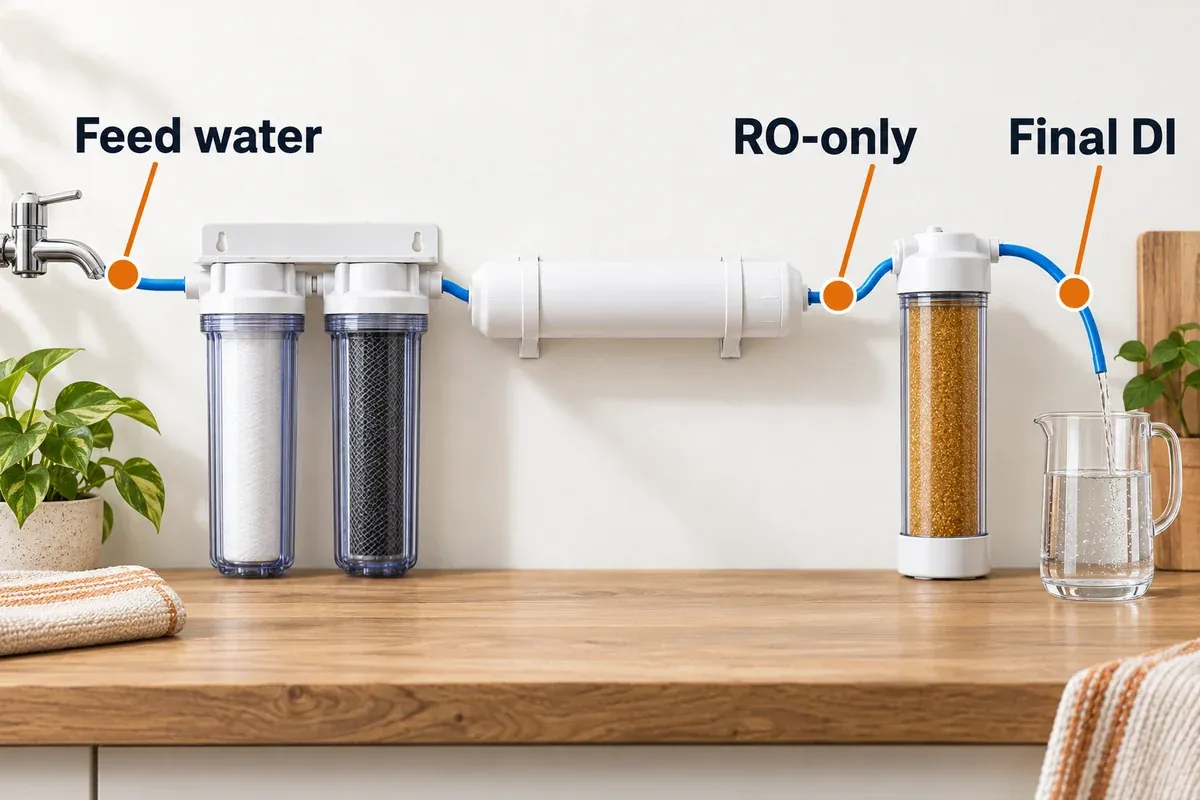
The most useful diagnosis uses three separate samples:
- Feed water (F): the supply actually entering the RO/DI unit. If a household softener or another filter is upstream, sample after that treatment, not from an unrelated tap.
- RO-only water (R): the membrane’s filtered product water, also called permeate, before it enters the DI stage. The membrane’s waste or reject line is a different stream and cannot be used for this reading.
- Final DI water (D): the output directly after the last DI cartridge, before a barrel, hose or top-off reservoir can change the sample.
A single reading from a storage barrel cannot tell you which stage failed. If the RO membrane is producing too much TDS, the DI resin has to remove that extra load and may exhaust quickly. If the RO stage is performing well but the final water is high, the membrane may be fine and the DI stage is the more likely fault.
Choose probe locations for the stages you need to compare, as shown in Aquatic Life’s TDS-meter connection guide. Trace the tubing instead of assuming that a probe marked IN is before RO or that OUT is after DI. Those labels identify the meter’s probes; their actual location determines what the numbers mean.
Use installed probes or the unit’s permitted sampling connections. Before opening a fitting, isolate the supply and relieve pressure as the system instructions require. If there is no accessible RO-only test point, arrange a compatible sampling fitting rather than opening a live, pressurized housing.
The three points below answer different questions. Use feed and RO-only readings to assess membrane rejection, then check final DI water separately before collecting it.
Three-point TDS measurement sheet
Copy or print the sheet below, or download the editable TDS measurement sheet. Keep startup readings separate from the two stable-production readings. Add a new set after servicing a stage so you can see what changed.
Prepare the meter and samples
- Check the meter’s unit and conversion setting. Use ppm for all three readings; do not divide a conductivity reading in µS/cm by a TDS reading in ppm. When comparing two meters, use the same TDS conversion setting.
- For a handheld meter, use clean containers dedicated to water testing. Rinse each with its own sample, follow the meter’s immersion instructions and keep fingers off the sensing surfaces. Salt-mixing buckets and cups with dried tap-water residue can contaminate a low-TDS sample.
- For inline probes, confirm seating and orientation from the meter manual. The HM Digital DM-1 instructions place both sensor pins across the flow and allow about 10 seconds for the displayed reading. That display-settling time is separate from the time an RO system needs to reach stable production.
- If results are implausible, check the batteries and verify calibration by the meter’s specified procedure. Use the recommended standard or reference method; do not adjust a meter to zero simply because you expect DI water to read zero.
Take the readings in one production run
- Record the conditions. Note the system and membrane model, rated gallons per day (GPD), cartridge changes, idle period and water temperature. Record gauge location as well as pressure.
- Restart with the product outlet going to waste. Observe any startup rise in RO-only and final DI TDS. Note the elapsed time; these first readings describe startup behavior, not steady membrane performance.
- Complete the unit’s startup or membrane-flush procedure. If it uses a flush valve, return that valve to its normal production position before evaluating rejection. Continue discarding product water while the readings are changing.
- Measure F, R and D during normal production. Read pressure while the unit is making water, with the outlet in the same arrangement you normally use. Take samples promptly and let each meter reading settle.
- Repeat the stable set. Record a second set after further production. If R or D is still clearly falling, continue collecting diagnostic readings instead of treating the first set as stable. There is no fixed waiting time that suits every unit.
- Calculate rejection from F and R only. Compare it with the installed membrane’s instructions and your earlier readings under similar conditions. Use D separately to assess the DI stage.
Date / system / membrane GPD: __________________________
Last sediment / carbon / DI change: ____________________
Idle period / feed temperature: ________________________
Meter / ppm setting / calibration check: _______________
Running pressure / gauge location: ____________________
Flush procedure / duration / normal position: __________

Readings in ppm        Time since restart   F    R    D
Startup                _________________   ___  ___  ___
Stable set 1           _________________   ___  ___  ___
Stable set 2           _________________   ___  ___  ___
After service          _________________   ___  ___  ___

RO rejection = (1 - R / F) x 100 = __________ %
Manual's expected performance / conditions: ____________
Stage to check / action taken: _________________________
Pressure / temperature after service: __________________
Worked example using assumed readings: feed water at 250 ppm and stable RO-only water at 10 ppm gives:
(1 - 10 / 250) x 100 = 96% RO rejectionThe membrane has reduced the meter-estimated TDS by 96%; the DI stage receives the remaining 10 ppm. That result alone does not mean the membrane needs replacing. Check whether it is appropriate for the exact membrane and operating conditions. The final DI reading is a separate result and is not used in this calculation.
Leave rejection uncalculated if F is zero, missing or unreliable. If R exceeds F, repeat the samples and check the selected line, units and meter before interpreting the result. At very low feed TDS, a one-ppm display step can change the calculated percentage substantially; avoid making a purchase decision from that percentage alone.
A fast high-TDS triage
Use this order before buying replacement parts:
| Pattern | Most likely direction | First check |
|---|---|---|
| RO-only rejection is below the unit’s expected performance during stable production | Pressure, pretreatment, membrane seating, membrane condition or flow restriction | Check running pressure and the upstream stages before ordering a membrane |
| RO rejection matches the expected performance, but final DI TDS is rising | Exhausted resin, channeling, bypass or a measurement fault | Confirm the final sample, then inspect the DI cartridge, seals and refill instructions |
| First water after a long idle is high, then drops | TDS creep or incomplete flush | Discard the initial output and test after the reading stabilizes |
| Feed TDS and RO-only TDS rise, but rejection is similar to the earlier result | A changed feed-water load | Check the source-water change and DI output; the absolute RO number does not establish a membrane fault |
| Outlet water is low in TDS but stored water is higher | Collection, storage or sampling contamination | Compare a fresh outlet sample with the barrel and transfer hose |
| Readings jump around between samples | Sampling, probe placement, temperature, or meter issue | Use a clean container and repeat the same test point |
Do not treat the first high number after startup as proof of a failed membrane. Test the water that you would actually collect after the unit has been running normally.
Step 1: Rule out TDS creep
TDS creep is a temporary rise in the first permeate after an RO system sits idle. During the idle period, dissolved ions can diffuse across the membrane or remain concentrated around the membrane surface. When production starts again, that first output can carry a higher TDS load than the steady-state water that follows.
Use the startup and stable rows of the measurement sheet to identify the pattern. If R returns to its expected level during normal production, that supports a startup effect. If R stays elevated, continue with pressure and rejection checks.
Membrane flushing and discarding product water do different jobs
A membrane-flush valve changes flow through the membrane’s waste-water path; see the valve positions in the Classic operation guide. Discarding startup product water keeps that output out of the collection container. Operating a flush valve does not, by itself, establish that the product water is ready to collect.
Complete the specified flush, restore normal production and watch the product readings. A reading taken with a manual flush valve left open is not a like-for-like comparison with the unit’s normal operation. Systems with automatic flush cycles also need to finish that cycle before you record the stable-production set.
Diverting water after DI protects the reservoir, but the startup load has already passed through the resin. If your system provides an approved way to divert RO-only startup water before DI, use that procedure. Do not improvise a bypass that defeats its shutoff or changes its required plumbing.
Frequent short runs repeatedly send startup water through the system. For Smart Buddie installations using a mechanical float valve, the Smart Buddie operation guide, page 5 recommends timer-controlled production to avoid repeated cycling and DI loading. Follow the arrangement for your model and collect into a suitable reservoir with its required shutoff protection.
A new membrane needs its commissioning flush
The first use of a new membrane has a separate purpose: removing its preservative. The RO Buddie guide, pages 12–13 requires 30 minutes of membrane flushing, discarding that output and connecting DI afterward. This is a model-specific commissioning instruction, not a universal 30-minute rule for every restart. Follow the complete procedure even if the meter displays a low value sooner.
Step 2: Measure pressure while the system is producing water
RO membranes need pressure to push water through the semipermeable layer. A static pressure reading with the faucet closed is less useful than the pressure shown while the RO/DI unit is actually making water.
The Aquatic Life Classic 100 GPD with Carbon Plus, model 540706 lists an optimal range of 40–65 PSI, a booster-pump requirement below 40 PSI and a maximum of 80 PSI. Those figures are about 2.8–4.5 bar and a 5.5-bar maximum. The RO Buddie +DI specifications give a suggested 60 PSI. Use the limits for your model and installed accessories; a pressure suitable for one unit can exceed another unit’s rating.
Gauge location matters. A gauge before the sediment and carbon stages measures their incoming supply, while a gauge after them shows the pressure reaching the membrane. One upstream gauge cannot quantify a pressure drop across the prefilters. Record its position so a later reading can be compared fairly.
What a pressure check can reveal
- Low pressure with low production and high RO-only TDS: the membrane may be under-pressurized rather than defective.
- Pressure falls sharply when production starts: check the supply valve, tubing and prefilters. A restricted supply or loaded cartridge can cause a drop; one reading does not tell you which is responsible.
- Pressure is normal but RO-only TDS is still high: continue to membrane rejection, flow-restrictor, temperature, and chlorine/chloramine checks.
- Pressure exceeds the unit’s maximum: stop and install the correct regulator or follow the manufacturer’s limit. More pressure is not automatically safer or better.
If the unit has no built-in gauge, a compatible quick-connect RO pressure gauge can provide a running pressure reading. Install it at the permitted location and check fitting size and pressure rating before reconnecting the supply.
Check current price on Amazon →Step 3: Calculate RO membrane rejection
Do not judge the RO membrane from the final DI reading. The DI stage is designed to remove the ions left after RO, so a final reading of zero can hide a membrane that is putting too much work on the resin.
Use the calculation in the measurement sheet. The percentage describes the reduction between feed water and RO permeate under the conditions you recorded. It is not the percentage of every possible contaminant removed, and it does not measure the DI cartridge’s remaining capacity.
Compare the result with the exact membrane’s stated rejection and test conditions. A specification quoted at a particular pressure and temperature cannot be treated as an unconditional promise at every household supply. DuPont’s FilmTec technical manual explains how pressure, temperature, feed concentration and recovery affect performance. Its industrial cleaning criteria are not replacement thresholds for a compact aquarium unit.
For a useful trend, compare runs at similar pressure, temperature and source-water conditions. A higher feed TDS can produce higher RO-only TDS without a corresponding fall in rejection. Conversely, fresh DI resin can keep final output at zero while a deteriorating RO stage sends it more dissolved ions. That is why the RO-only reading belongs in your maintenance record even when final DI water appears satisfactory.
Before replacing the membrane, inspect the stages before it
The membrane is not the first cartridge to blame:
- Sediment filter: a loaded filter can reduce flow and pressure.
- Carbon stage: check its disinfectant rating, rated capacity and service instructions. A cartridge can still pass water after its treatment capacity is spent. TDS does not verify chlorine or chloramine removal; use the test and sampling location specified for that pretreatment.
- Tubing and fittings: look for a partially closed supply valve, a kink, leaks or a product line connected to the wrong outlet.
- Flow restrictor and drain: confirm the restrictor matches the membrane and installed pump arrangement. Check for a blocked or kinked waste line. Do not close the drain to improve the apparent product-to-waste ratio.
- Temperature: colder feed water can reduce production. Compare against the documented test conditions and avoid mixing in hot water to force the rated output.
Pretreatment must suit the disinfectant in your supply. The RO Buddie cartridge guide explicitly warns that its standard treatment removes chlorine, not chloramines. The Classic 100 GPD Carbon Plus version, model 540706, has a different chloramine-rated cartridge. A similar-looking housing does not establish that this cartridge is installed. Confirm the water utility’s treatment and the actual cartridge label before relying on it.
Free chlorine can damage polyamide RO membranes, and DuPont also warns about damage associated with combined-chlorine treatments in section 2.6.6 of the FilmTec manual. If pretreatment is inadequate, correct it before installing another membrane.
When a membrane replacement is justified
Repeatedly poor rejection during stable production, outside the installed membrane’s documented expectations, supports further membrane inspection. Before ordering, confirm that pressure and pretreatment are appropriate and that the membrane is fully seated with its required seals. An incorrect installation can allow bypass and resemble a failed element.
Use the manufacturer’s troubleshooting and replacement procedure to decide whether the element needs replacement or another permitted service. For example, the RO Buddie cartridge guide recommends a one-to-two-year membrane interval; actual condition also depends on feed water and use. Neither that interval nor the worksheet’s 96% example is a universal rule for all membranes. Do not apply an industrial chemical-cleaning recipe to a household cartridge without explicit approval.
Check current price on Amazon →The AquaticLife 50 GPD TFC membrane is an 11.75-inch element intended for compatible RO Buddie and Classic systems. Match element size, capacity, seals and the required restrictor to the installed unit. A physically fitting 50 GPD element is not automatically a suitable replacement for a 100 GPD setup.
Step 4: Decide whether the DI resin is exhausted
DI resin is the final polishing stage. It exchanges positively and negatively charged ions that remain after RO. When the resin is exhausted, final TDS can climb even though the RO-only reading is still good.
The most useful pattern is:
- RO rejection is appropriate, final DI TDS rises: inspect the DI stage after confirming the final sample and meter.
- RO rejection is poor and final DI TDS is high: address the upstream fault as well as the exhausted or faulty DI stage. Fresh resin alone will not correct the RO problem.
- The color indicator changes but final TDS remains zero: check the resin’s defined color-change endpoint and service instructions. A zero display does not override a replacement criterion in that manual.
- The resin looks fresh but final TDS is high: check for a loose cap, damaged O-ring, missing gasket, channeling, or water bypassing the cartridge.
Use output TDS and the resin’s own instructions together. For RO Buddie model 540019, the cartridge-change guide calls for replacing the DI cartridge when all the resin has changed color. Other cartridges can have different indicators or service criteria. Do not transfer a color description or a permitted output value from another brand.
If your final stage is intended to produce zero displayed TDS, a repeatable nonzero result is a reason to hold that batch and investigate. Confirm it directly at the outlet with a checked meter. You do not need to wait for a large number or a complete visual change before investigating breakthrough.
Check the cartridge before buying resin
With the water supply isolated and pressure relieved, inspect the cartridge in the way its manual permits. Confirm flow direction, seating, cap closure, O-rings and gaskets. On a refillable cartridge, inspect the retainers and whether the resin bed has gaps that could let water take an easier path. Follow its packing instructions; do not use an improvised amount or leave loose media above the bed.
The Aquatic Life 10-inch mixed-bed cartridges have screw-off caps for refilling and a blue-to-tan indicator. These are a different format from the compact RO Buddie inline DI cartridge. Choose resin and cartridge format for the actual housing; an unopened three-pack does not solve an incompatible connection or a bypassing seal.
Check current price on Amazon →If new resin is used up unusually quickly
Check whether startup cycling or elevated RO-only TDS is loading the resin. Also check the quantity produced since the change; resin age in days says little without water volume and feed conditions.
If RO rejection is appropriate, the cartridge is installed correctly and DI life is still unexpectedly short, investigate the feed-water chemistry with the supplier. SpectraPure’s mixed-bed resin guidance identifies low pH and high dissolved carbon dioxide as causes of reduced DI life. A TDS reading alone does not diagnose that condition. Ask for source-water assessment and a compatible treatment plan before buying another membrane or assembling a degassing setup.
What a dual-TDS meter actually tells you
A dual inline meter compares two sampling points. The HM Digital DM-1 has two probes and a stated ±2% accuracy; its manual specifies one-ppm resolution below 1,000 ppm. Resolution and accuracy are different limits. A zero display is not proof that every dissolved substance is absent.
You can use the two probes in either of these ways:
Setup A: feed versus final DI
This is the simplest ongoing check. It tells you whether the system is producing low-TDS water overall, but it cannot tell you whether the RO membrane or DI stage changed first.
Setup B: RO-only versus final DI
This layout lets you watch what reaches DI and what leaves it. Measure feed water separately during the same production run so you can still calculate rejection. Yesterday’s feed reading is a weak reference if the source has changed.
For systems with two or more DI stages, a reading between cartridges describes that intermediate stage. Sample after the last cartridge as well, and use the manufacturer’s sequence for assessing and replacing each resin. An intermediate reading should not be mistaken for final product water.
Check current price on Amazon →0 TDS does not mean sterile
TDS meters estimate dissolved ionic material from electrical conductivity. The USGS explanation of conductivity describes how dissolved ions allow water to conduct electricity. The meter does not identify each ion or measure bacteria, viruses or every organic contaminant. Zero displayed TDS does not prove that water is sterile.
Keep those checks separate: assess membrane rejection with F and R, assess DI output with D, and assess a specific contaminant with an appropriate test. A TDS result cannot confirm chlorine removal, rule out microbial contamination or certify water as ready for fish. CDC guidance on choosing water filters likewise calls for tests and treatment matched to the contaminant of concern.
Aquarium preparation still comes afterward. Marine mixing water needs the correct salt mix and salinity check. Freshwater replacement water needs species-appropriate mineral content and buffering; use a deliberate remineralization or blending plan when RO/DI is part of that setup. The beginner aquarium water-preparation checklist covers the distinction between preparing source water and establishing a biological filter.
When a booster pump is the right fix
Add a pump after a pressure measurement, not before it. The AquaticLife Smart Buddie product information describes compatibility with 50–100 GPD units, included tubing and elbows, and a flush function intended to improve membrane operation.
A booster pump is a reasonable option when running membrane-feed pressure remains below the unit’s recommended range after supply restrictions and loaded prefilters have been addressed. Slow flow on its own does not establish that a pump is needed; cold water or a fouled membrane can also reduce production.
Check pump compatibility, the pressure limits of the affected components and the plumbing diagram for the complete arrangement. The Smart Buddie installation guide includes model-specific flow-restrictor changes. Do not assume that every booster is installed with the original restrictor left in place.
A pump cannot repair chlorine damage or restore an exhausted carbon cartridge. After installation, repeat running pressure and the stable F/R/D set. The result should show whether insufficient pressure was responsible, rather than merely whether production became faster.
Check current price on Amazon →Choose tools and replacement parts from the readings
Start with access to the three TDS readings and a running pressure measurement. An existing system that returns to its documented performance after correcting a valve, seal or cartridge does not need wholesale replacement. The options below serve different measuring, treatment and replacement needs.
-
AquaticLife 4-Stage RO/DI Filter with Carbon Plus, 100 GPD
AquaticLife
A 100 GPD four-stage RO/DI unit with Carbon Plus pretreatment, a flush valve, automatic shutoff, and a built-in pressure gauge.
- Carbon Plus pretreatment for chlorine and chloramine
- 100 GPD RO membrane followed by color-changing DI resin
- Built-in pressure gauge, flush valve, and automatic shutoff
- Best for
- Higher-volume water making or chloramine-treated tap water
- Diagnostic role
- Baseline RO/DI unit with built-in pressure reading
-
Aquatic Life RO Buddie 4-Stage Aquarium RO/DI System, 50 GPD
Aquatic Life
A compact four-stage aquarium RO/DI unit with sediment, carbon, membrane, and color-changing DI stages for source-water testing and routine water making.
- 50 GPD output under the manufacturer's test conditions
- Five-micron sediment and carbon prefiltration before the membrane
- Color-changing DI stage after the RO membrane
- Best for
- Smaller aquariums and a compact baseline system
- Diagnostic role
- Compact aquarium RO/DI baseline
-
AquaticLife Smart Buddie Booster Pump Kit, 50–100 GPD RO/DI
AquaticLife
A booster-pump kit for 50–100 GPD RO/DI systems that raises membrane feed pressure and includes automatic membrane flushing hardware.
- Designed for 50–100 GPD RO/DI units
- Automatic flush function and internal check valve
- Includes tubing and press-fit elbows for common installations
- Best for
- Low or inconsistent feed pressure after a pressure test
- Diagnostic role
- Correct low feed pressure after measurement
-
HM Digital DM-1 In-Line Dual TDS Monitor
HM Digital
A dual-probe inline monitor that lets you compare two TDS points instead of guessing which stage is failing.
- Two probes for feed/product or RO/DI test-point comparisons
- 0–9,990 ppm range with ±2% stated accuracy
- 1/4-inch quick-connect probe fittings
- Best for
- Comparing feed water with RO or final product water
- Diagnostic role
- Separate feed, RO, and DI readings
-
Express Water Pressure Gauge for Reverse Osmosis Systems
Express Water
A quick-connect pressure gauge with a T-stem adapter for checking RO-system pressure while the unit is producing water.
- 0–160 PSI scale for pressure troubleshooting
- 1/4-inch quick-connect T-stem adapter
- Useful for checking pressure under real flow conditions
- Best for
- Adding a direct pressure reading to an RO/DI system without a built-in gauge
- Diagnostic role
- RO/DI feed-pressure measurement
-
AquaticLife RO Membrane Replacement Cartridge, 50 GPD
AquaticLife
A 50 GPD TFC replacement membrane intended for the RO Buddie and other compatible standard-size RO/DI housings.
- Standard 11.75-inch element size for compatible housings
- TFC polyamide membrane construction
- Use the RO-only TDS reading to judge membrane performance
- Best for
- A measured membrane replacement for a compatible 50 GPD unit
- Diagnostic role
- Repair low RO rejection after pressure checks
-
AquaticLife Color-Changing DI Resin Cartridges, 10 in, 3-Pack
AquaticLife
Three refillable mixed-bed DI cartridges for standard 10-inch RO/DI housings, with a color change that helps show resin exhaustion.
- Mixed-bed DI resin for the final polishing stage
- Color change provides a visual exhaustion signal
- Refillable 10-inch cartridge format
- Best for
- Replacing an exhausted final DI stage while keeping a spare cartridge on hand
- Diagnostic role
- Replace an exhausted final DI stage
Match the membrane capacity, flow restrictor, fittings, and pressure limit to your existing system before ordering replacement parts.
For a new system, match treatment to the source water as well as production needs. The compact 50 GPD RO Buddie +DI combines sediment, carbon, RO and DI stages. The 100 GPD Classic Carbon Plus version includes chloramine-rated pretreatment and a gauge. When comparing Classic models, confirm model 540706 for that Carbon Plus specification; the standard-carbon model is a different treatment arrangement.
Verify the fix before collecting another batch
Service the stage indicated by the measurements and its manual. Make one diagnostic correction at a time where possible, then record the result. If you must replace multiple expired cartridges together, record all of them so the next trend has a clear starting point.
After the required cartridge or membrane commissioning flush, restore normal production and fill the worksheet’s after-service row. Confirm that RO rejection is appropriate and final DI water meets the intended output criterion. Check the housings and disturbed fittings for leaks. Observe the next startup too if the original complaint followed an idle period.
Keep the completed sheet with the filter-change dates. Repeat the check after a source-water change, unexplained production change, cartridge replacement or unexpected final reading. Comparing the same test points under recorded conditions is more useful than replacing parts on the basis of one barrel sample.
If outlet water is clean but stored water has higher TDS
A storage reading includes everything that happened during collection and handling. Compare a fresh final-outlet sample with a fresh sample from the transfer hose, then with the stored batch. Use the same checked meter and clean sampling method.
Look for startup water that was collected too early, salt residue in a shared container, contaminated transfer equipment or additives already present in the barrel. A container used for saltwater mixing should not be your reference for untreated RO/DI output. Once salt or remineralizer has been added, the resulting TDS is no longer a measurement of the RO/DI system’s final stage.
If the outlet repeatedly meets the target but stored water does not, resolve collection and storage before replacing the membrane. Keep freshwater storage and mixing equipment clearly identified, and follow suitable cleaning instructions for the container. A low outlet reading also does not replace routine care of the reservoir and hoses.
Frequently Asked Questions
Can low pressure cause high RO/DI TDS?
Yes. Low pressure can reduce permeate production and membrane rejection, so RO-only TDS may rise. But clogged prefilters, cold water, wrong flow restriction, chlorine or chloramine damage, and a failing membrane can create a similar pattern. Measure pressure and RO-only TDS before choosing a pump.
Why is my final DI TDS high when the RO membrane reading is low?
The DI resin may be exhausted, bypassed, channeling, or not fully seated. Check the cartridge, seals, packing, and probe placement. If the RO-only sample is healthy, the membrane is not the first part to replace.
How long should I flush an RO/DI system?
There is no single time that applies to every membrane, pressure, temperature, and system design. Follow the unit’s startup and flush instructions, discard the first post-idle output, and test until the reading stabilizes. The measurement is more useful than a fixed timer copied from another system.
Does a booster pump fix a bad membrane?
No. It can correct insufficient feed pressure and may improve production and rejection when pressure is the limiting factor. It cannot repair chlorine damage, fouling, a torn membrane, incorrect plumbing, or a mismatched flow restrictor.
What does TDS creep look like?
The first output after the system has been idle has unusually high TDS, then the reading falls as the membrane returns to steady operation. If the reading stays high after flushing, investigate pressure, pretreatment, membrane condition, and flow restriction instead.
Do I need zero TDS for every freshwater aquarium?
Not necessarily. The correct source water depends on the species, tap-water chemistry, and the remineralization plan. RO/DI water is a controlled starting point, not a finished aquarium recipe. For reef systems and other setups that require very low-TDS source water, the final DI reading is particularly useful; the water still needs to be prepared for the aquarium before livestock is exposed to it.
Sources and Further Reading
- DuPont FilmTec Reverse Osmosis/Nanofiltration Membranes Technical Manual for membrane performance, pretreatment, and operating principles.
- Aquatic Life: RO Buddie Installation, Operation & Maintenance Guide for membrane commissioning, cartridge installation and DI color guidance.
- Aquatic Life: RO Buddie Cartridge Change Recommendations for model-specific service intervals, DI replacement and the chloramine warning.
- Aquatic Life: Classic Model 540326 Operation Guide for the manual flush valve and standard-carbon system arrangement.
- Aquatic Life: 50 GPD 4-Stage RO Buddie +DI for pressure, temperature, stages, production, and rejection specifications.
- Aquatic Life: Classic 100 GPD with Carbon Plus, Model 540706 for chloramine-rated pretreatment and that version’s operating specifications.
- Aquatic Life: How to Use TDS Meters in an RO/RODI System for practical probe placement and TDS monitoring points.
- HM Digital: DM-1 and DM-1 Manual for accuracy, resolution, probe orientation and calibration.
- Aquatic Life: Smart Buddie Booster Pump and operation guide for compatibility, timer use and the required plumbing arrangement.
- Express Water: Quick-Connect Pressure Gauge for the pressure-gauge option.
- Aquatic Life: 50 GPD TFC Membrane for the compatible replacement element and standard size.
- Aquatic Life: 10-Inch DI Cartridge 3-Count Bundle for mixed-bed DI, color indication, and refillable cartridge details.
- SpectraPure: Color-Changing Mixed-Bed DI Resin for feed-water chemistry that can shorten DI life.
- USGS: Conductivity and Water for the relationship between dissolved ions and electrical conductivity.
- CDC: Choosing Home Water Filters for contaminant-specific testing and treatment.