

 Published sources
 Product details checked
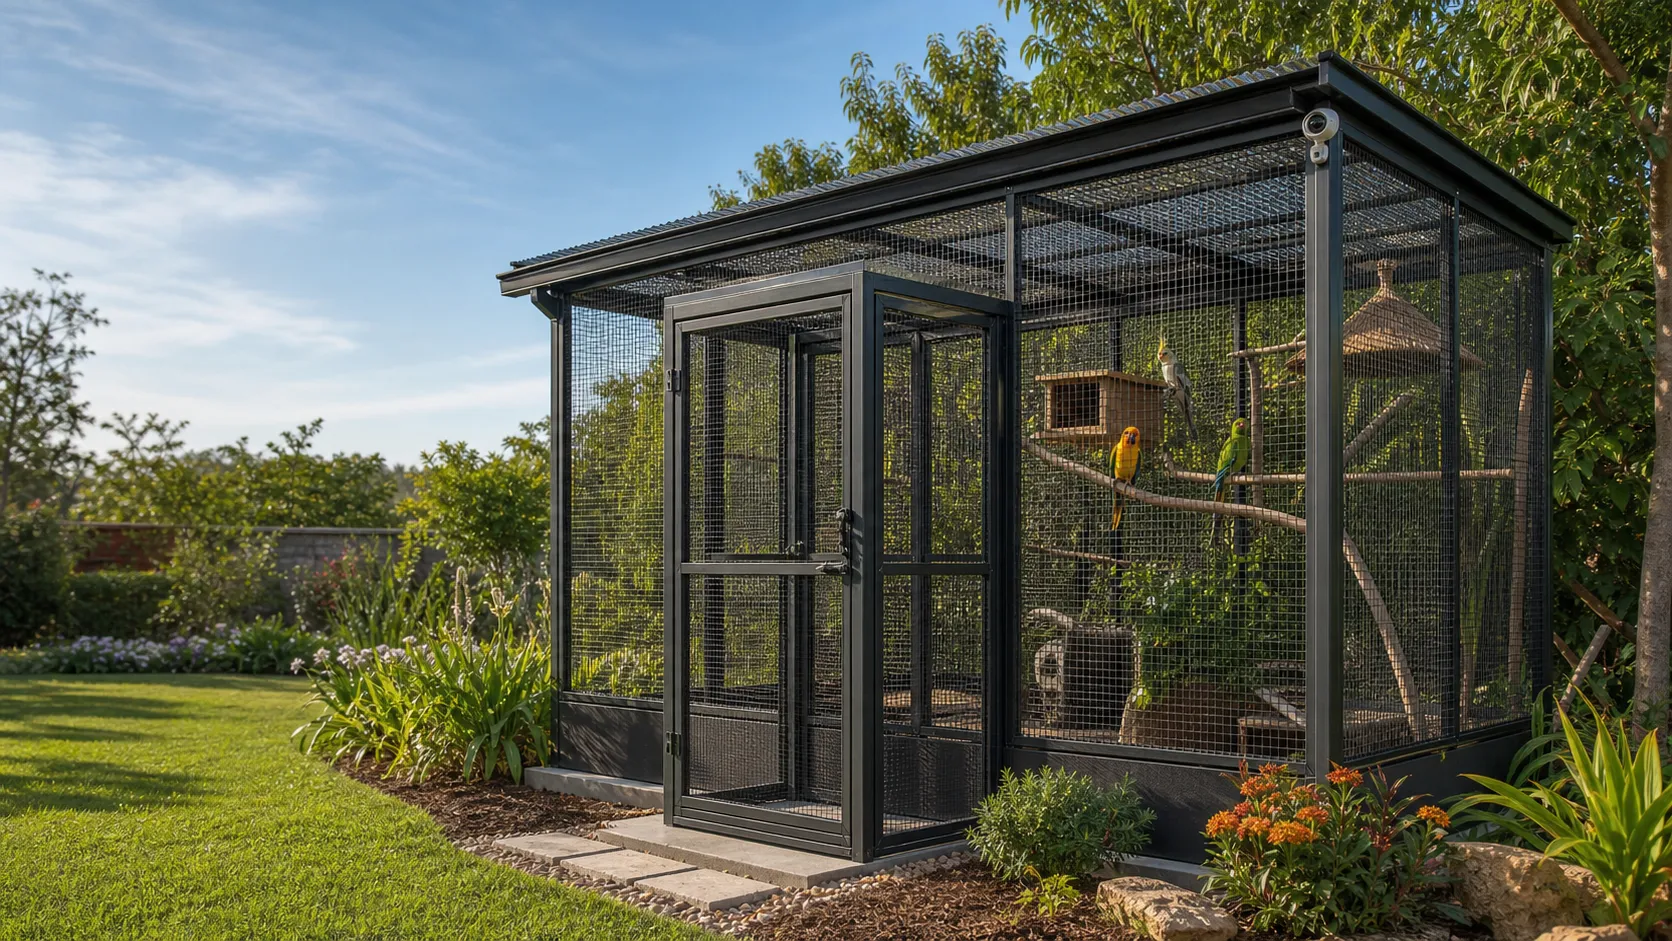
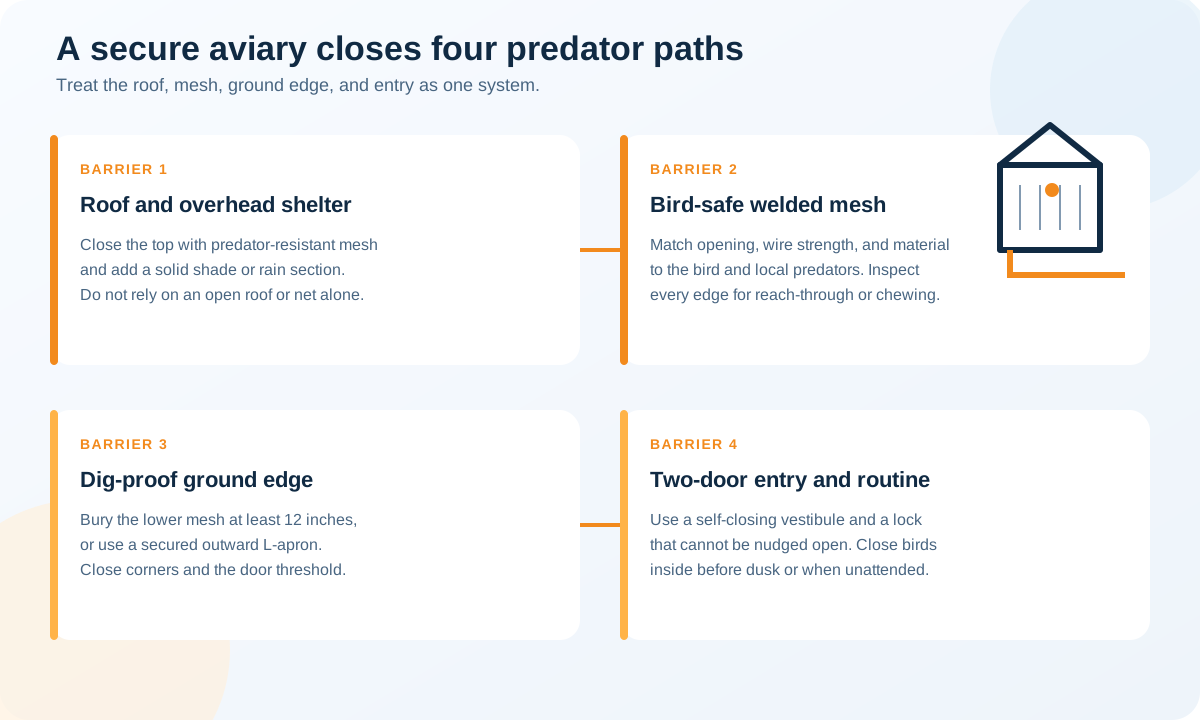
To reduce predator risk in an outdoor aviary, close every entry route and keep predators from touching the birds through the enclosure. That means a secured roof, mesh suited to the individual bird and the animals outside, a continuous ground barrier, and a two-door entry. Give the birds a sheltered retreat and decide where they will spend the night before you start building.
The difficult part is choosing how those measures fit together. A fine mesh can have weak welds. A heavy panel can have openings wide enough for a paw. A buried wall can leave an unprotected doorway. A bird that is safe on a central perch can still climb onto the outer wire.
No mesh size, burial depth, camera, or ready-made enclosure gives a universal “predator-proof” guarantee. Use the term as a planning goal. The finished aviary needs to match your birds, local wildlife, soil, weather, and daily routine, and it needs inspection throughout its life.
In this guide
- Decide what your birds need outdoors
- Identify the ways predators could reach them
- Choose mesh opening and wire strength separately
- Keep paws and talons away from the birds
- Choose materials for the surfaces birds can reach
- Design the ground barrier for your site
- Secure the roof, shelter, and entry
- Compare equipment by the job it must do
- Use cameras to check access and routines
- Inspect the aviary before and during use
- Respond to damage or a predator encounter
- Frequently asked questions
Decide what your birds need outdoors
Start with the birds you actually keep. Record their species, the size of the smallest individual, whether they climb or chew the enclosure, and whether any bird has limited flight or mobility. Then decide whether the aviary is for supervised outdoor sessions or permanent housing.
Those are different projects. A daytime enclosure still needs physical protection, but you can return the birds indoors before leaving the garden. Permanent housing needs a secure, usable shelter through the worst conditions your site can experience, along with a way to feed, clean, and transfer birds without opening an escape route.
The RSPCA’s pet-bird housing guidance calls for both outdoor and indoor areas, with enough indoor space for all the birds during harsh weather. Plan that accommodation first; a rain cover over a mesh cage is not an insulated indoor room.
Make a short written specification before requesting quotes:
- Which birds will live there, including the smallest bird and the strongest chewer?
- Can every bird reach food, water, and shelter without crossing another bird’s preferred resting area?
- Which predators need to be excluded, and which can reach through or push against the walls?
- Will the enclosure sit on soil, a continuous slab, a raised floor, or another prepared base?
- How will the roof, walls, floor, and door thresholds join without gaps?
- Where will the birds go during a storm, a damaged-panel repair, or a failed heating system?
- Who will check and lock the aviary when you are away?
If a supplier cannot explain the material, clear mesh opening, wire diameter, panel support, and base connection, you do not yet have enough information to assess the build.
What poultry guidance can tell a parrot owner
Poultry sources are useful for predator entry routes. The Merck Veterinary Manual’s backyard-poultry guidance supports closing the top and protecting the lower perimeter against digging. A fox can exploit an open ground edge regardless of whether the enclosure contains chickens or companion birds.
The bird-contact details need separate assessment. Parrots may climb, mouth, or chew wire and fittings. A gap intended to contain a chicken does not establish safe head clearance for a small pet bird. Poultry housing dimensions and temperature advice also do not establish suitable parrot accommodation.
For those decisions, use companion-bird sources. LafeberVet’s Caging the Companion Parrot handout explains head and limb entrapment and the need for smooth welds. Merck’s pet-bird heavy-metal guidance addresses wire and hardware that birds can ingest. Together, these answer questions that a poultry perimeter guide does not resolve.
Identify the ways predators could reach them
Inspect the proposed site before buying the frame. Look below the wall line, through the side panels, above the roof, and around every opening used by a person. Include household pets in the assessment.
The Poultry Extension predator guide describes a range of mammals, snakes, and birds of prey. It also documents attacks through enclosure wire. These are useful warning mechanisms, not a list of animals present in every garden. Ask a local wildlife service or extension adviser which threats matter at your site.
| Animal or access route | What changes in your design | What to inspect on the finished aviary |
|---|---|---|
| Cats and raccoons reaching through a wall | Separation between birds and the outside surface; protected resting areas | Whether a bird can cling to a panel that an animal can reach from outside |
| Foxes, dogs, and other animals digging or pushing | Ground barrier, supported panels, secure anchoring | Lower corners, threshold, exposed soil, frame movement, and pulled fasteners |
| Rats, small mustelids, or snakes entering openings | Local species assessment and consistent exclusion at every joint | Drain outlets, roof junctions, service holes, door clearances, and damaged mesh |
| Hawks or owls approaching from above | Closed roof and an overhead retreat | Roof-edge gaps and perches immediately below an exposed roof surface |
| Animals climbing onto the structure | A roof that remains secure under the expected loads | Eaves, panel attachments, and objects that give access to the roof |
| Birds escaping during feeding or cleaning | Two-door entry and secured service hatches | The route a bird could follow while a door, tray, or feeder is open |
A predator does not have to enter to injure a bird. Claws, talons, teeth, or a frightened bird colliding with a panel can cause harm while the enclosure still appears intact. Include a sheltered place where birds can move out of sight.
Walk the site at the times you expect to use it. Check what happens when the sun moves, wind pushes the door, a delivery person approaches, or your dog runs along the boundary. Keep an accessible strip around the aviary so you can see new holes and reach fittings for repairs.
Choose mesh opening and wire strength separately
“Aviary mesh” describes a use, not a complete specification. You need the clear opening, wire diameter, material, construction, and method of fastening. A roll’s overall width tells you almost nothing about its suitability for your birds.
Measure the clear opening in both directions
The clear opening is the empty space between wires. Measure that space, rather than the distance from the center of one wire to the center of the next. On rectangular mesh, record both dimensions. A narrow measurement in one direction does not cancel out a long opening in the other.
Measure several places with a ruler or caliper, including the edges and any distorted sections. Check the widest gaps at doors, hinges, feeding ports, roof joints, and the base. Those gaps may be larger than the nominal mesh opening.
LafeberVet’s caging handout recommends openings that prevent the bird from putting its head through while avoiding limb and toe entrapment. A square welded grid, a rectangular opening, and parallel cage bars have different geometry, so do not transfer a bar-spacing number to a mesh panel without assessing the panel itself.
Use the bird cage size and bar-spacing chart for the bird-side starting point. It helps you assess containment and cage fit. Outdoor predator contact remains an additional requirement.
| Birds using the aviary | Bird-side priority | Additional construction decision |
|---|---|---|
| Finches and canaries | The smallest individual’s head clearance and safe flight space | Assess joints and feeder openings as carefully as the main mesh; a generic parrot enclosure may have much wider openings |
| Budgies, lovebirds, and parrotlets | Individual head clearance, toe safety, and access to fittings | Small body size does not remove chewing or climbing concerns; confirm both the opening and the bird-contact material |
| Cockatiels and small conures | Clearance for the individual bird, including slim or young birds | Do not assume that a cage sold for “medium birds” fits every cockatiel or conure |
| African Greys, Amazons, cockatoos, and macaws | Beak resistance, strong doors, and usable interior space as well as head clearance | Heavy bird-contact panels may still need a separate outer barrier against reaching animals |
For comparison, LafeberVet lists average cage-bar ranges of 3/8–7/16 inch (9.5–11.1 mm) for budgies and canaries, 1/2–3/4 inch (12.7–19.1 mm) for cockatiels and small conures, and 3/4–1 inch (19.1–25.4 mm) for African Greys and Amazons. These are bird-containment references for cage bars, not specifications for an outdoor predator barrier. The individual bird may need a tighter opening.
A 1/2-inch opening is 12.7 mm. That conversion is useful for comparing specifications; it is not a recommendation for every species. Treat any borderline opening as unresolved until the exact bird and panel have been assessed. Never push a bird’s head or foot into a gap to test it.
Select wire strength for the bird, predator, and unsupported span
Wire strength needs its own decision. A mesh panel can have small openings and still bend, break at the welds, or peel away from its frame.
Ask for the wire’s actual diameter in millimeters and the gauge system used. A bare number such as “16 gauge” is incomplete when you do not know the standard. Also ask how far the panel can span between supports and how it must attach to the frame. Do not assign a universal minimum gauge from the bird’s name alone.
The NSW native-bird rehabilitation code, housing section, distinguishes predator exclusion from the need for heavy-duty mesh parrots cannot chew through. Its scope is wildlife rehabilitation, but the separate questions about entry and chewing are relevant to a companion-bird build. The enclosure dimensions and rehabilitation routines are not pet-housing recommendations.
Assess the whole panel assembly:
- Bird pressure: Can the bird grip exposed wire ends, reach a fastener, or work repeatedly at one joint?
- Animal pressure: Can an outside animal pull an edge, push a broad panel inward, or load the roof?
- Panel support: Does the mesh have a supported edge on all sides, and are long spans supported as required by the builder?
- Connections: Do the fasteners suit the frame material and hold the mesh continuously, including corners and roof edges?
- Condition: Are there damaged welds, corroded sections, sharp ends, or openings enlarged during installation?
Make these checks on an empty enclosure. A gentle hand check can reveal a loose panel; it cannot certify resistance to a determined dog or a storm. Obtain a fabricator’s assessment where the expected loads or a large parrot’s chewing strength exceed the information supplied with the panels.
Chicken wire is a poor substitute for a specified bird-contact panel. The NSW code warns that it can damage beaks and feathers. Flexible netting, garden fencing, and insect screens also need assessment for the job they are expected to do; fine openings alone do not establish predator resistance.
Keep paws and talons away from the birds
Moving a perch inward helps at that perch. It does not protect a parrot that climbs onto the wall or hangs from the roof mesh. Assess every surface the bird can reach, including the wire above its head.
Double wiring uses two separate mesh layers with space between them. The bird-side layer contains the birds; the outer layer limits outside access. The Parrot Society UK’s husbandry guidance recommends this arrangement and describes at least 5 cm, approximately 2 inches, between the layers. That is a published design reference, not a universal reach-proof distance.
The separation must remain effective in the installed structure. A flexible outer panel can bow inward. A bracket can bridge the gap. A door may have only one layer even when the walls have two. Review the spacing against the local animal, the openings, and the movement possible in both panels.
When planning two layers:
- Keep the birds entirely on the inner side; they should not be able to enter the gap.
- Carry protection across exposed doors and roof areas, rather than double wiring only the easiest wall.
- Keep cut ends and attachment hardware out of the birds’ reach.
- Provide access to inspect and clean the gap without releasing the birds.
- Ensure an outside animal cannot deform the layers until they meet.
- Check that the added mesh does not obstruct door closure or reduce ventilation in the shelter.
Laying two sheets directly against each other does not create this separation. Misaligned sheets can also introduce awkward spaces for toes or beaks. Plan the layers as an enclosure detail with supports and closed edges.
Solid lower panels can reduce a bird’s view of animals prowling at ground level. They still need secure attachments, cleanable surfaces, and closed joints. A visual screen helps with disturbance; it does not replace the structural barrier behind it.
Choose materials for the surfaces birds can reach
Bird-contact material includes much more than the main mesh. Think about screws, washers, clips, hinges, chains, feeder mounts, roof fittings, and anything exposed after a bird removes a cap or coating.
Merck’s companion-bird guidance on heavy-metal poisoning identifies galvanized wire and hardware as potential zinc sources and favors stainless steel or other safe alloys for cages. Material choice should follow the bird’s access and chewing behavior, rather than the enclosure’s color or marketing name.
| Material or finish | Where it needs attention | Purchase or maintenance decision |
|---|---|---|
| Stainless-steel mesh and fittings | Bird-contact surfaces, welds, and cut edges | Obtain the alloy and construction specification; stainless steel does not compensate for weak welds, unsuitable openings, or sharp cuts |
| Galvanized wire or zinc-plated fittings | Any area a bird can mouth, lick, or chew | Do not assume an outdoor corrosion coating is suitable for bird contact; consider an inaccessible outer layer or an alternative material |
| Powder-coated steel | Coating quality, underlying metal, and damage at joins | Use a cage or panel intended for birds with a documented finish; remove access to peeling or chipped surfaces |
| Plastic- or vinyl-coated wire | Places a parrot can strip the coating | Avoid treating the coating as a durable chewing barrier; exposed metal and swallowed pieces remain concerns |
| Timber and painted panels | Chewable edges, preservatives, and old paint | Specify a bird-appropriate material and finish; shield structural pieces that must remain inaccessible |
The avian veterinary practice For the Birds explains why coatings and underlying metal both matter. Its material discussion includes the hazards of chewed coatings and explains that a vinegar wash does not remove the zinc coating from galvanized wire.
Do not turn “wash and weather the wire” into a safety guarantee. Cleaning may remove residues or surface deposits, but it does not establish that a bird can chew the finished panel safely. For a persistent chewer, obtain advice from an avian veterinarian and a builder familiar with that species before allowing access.
Check the completed enclosure for accessible hazards
Run a gloved hand carefully along accessible joins while the birds are elsewhere. Look for protruding wire tails, rough welds, loose washers, screw points, flakes, and cracks. A smooth-looking side panel can have a sharp edge where it meets a door frame.
Place latches and their coatings outside the bird’s reach where possible. A safe inner mesh layer should not give the bird a route to an unsuitable outer bolt. Reinspect after adding feeders, cameras, or roof panels; each attachment can introduce a new accessible fitting.
Replace suspect material or keep the birds away until its suitability is resolved. Painting over an unknown surface does not establish what lies beneath or how the finish will behave when chewed.
Design the ground barrier for your site
The barrier needs to connect the wall to the base without a route underneath. Include the airlock, service doors, corners, posts, drains, and the connection to the night shelter. A frame resting on soil is not a continuous ground barrier.
The available approaches solve different problems. Choose the arrangement you can build securely and inspect, then obtain the dimensions appropriate to your site.
Alberta Agriculture’s poultry construction note illustrates an outward surface apron attached to the wall and restrained along the ground. The transferable idea is to place a continuous barrier where digging at the wall begins. Its poultry wire and dimension recommendations do not establish suitable bird-contact mesh or a sufficient apron for every aviary.
| Base arrangement | How it reduces access | Details that determine whether it works |
|---|---|---|
| Buried vertical barrier | Makes an animal digging at the wall meet a barrier below ground | Depth, continuity, corrosion resistance, wall attachment, soil movement, and threshold construction |
| Buried L-shaped barrier | Adds an outward bend below ground to interrupt digging near the wall | The burial depth and horizontal leg are separate measurements; corners and joins must remain closed |
| Surface apron outside the wall | Places secured mesh across the ground where digging at the edge would begin | Outward width, attachment to the wall, edge restraint, coverage, and erosion or disturbance |
| Continuous solid floor with a secured perimeter | Removes a direct soil route through the floor | Frame-to-floor joints, door thresholds, drainage openings, cracks, and cleanability |
| Raised enclosure with an enclosed floor | Blocks direct access from the space below | Floor strength, underside protection, panel connections, service openings, and anchoring |
Interpret burial figures in their original context
Merck’s poultry guidance describes fencing extending at least 30 cm, about 12 inches, into the ground against digging predators. UF/IFAS Extension’s backyard-chicken guide describes a buried L-shaped perimeter barrier at 12–18 inches, approximately 30–46 cm.
These are poultry construction references. They are not evidence that every aviary becomes secure at that depth. Also, UF/IFAS’s buried L-shaped arrangement should not be quoted as a universal width for a surface apron. A depth, an outward horizontal leg, and an apron laid at ground level are different dimensions.
Loose or disturbed soil, drainage channels, erosion, frost movement, roots, corrosion, and persistent digging can change the design needed. A builder or local adviser should assess those conditions before specifying the base. If you cannot establish a suitable below-ground or apron arrangement, consider a properly connected solid-floor design rather than guessing a depth.
Keep the barrier continuous at difficult joins
Decide how the ground barrier will cross the doorway before erecting the frame. A buried strip along the side walls cannot protect an open strip beneath the door. Nor does an apron protect a corner where two pieces simply meet and can separate.
Secure mesh to the frame with a fastening arrangement suited to both materials. Clamped edges or other continuous restraints may be appropriate; the builder should specify the connections and corrosion compatibility. Loose ballast, sparse pegs, and temporary plastic ties do not provide the same restraint as a designed connection.
Cover exposed mesh ends so people and birds cannot contact them. Keep a record of where buried or covered barriers lie, including their dimensions and joins. That record helps when you install a drain, replace a post, or dig a planting hole near the aviary.
Provide drainage without creating a new entrance
Water needs a route out. Animals should not gain a route in through the same opening. Design drain covers and service holes to retain the required exclusion and remain accessible for cleaning.
Agriculture Victoria’s caged-bird code emphasizes drainage, clean accommodation, and pest-resistant construction. A sealed base that traps dirty water creates a different welfare problem, so resolve drainage while designing the perimeter.
For a movable enclosure, reassess the ground connection every time it moves. UF/IFAS notes that mobile poultry housing can be more vulnerable to burrowing than stationary housing. Uneven ground may leave a new gap even when the frame fitted tightly at its previous location.
Secure the roof, shelter, and entry
Close the roof all the way to the walls
The roof barrier must join the side panels continuously. Inspect eaves, corners, roof supports, and the top of the doorway. A sheet placed above the aviary can provide rain cover while leaving an accessible gap around its edge.
Merck’s backyard-poultry guidance recommends a covered enclosure against animals that fly or climb. In a companion-bird aviary, also assess whether a bird hanging from the roof mesh could be touched from above. The same separation principles used on the walls may be needed overhead.
A shade cloth provides shade. It does not establish resistance to chewing, climbing animals, or a bird escaping through damaged fabric. If it sits above a mesh roof, keep it and its fasteners beyond the birds’ reach and maintain the structural barrier underneath.
Obtain roof and anchoring details suited to local wind and snow conditions. Adding a solid panel changes the loads on the structure. A frame intended for a lightweight cover should not be assumed to support any roof material you choose.
Give the birds a usable retreat
Place sheltered perches where birds can get out of direct sun, rain, and the view of approaching animals. RSPCA pet-bird guidance recommends shade and weather protection over at least a third of the outdoor area. That is a welfare starting point; inspect the actual shade as the sun changes position.
The enclosed area should remain dry and ventilated, with room for all birds to perch and use their food and water stations. Agriculture Victoria’s code calls for protection from climate extremes, draught-free shelter, and accommodation appropriate to the birds.
Do not use an enclosed box as a substitute for a properly assessed night room. Plan temperature control and a route indoors for birds whose health or acclimation requires it. Any heating equipment, cords, and controls must be suitable for use around birds and inaccessible to chewing.
Build an entry that can be used with one door closed
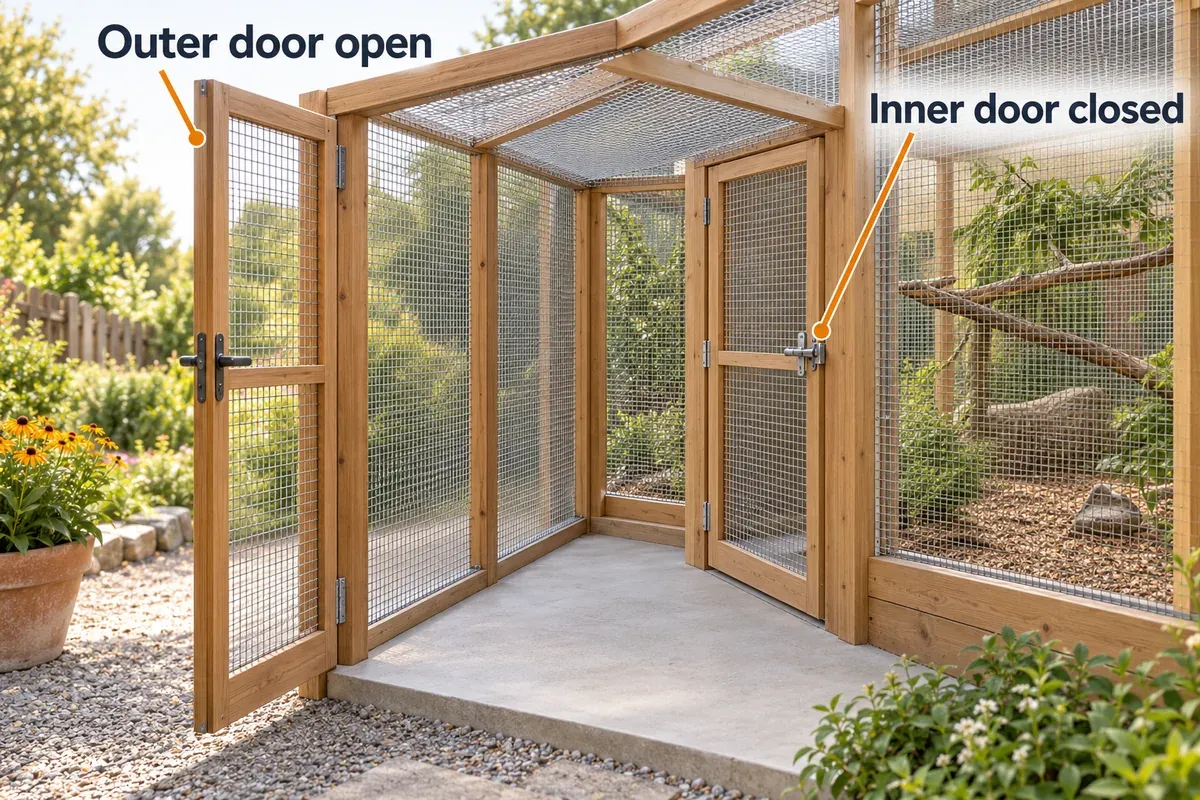
A two-door airlock, also called a safety porch, is an enclosed space between the outside door and the door into the flight. The RSPCA recommends a safety porch and double doors to reduce accidental escapes.
Make it large enough to step inside, handle the carrier or cleaning equipment, and shut one door before opening the other. Check door swing, handles, thresholds, and space for a second person. An awkward entry encourages people to prop a door open.
Use the same sequence every time:
- Open the outer door, enter completely, and shut and latch it.
- Check that the vestibule contains no loose bird or unwanted animal.
- Open the inner door, enter the flight, and shut and latch it.
- Reverse the sequence when leaving, keeping one door closed throughout.
Self-closing hinges can help, but a door is only secured when it has closed into its latch. Test closure with the carrier, hose, and other equipment you normally use. Confirm that wind, a settled frame, or debris at the threshold cannot leave the door partly open.
The Poultry Extension night-housing precautions include closing and locking all doors. For your aviary, use latches appropriate to the animals and birds that can reach them, with a positive locking step when the enclosure is unattended. Keep emergency access practical for the people caring for the birds. A lock that nobody can open quickly during a fire or injury creates a separate problem.
Check feed hatches, removable trays, nest-box access, and the door to the shelter as additional openings. Open them only with the birds secured or with a protected access arrangement designed for that task. Keep the escape route closed while cleaning as well as during normal entry.
The entry detail below shows the first stage of the airlock routine. Practice it with your carrier and cleaning equipment so one door remains closed throughout.
Compare equipment by the job it must do
A large walk-in frame, a roll of mesh, a roof panel, and a camera cannot substitute for one another. Compare each against the part of your specification it must satisfy.
| Equipment | Information to obtain before buying | Reason to pause |
|---|---|---|
| Walk-in frame or complete aviary | Usable interior dimensions; every opening; wire diameter and material; anchoring, roof, and base instructions | No clear mesh specification, exposed sharp joints, or an unexplained gap at the floor |
| Welded mesh or rigid panels | Both clear opening dimensions; actual wire diameter; material; panel support and attachment requirements | A fine grid with insufficient strength, or a coating unsuitable for the bird’s behavior |
| Ground-barrier materials | Chosen geometry, dimensions, connections, and suitability for the soil environment | Dimensions borrowed from a different barrier layout or a material that cannot be inspected or maintained |
| Doors and latches | Fit at all edges; reliable closure; bird and predator access to the hardware | A door that must remain open during an ordinary feeding or cleaning task |
| Shelter and roof | Weather protection, ventilation, cleaning access, and load compatibility | A rain cover offered as a complete answer to winter accommodation |
| Camera | Coverage of the entry and lower perimeter; power, network, recording, and alert arrangements | An installation that depends on the camera to compensate for a physical gap |
Ask the supplier how a mesh retrofit affects the door, ventilation, frame loads, and warranty. Tightening the openings may reduce escape risk while leaving the frame, base, or reach-through problem unresolved.
Before ordering, make a simple layout showing the flight area, shelter, airlock, base connection, and inspection access. Mark where birds can touch the enclosure. Include the full material and hardware requirements in the quote, so a substituted fitting does not undermine the bird-contact specification.
Use cameras to check access and routines
A camera can reveal an animal visiting the aviary, a gate left open, or digging along the base. University of Maryland Extension’s predator guidance describes cameras as a way to identify activity and explicitly distinguishes that information from deterring predation.
Install the physical barriers first. Then position cameras to see the outer entry, the threshold, and vulnerable lower corners. Check the view after dark: mesh close to the lens can reflect infrared light, while plants or roof supports can hide the part of the perimeter you need to see.
Wired recording: Reolink RLC-811A
The Reolink RLC-811A has 4K 8MP video, 5× optical zoom, PoE, and an IP67 housing. It supports motion, scheduled, and continuous recording to suitable storage, including a microSD card up to 512GB, a compatible NVR, or FTP.
For an aviary with an Ethernet route, continuous recording can help you review activity that did not produce an alert. Plan a PoE injector or switch, protected cable connections, and recording storage. Optical zoom can help inspect a particular corner, but narrowing the view also leaves less of the aviary visible.
Check current price on Amazon →Cellular event recording: Reolink Go Plus
The Reolink Go Plus uses 4G LTE, a rechargeable battery, and solar-panel support. Its 2K 4MP camera records triggered events, with local microSD storage up to 128GB. This is an event-recording option rather than a continuous recorder.
It may suit a remote garden location without Wi-Fi or an Ethernet run. Check the regional model, compatible data SIM, and signal at the exact mounting point. Account for the data plan and battery charging as ongoing requirements. Solar charging depends on the panel’s exposure and the camera’s use; inspect battery reserve during cloudy periods.
Check current price on Amazon →Test the view and the response to an alert
With the aviary empty, walk past each area you want monitored and review the recording. Check whether you can see a hand at the latch, the door bottom, and movement along the ground edge. Repeat in darkness and in the lighting conditions produced by your garden lights.
Confirm that timestamps are correct, storage is recording, and notifications reach the person who can act. If a network or power connection fails, the bird-care routine must still work. Do not regard the absence of an animal-detection alert as evidence that no animal visited.
Keep electrical cords away from the birds. MSD Veterinary Manual’s pet-bird safety guidance identifies chewing cords as an electrocution risk. Keep spotlights and sirens from startling resting birds; review automatic deterrent settings before putting a camera into use beside the shelter.
Inspect the aviary before and during use
Check the empty enclosure before the first session
Work around the entire structure, rather than inspecting only the panel nearest the door. Keep a record of the mesh, connections, and base arrangement so later repairs can preserve the intended specifications.
- Roof: Confirm that the barrier joins every wall and door frame. Look for unfinished corners and gaps beneath the rain cover.
- Mesh: Measure both clear opening dimensions and the widest irregular gaps. Inspect welds, cuts, surface damage, and attachment points.
- Separation: Check all surfaces a bird can climb, including doors and the roof. Inspect the space between layers and whether panels can move toward each other.
- Base: Trace the whole wall-to-ground connection, including the airlock, corners, drains, and shelter transition. Confirm the specified buried or covered work before it disappears from view.
- Entry: Carry your usual equipment through the airlock. Shut and latch one door before opening the other, and test every service hatch.
- Shelter: Confirm access for all birds, shaded perches, dry surfaces, ventilation, and the planned route to secure night accommodation.
- Materials: Check reachable fittings, rough joints, damaged coatings, and accessible cables. Resolve unknown bird-contact materials before use.
- Routine: Identify the person responsible for closing up, checking the birds, and responding to damage or bad weather.
- Monitoring: Test recording and alerts if installed. Check whether the physical security and care plan remain adequate when the camera is offline.
An inspection finds visible defects; it does not certify the design. Keep the birds indoors if any essential opening, material, or structural detail remains unresolved.
Introduce outdoor time gradually
Use a secure carrier to move the bird into the closed airlock and flight. Do not walk a loose bird across the garden. Begin when conditions are mild and calm and stay nearby.
The RSPCA’s introduction guidance recommends short initial sessions of no more than 10 minutes, extending them as the bird becomes confident. Let a reluctant bird return to its carrier and try again another day. Confirm that it can locate food, water, and its retreat before increasing outdoor time.
A bird with illness, limited mobility, or a history of panic needs an individual plan. Outdoor acclimation does not establish winter tolerance or suitability for overnight housing.
Check birds and barriers each day
Observe every bird before opening the enclosure. Look for normal perching and movement, then inspect doors, lower joints, mesh condition, and new digging. Make sure the shelter and drinking water remain usable.
Clear spilled feed and discarded fruit, repair leaks, and store spare food in closed pest-resistant containers. Avoid leaving food outside after the birds have moved to their secure night space. Continue to provide the birds’ required food and water in the accommodation they are using.
The Poultry Extension guide supports clean surroundings, removal of feed left in the run, and secured night housing. For pet birds, adapt the timing to their feeding and housing needs rather than simply removing everything at a fixed hour.
Check hidden connections periodically, including areas behind lower panels and between mesh layers. Repeat the full inspection after storms, excavation, repairs, moving the enclosure, or adding equipment. A new cable route or drain can introduce an opening that the original build did not have.
Respond to damage or a predator encounter
If you find disturbed soil, a pulled panel, a door that no longer shuts, or an animal trying to reach the birds, move the birds into secure accommodation before working on the aviary. Keep the airlock sequence intact during the transfer. Do not leave birds against the damaged area while you add a temporary patch from outside.
Check the complete perimeter for a second access point. Save useful camera footage and note the location of damage. Predator identification can help you choose a repair, but a missing bird or disturbed panel alone does not prove which animal was responsible.
Contact an avian or emergency veterinarian urgently if a bird has been bitten, injured, or shows breathing difficulty, active bleeding, weakness, a drooping wing, or inability to perch. MSD Veterinary Manual’s pet-bird trauma guidance describes these findings and the need for prompt stabilization. Tell the veterinarian about any suspected animal contact, including a bird caught or scratched by a cat.
Use a secure carrier and minimize handling while arranging care. Do not wait to repair the enclosure before seeking help for an injured bird.
Repair the cause as well as the visible damage. A stronger replacement panel will not address an exposed lower edge or a reachable sleeping perch. If the predator pressure exceeds your design, keep the birds indoors until the barrier layout has been reassessed.
Frequently asked questions
Is 1/2-inch hardware cloth suitable for every outdoor aviary?
No. It describes an opening size, not the wire strength, material, or suitability for the individual bird. Smaller birds may need tighter openings, and an outdoor panel also needs assessment for predator contact. Check irregular gaps and the accessible fittings as well as the main mesh.
Is a finer mesh always safer?
No. The opening must suit the bird’s head, toes, and beak, and the panel still needs sufficient strength. Very fine screening may be weak or unsuitable for chewing. Choose the complete specification, including supports and connections, rather than the smallest advertised opening.
Does a 12-inch buried edge guarantee that animals cannot dig in?
No. It is a figure used in poultry guidance, not a universal aviary guarantee. The barrier’s geometry, connections, condition, soil, and local predators all matter. A buried vertical barrier and a surface apron need separate specifications; do not exchange their dimensions.
Can double mesh replace a ground barrier?
No. Separate layers can help keep animals from touching birds through the walls, but an open lower perimeter remains an entry route. Connect the outer exclusion layer to the chosen base and assess the door, corners, and roof as well.
Can I make galvanized mesh bird-safe with vinegar?
A wash does not remove the zinc coating or establish suitability for chewing. Choose material according to the bird’s access and behavior, and seek avian veterinary advice about uncertain bird-contact surfaces. Do not allow a persistent chewer access while that question is unresolved.
Can a rolling indoor cage serve as an outdoor aviary?
Assess it as a cage for supervised outdoor use, including openings, reach-through risk, stability, weather exposure, and a sheltered retreat. Casters and a pull-out tray do not establish a secured base or protected night accommodation. Keep the bird attended and return it indoors when the session ends.
Can birds stay in the aviary overnight?
Only after the enclosure, shelter, bird’s health and acclimation, local predators, and weather have been assessed for permanent outdoor housing. If those conditions are unresolved, use the aviary for supervised sessions and return the birds to secure indoor accommodation.
Will lights, noise, or a camera make a weak enclosure safe?
They do not close physical openings or separate a bird from an animal’s reach. Spend the first effort on the barrier, entry, and shelter. A camera then helps you observe activity and check routines, provided someone can respond when needed.
Before the birds move in, finish the base, inspect every opening, and practice the airlock routine with the equipment you will use. For perches, feeding stations, and the indoor setup, continue with the parrot cage setup checklist and bird cage placement guide.
Sources and further reading
- RSPCA: Housing and Environments for Pet Birds — companion-bird shelter, safety porch, and gradual introduction.
- LafeberVet: Caging the Companion Parrot — head and limb clearance, welds, and cage-material considerations.
- Merck Veterinary Manual: Pet-Bird Heavy-Metal Poisoning — zinc, lead, and bird-contact materials.
- For the Birds DVM: What’s That Cage Made Of? — coatings, galvanized wire, and the limits of washing.
- Parrot Society UK: Husbandry and Management of Parrot Species — separated mesh layers and aviary construction.
- NSW: Code of Practice for Injured, Sick and Orphaned Native Birds, housing section — rehabilitation-specific mesh and chewing considerations.
- Agriculture Victoria: Code of Practice for the Housing of Caged Birds — shelter, drainage, and pest-resistant accommodation.
- Merck Veterinary Manual: Management of Backyard Poultry — poultry perimeter and roof principles.
- UF/IFAS Extension: Raising Backyard Chickens for Eggs — buried L-shaped barriers and mobile-housing limitations.
- Alberta Agriculture: Prevention of Predator Damage in Poultry Flocks — surface-apron geometry and attachment.
- Poultry Extension: Predator Management for Small and Backyard Poultry Flocks — predator behavior and husbandry precautions.
- University of Maryland Extension: Identifying and Preventing Poultry Predators — cameras for identifying activity.
- Reolink RLC-811A specifications and Reolink Go Plus specifications — camera connectivity and recording capabilities.
- MSD Veterinary Manual: Household Hazards for Pet Birds — electrical and other accessible hazards.
- MSD Veterinary Manual: Traumatic Injury of Pet Birds — urgent veterinary assessment after trauma.