

 Published sources
 Product details checked
When an automatic litter box stops halfway through a cycle, the motor is not automatically the problem. The safety system may be doing exactly what it was designed to do: stopping because it still detects a cat, an unstable base, an unexpected weight change, or resistance inside the cleaning path.
Quick answer: Work through the checks in this order: keep your cat away and unplug the unit, move it to a firm level floor, make sure no wall, cord, or soft mat touches the base, fit the waste-drawer liner flat, clean accessible sensor surfaces while dry, correct the litter level, reset or zero the scale, and run one supervised test cycle. If it stops at the same mechanical point, grinds, smells hot, or has a damaged cord, stop using it and contact the manufacturer.
This is a brand-agnostic troubleshooting guide, not a hands-on review of every model. Exact light codes, litter limits, reset procedures, and sensor locations vary by model.
In this guide, you will learn:
- Which symptom points first to the floor, drawer, litter, sensor, or motor
- How to perform a safe five-minute reset without bypassing safety features
- Why carpet, a bunched liner, sensor dust, and overfilled litter can look like a hardware failure
- When a litter trial, backup box, or replacement machine is reasonable—and when it is not
- Which existing automatic-litter-box guides can help with the next decision
Quick diagnosis: match the symptom to the first check
Start with the first check in the table before taking the unit apart. A safety stop is useful information; repeated resets can hide the original trigger.
| What you see | Check first | Most likely cause |
|---|---|---|
| The cycle stops when your cat approaches or enters | Remove the cat, wait for the unit to settle, and check the entry or weight sensor | Normal safety pause or a false cat/weight detection |
| The box starts, then reverses or stops at the same point | Unplug it and inspect the drum, sifter, waste chute, and seals for a clump or object | Obstruction, sticky clump, or drive resistance |
| Your cat leaves but no cycle starts | Test the base on a hard, level floor with every foot free and the drawer fully seated | Weight baseline, floor contact, drawer, or calibration problem |
| It reports a full drawer when the drawer is empty | Check the liner, drawer seating, sensor area, and waste port; then reset if the manual says to | Bunched liner, dust, debris, or a drawer-full sensor reading |
| Clean litter is dumped or left behind | Check the fill line, litter type, and the delay before cleaning | Overfill, underfill, slow clumps, or incompatible litter |
| It stops after several successful cycles | Empty the drawer and inspect the waste path before running another cycle | Full-drawer trigger, liner shape, accumulated dust, or a developing blockage |
Do this first: a safe five-minute reset
Use this sequence for a box that has stopped unexpectedly. Keep the model’s manual open if you have it; the manual takes priority over any general advice here.
- Keep your cat away from the unit. Stop the cycle and unplug the power adapter before reaching into the drum, chute, or drawer. Never hold down, tape over, or otherwise bypass a safety sensor.
- Remove and empty the waste drawer. Refit the liner so it lies flat across the bottom and sides. Bunched corners can change the drawer’s weight or optical reading.
- Inspect the cleaning path with the power off. Look for a wet clump, toy, scoop, loose liner edge, excess litter, or object caught near the entry, drum, sifter, seal, or waste port. Do not force a drum past resistance.
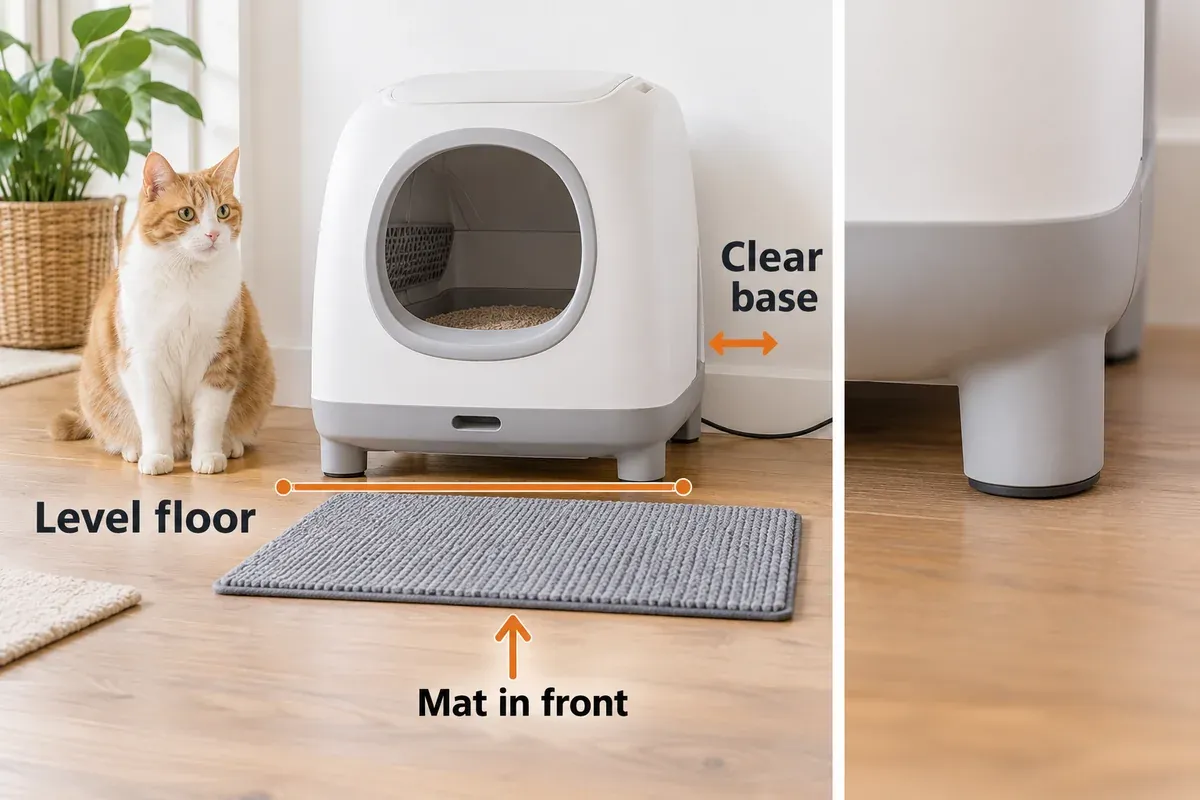
- Check the floor and clearances. Put the unit on a firm, level surface. No soft rug, litter mat, power cord, wall, baseboard, grout line, or furniture should push against the base or lift one foot.
- Clean only accessible sensor surfaces. Use a clean, dry cloth, soft brush, or dry cotton swab where the manufacturer permits. Do not spray cleaner into openings, pour water into the base, or scrape a sensor with metal.
- Correct the litter level. Remove excess litter rather than adding more by guesswork. Fill only to the model’s marked line and use a litter type described as compatible in the manual.
- Reassemble and reset or zero the unit. If the model has a Reset, Scale, or Zero command, use it after changing the drawer, floor, or litter. Run one supervised empty test cycle, then observe the next cycle with your cat safely out of the room.
Stop troubleshooting and use the manufacturer’s support or warranty process if you find a hot adapter, damaged cord, burning smell, repeated grinding, water inside the base, a cracked structural part, or a fault that returns on a clean, stable setup. A new sensor or motor bought at random is rarely the safest first repair.
Surface troubleshooting: why carpet can look like a sensor failure
Many automatic boxes use the base as a scale. The system compares a changing weight against a calibrated baseline to decide whether a cat is present, whether the drawer has changed, or whether the cleaning cycle can continue. Soft carpet, an uneven board, a cord under one foot, or a wall touching the housing can make that baseline move.
This is model-specific. The PuraMax 2 FAQ instructs owners to use a firm, level surface, keep carpets out from under the unit, place mats in front rather than underneath, and leave clearance from the wall. The Litter-Robot 4 product information says the unit can function on carpet, but its SmartScale readings are most accurate on a firm surface. Whisker’s Litter-Robot 4 Carpet Tray is a model-specific accessory intended to improve weight accuracy on carpet or an uneven floor; it is not a universal requirement for every box.
Try this floor test before replacing the machine:
- Move the unit off the rug or soft litter mat and onto a rigid, level floor.
- Check that all feet are fully supported and that no cord or folded liner runs underneath the base.
- Leave a small gap from the wall and remove anything touching the sides.
- Refit the drawer and use the model’s reset or zero procedure.
- Run two supervised cycles without changing anything else.
If the stops disappear, the sensor may be fine. Keep the walking mat in front of the unit so paws can step onto it after the exit, not beneath the weight-bearing base. If your model supports a specific carpet tray or rigid platform, use the accessory and instructions intended for that model. Do not block vents, feet, or access panels with a homemade platform.
Sensor dust, fur, and false weight detection
There are usually several sensing jobs hiding behind one vague “sensor error”:
- Entry or curtain sensors decide whether a cat is in or near the cleaning area.
- Weight sensors detect a cat, establish a baseline, or notice a changed drawer.
- Drawer-full sensors estimate how high waste has piled up or whether the drawer is correctly seated.
- Position sensors confirm that a drum, rake, lid, or chute reached the expected position.
Dust, fur, litter granules, and dried residue can affect more than one of these systems. Whisker’s Litter-Robot 4 laser-sensor cleaning instructions recommend a dry cloth, a brush attachment around the bezel perimeter, and a dry cotton swab for accessible sensor surfaces. The instructions also describe gentle compressed-air use; only use compressed air when your own model’s manual allows it and keep pressure away from seals and electronics.
Neakasa’s automatic litter-box FAQ gives a useful example for false-full alerts: check that bag corners are flat and wipe dirt from the sensor at the bottom of the drawer if the alert remains. That procedure is specific to the affected model, but the general lesson applies broadly: a clean drawer path and a flat liner matter as much as the sensor itself.
Clean with the unit unplugged and dry. Do not use a wet wipe, glass cleaner, disinfectant, oil, or abrasive pad inside sensor openings. Do not insert a pin or screwdriver to “clear” a sensor. If a sensor is behind a sealed cover, stop at the maintenance access described by the manufacturer.
Litter level and cycle timing
Too much litter can increase the load, spill into the drive path, cover a sensor, or prevent a rotating drum from returning to position. Too little litter can expose the cleaning surface, reduce clump capture, or make a level sensor behave differently. The correct amount is the manufacturer’s fill line—not the amount that makes the box look full.
Litter also needs enough time to form a firm clump. Neakasa’s FAQ advises a cleaning delay of more than five minutes for firmer clumps on its models. Treat that as a model-specific example, not a universal setting. If the cycle starts before urine has set, the soft clump can smear across the drum or fall apart in the sifting path and create the next stop.
For many rotary or sifting boxes, a standard-weight, fast-clumping litter is the safest starting point. Check the manual before using crystal, wood, pellets, tofu, cassava, mixed litter, non-clumping litter, or unusually lightweight formulas. Whisker’s Litter-Robot 4 guidance explains that litter weight and particle characteristics can affect the unit’s readings and performance.
Full waste drawers and false-full alerts
A full drawer is not just an odor problem. Many machines pause or disable automatic cycles to prevent waste from backing up into the cleaning path. Empty the drawer before the manufacturer’s stated maximum, especially with multiple cats. A headline capacity is not a promise for every cat, litter type, humidity level, or cleaning delay.
When the drawer is empty but the alert remains, check these points:
- The drawer is pushed completely into its rails or housing.
- The liner is smooth, below the rim where required, and not ballooning into the waste opening.
- No clump, wipe, filter, or loose litter blocks the waste port.
- The drawer-full sensor and the surrounding bezel are dry and free of litter dust.
- The drawer was not weighed down by a bag roll, scoop, or other item.
- The unit has been reset or zeroed after the drawer and liner were changed.
Whisker’s Litter-Robot 4 drawer-full sensor guidance notes that a liner that is stretched or not lying flat can lead to inaccurate readings. Its waste-drawer gauge troubleshooting makes the same practical point about a liner pressed against the drawer and debris around the bezel. The exact sensor arrangement differs across brands, but a flat bag and a clean path are low-risk first checks.
Do not keep pressing Start to force cycles with a genuine full-drawer alert. Empty the drawer, fix the liner or sensor trigger, and confirm that waste has a clear route out.
When it stops at the same point every time
A repeatable stop at one position is more suspicious for resistance than a random pause. With the unit unplugged, inspect for:
- A wet clump stuck to the drum, grate, rake, or sifting screen
- Litter above the fill line spilling into the motor or gear area
- A loose liner edge, seal, flap, filter, or carbon insert in the waste path
- A toy, scoop, collar, or other foreign object in the opening
- A drawer, lid, globe, or grate that is not fully seated
- A drive part that is visibly cracked, bent, or rubbing
Remove only what the manual identifies as a user-accessible obstruction. Do not force a rotating assembly, lubricate an unknown gear, open the motor housing, or substitute a random power adapter. A motor that hums without moving, grinds, becomes unusually hot, or stops after the same load point needs manufacturer support rather than repeated cycling.
If the unit stops in different places but only when your cat is nearby, return to the entry and weight-sensor checks. If it works empty but fails with litter, check fill level, clump timing, litter compatibility, and the waste path before blaming the motor.
Power, app, and firmware checks
After the physical checks, confirm the easy electrical and software causes:
- Plug the official adapter firmly into a known-good outlet. Avoid an extension cord or smart plug while diagnosing.
- Check the app for an error code, paused state, drawer alert, calibration prompt, or firmware update.
- Install a firmware update only through the manufacturer’s normal app or support flow.
- Follow the model’s documented restart or recalibration procedure.
- Run a supervised manual cycle only if the manufacturer permits it with the current alert cleared.
An app showing “offline” does not prove that the cleaning mechanism is broken, and a working Wi-Fi connection does not prove that the base is stable. Do not factory-reset first if it could erase cat profiles, calibration, or history. Record the light pattern, app message, time in the cycle, litter level, and whether the drawer was empty before contacting support; that gives the support team a much better starting point.
Products that help only after the diagnosis
The following products are not a generic “buy a new box” list. Each one addresses a different, defined situation: a controlled litter trial, a manual backup while the robot is unplugged, or a replacement when the current unit has a persistent fault after setup checks.
Options for a stable repair or backup setup
-
BoxiePro Bot Probiotic Cat Litter - 16 lb
BoxiePro
Clay clumping litter sold in a BOT formula for automatic boxes; useful as a controlled trial when loose or slow clumps stick to the drum or sifter.
- 16-lb BOT models
- Clay granules in a formula marketed for automatic boxes
- Best for
- A controlled litter trial for automatic boxes that need firmer clumps
-
iPrimio Stainless Steel Cat Litter Box XL
iPrimio
Large stainless-steel litter box with high sides and a detachable enclosure for testing open versus covered access.
- 23.5 × 15.5-inch format gives larger cats more room than compact pans
- Stainless steel does not absorb urine odor like scratched plastic can
- Detachable enclosure can help contain scatter and spray or be removed
- Best for
- Large cats and households needing a non-porous, high-sided box
-
PETKIT PuraMax 2 Automatic Self-Cleaning Cat Litter Box
PETKIT
A more enclosed, lower-entry alternative with app monitoring, anti-leakage features, and a lower upfront price than a Litter-Robot 4.
- Covered low-entry design with automatic cleaning and safety sensors
- Basic bundle includes the K3 N50 2.0 odor accessory, bags, sifter, and remover
- 24.4"L x 21.18"W x 21.73"H footprint; 22 lb unit weight
- Best for
- Compact homes, lower-entry access, and owners who prefer a covered design
-
Neakasa M1 Plus Open-Top Self-Cleaning Cat Litter Box
Neakasa
Open-top rotating alternative with app control and a large waste drawer for owners who want more visual space than a covered unit provides.
- Open-top design gives cats a clear view and no roof to duck under
- Automatic sifting system with app monitoring and safety sensors
- 22"L x 20"W x 26"H footprint
- Best for
- Large or cautious cats that prefer an open-top entry
-
Litter-Robot 4 Supply Bundle
Whisker
Premium self-cleaning litter box with app control, weight tracking, and comprehensive supply bundle included.
- Automatic sifting separates waste from clean litter
- WiFi app tracks visits and weight trends
- Sealed, carbon-filtered waste drawer
- Best for
- Multi-cat households, large cats, convenience-focused owners
Review the linked product page before purchasing.
How to interpret the options
- BoxiePro Bot litter: Consider this only as a controlled litter trial when your model manual permits the formula. It may help with weak or slow clumps, but it cannot correct a moving base, dirty sensor, full drawer, or mechanical obstruction. It does not repair the automatic box. It is a better fit for an owner who wants a compact enclosed replacement and can provide a firm, level floor; the PuraMax 2 instructions specifically say not to place it on carpet. It still needs correct litter, calibration, clearances, and routine cleaning; open-top does not mean maintenance-free. It has a mature support ecosystem, but it still benefits from a firm surface, a clean sensor area, and a flat drawer liner. A higher price does not make setup physics disappear.
All existing automatic-litter-box guides
If the troubleshooting process shows that your current machine is the wrong size, mechanism, or fit for your cats, continue with the related Zoolory guides:
- Best Self-Cleaning Litter Boxes
- Best Automatic Litter Boxes for Multiple Cats
- Self-Cleaning Litter Boxes for Large Cats
- Litter-Robot 4 vs. 3
- Litter-Robot 4 Alternatives
- homerunPET CS106 review
- homerunPET CS106 vs. Litter-Robot 4
For the surrounding setup, see How to reduce litter-box smell and Why is my cat not using the litter box?. A sudden change in litter-box behavior, repeated straining, blood, vocalizing, frequent unproductive visits, or urinating outside the box can be a medical issue; contact a veterinarian rather than trying to solve it with a new device.
Frequently Asked Questions
Why does my automatic litter box stop after my cat leaves?
The box may still detect weight, movement, or an entry obstruction. First check that the cat is fully clear, then test the base on a hard level floor, clean accessible sensors, refit the drawer, and reset the scale if the manual calls for it. If the stop repeats at the same mechanical point, inspect for resistance instead.
Can an automatic litter box sit on carpet?
Some models can operate on carpet, while others require a firm level surface. Even when carpet is allowed, weight readings are usually most stable on a hard floor or on the model’s dedicated carpet accessory. Never assume a soft mat is harmless underneath the base; check the manual and test the unit after resetting its baseline.
How often should I clean the sensors?
Inspect them whenever you empty the drawer, change litter, see a false alert, or notice dust around the entry or bezel. The exact schedule depends on the model and litter. Use the manufacturer’s dry-cleaning method and stop if a sensor is sealed behind a cover.
Does too much litter make an automatic litter box stop?
Yes. Overfill can add load, spill into the drive path, cover a sensor, or block the waste route. Remove litter down to the marked fill line, use a compatible formula, and reset or zero the unit after the change if required.
Why does it say the waste drawer is full when it is empty?
Common causes include a liner that is bunched or pressed against the drawer, an incorrectly seated drawer, dust or debris near the full sensor, or a calibration that was not reset after emptying. Fix the liner and clean only the accessible sensor area while unplugged. If the alert remains, contact the manufacturer.
When should I stop troubleshooting and contact support?
Stop when there is heat, a burning smell, grinding, a damaged cord, water inside the base, a cracked part, or repeated failure after a clean-floor, clean-sensor, correct-litter test. Also stop if the manual requires an internal repair. Keep the error code and a short video of the supervised failure for the support team.
Final checklist
Before deciding that the automatic litter box is broken, confirm:
- The cat is out of the unit and the power is unplugged for inspection.
- The base is firm, level, and clear of mats, cords, walls, and furniture.
- The drawer is empty, fully seated, and fitted with a flat liner.
- The sensor surfaces and waste path are dry and free of litter dust or clumps.
- The litter is within the marked line and approved for the mechanism.
- The cycle delay gives clumps time to set.
- The unit has been reset or zeroed after the physical changes.
- One supervised test cycle completes before normal use resumes.
- Any recurring electrical or mechanical fault is documented and sent to support.
Most repeat stops are a setup or sensing problem, so start with the floor, drawer, sensors, and litter amount in that order. Do not buy a new robot until that test is complete. If the fault returns on a clean, stable setup, use the error light or app code and contact the manufacturer while the warranty or return window still applies.
Verify the exact model information before ordering.