

 Published sources
 Product details checked
A turnout blanket can look clean and still fail at the job you bought it for. Dirt and dried sweat can reduce breathability, ordinary laundry detergent can leave residues that interfere with water repellency, and a small unnoticed tear can turn into a soaked lining during the next storm.
Quick answer: Start with the blanket’s care label. Remove dry mud and hair, close the fasteners, and wash one blanket at a time with a technical cleaner in a machine that can handle its size. Skip fabric softener and high heat. Air-dry the blanket fully in the shade, then test the outer fabric with a few drops of water. Re-waterproof only when the clean shell no longer beads water, and repair small tears before turnout. A failed seam, strap anchor, chest closure, or large rip needs a professional repair rather than another layer of tape.
In this guide, you will learn:
- How to decide whether your blanket needs washing, re-proofing, repair, or replacement
- How to prepare a turnout blanket without damaging buckles, straps, lining, or waterproof coating
- Which detergents and wash bags make sense, and when a household washer is simply too small
- How to tell a worn water-repellent finish from a hole, failed seam, or wet insulation
- When wash-in proofing is the better fit than a spray-on treatment
- How to patch a small tear safely and when to stop using the blanket
The three-question care check
Use the symptom, not the product label, to choose the next step.
| What you see | Most likely job | First move |
|---|---|---|
| Mud, hair, sweat, or odor, but the shell still beads water | Cleaning | Brush off the debris and wash according to the care label |
| The blanket is clean and intact, but water darkens the face fabric quickly while the inside stays dry | Re-waterproofing | Apply a compatible wash-in or spray-on treatment after cleaning |
| Water reaches the lining, a tear is spreading, or a seam/strap is failing | Repair or replacement | Keep the blanket off the horse and inspect the damage before using it again |
| The horse is damp or sweaty under a clean blanket | Fit, warmth, or breathability problem | Check the horse, weather, fill weight, fit, and lining instead of adding more proofing |
Re-waterproofing restores water repellency; it does not restore missing insulation, repair a puncture, or make a badly fitted blanket comfortable. If the horse is wet underneath, remove the blanket and let the horse dry while you find the cause.
Care products by job
The products below are a short maintenance kit, not a “buy everything” list. The cleaner and proofing treatment solve different problems. A wash bag is useful only when the washer can safely handle the blanket, and repair tape is for small, low-stress damage—not for load-bearing hardware.
Horse blanket wash, proofing, and repair supplies
-
Nikwax Rug Wash, 1L (33.8 fl oz)
Nikwax
A dedicated, water-based cleaner for horse blankets and turnout sheets that removes dirt without the residue of conventional laundry detergent.
- 33.8 fl oz size for a normal home-care starting point
- Designed for horse blankets, turnout sheets, and pet beds
- Use before Rug Proof or another compatible reproofing product
- Best for
- Cleaning a synthetic turnout blanket before any proofing treatment
- Application
- Wash-cycle cleaner
-
Nikwax Rug Proof, 33.8 fl oz
Nikwax
A wash-in waterproofer made for horse blankets and pet beds that is intended to restore water repellency while preserving breathability.
- 33.8 fl oz size with a 169 fl oz bulk option on the product documentation
- Designed for horse blankets and turnout sheets
- Nikwax directs users to clean first with Rug Wash
- Best for
- Reproofing a clean synthetic horse blanket with a wash-in treatment
- Application
- Wash-in or hand-applied proofing treatment as directed
-
STAR BRITE Horse Blanket Waterproofing Treatment
STAR BRITE
A ready-to-use, PFAS-free waterproofing treatment intended for horse blankets, pet bedding, and outdoor fabrics; use the 32 oz spray option for a smaller job.
- the product documentation states no dilution is needed and the treated fabric must dry fully
- The 1-gallon description lists approximately 450 square feet of coverage
- Best for
- Spray-on reproofing when the care label allows an exterior treatment
- Application
- Ready-to-use exterior spray
-
OTraki XXL Mesh Washing Bag, 43 x 35 Inches
OTraki
A large mesh laundry bag that can reduce snagging from buckles and straps, provided the blanket and washer can handle the combined size and weight.
- 43 x 35 inch XXL size is intended for bulky blankets and bedding
- Low-cost accessory for keeping hardware contained during washing
- Best for
- Containing straps and hardware on a blanket that fits the machine safely
- Application
- Containment during a compatible wash cycle
-
Tough-1 Blanket and Sheet Repair Kit
Tough-1
A horse-blanket repair kit for small holes and tears when the outer fabric is repairable and the blanket can be kept out of turnout until the repair is secure.
- Horse-specific repair category rather than a generic household tape
- Useful as a small emergency kit for a clean, dry blanket
- Best for
- Keeping a horse-specific patch and repair option in the barn
- Application
- Horse blanket and sheet patch repair
-
KING MOUNTAIN Self-Adhesive Nylon Fabric Repair Tape, 4 x 63 Inches
KING MOUNTAIN
A long self-adhesive nylon repair strip marketed for outdoor fabrics; its material and format make it more relevant to a turnout shell than ordinary duct tape.
- 4 x 63 inch strip can be cut to a repair with generous overlap
- Nylon fabric format is suited to outdoor gear and synthetic shells
- Best for
- A quick, low-cost patch for a small clean tear in synthetic outer fabric
- Application
- Small outdoor-fabric patches
Review the linked product page before purchasing.
Before washing: prepare the blanket
1. Read the care label first
Blankets that look similar can have different coatings, membranes, fills, linings, and closure systems. The label or manufacturer instructions determine whether the blanket can be machine-washed, which temperature is allowed, whether a dryer is permitted, and which treatments are compatible.
If the label is missing, use a conservative approach: cool or lukewarm water, a delicate cycle, a technical cleaner, thorough rinsing, and air-drying in the shade. Do not assume that a 1200D shell, fleece lining, or heavy fill can tolerate a normal hot laundry cycle.
2. Remove the dirt that water should not carry into the washer
Take the blanket off the horse and let mud dry. Brush away loose dirt, hair, hay, and manure from the outside. For a heavily soiled blanket, rinse or hand-scrub the worst areas outdoors first. Nikwax notes that heavy blankets may need an initial hand-scrub before machine washing, and Emmers likewise starts with removing loose dirt and hair.
Do not use a stiff wire brush on coated fabric, seam tape, fleece, or a smooth lining. The goal is to remove debris, not abrade the face fabric.
3. Close and protect the hardware
Close buckles, hook-and-loop fasteners, and other closures as the manufacturer recommends. Remove detachable liners, hoods, leg straps, and tail cords when the care instructions treat them as separate pieces. Check that no sharp buckle edge or loose strap can snag the shell.
A large mesh wash bag can contain straps and hardware. It cannot compensate for a washer that is too small. If the blanket has heavy fill and cannot move freely in the drum, use a commercial machine or a professional blanket laundry service instead.
4. Inspect before the blanket gets wet
Look at the outer shell, lining, seam tape, chest closures, belly straps, leg-strap anchors, and tail area. Photograph a tear or loose seam before repair. Washing can enlarge a weak area, and a blanket that is already structurally unsafe should not go back on the horse just because it smells cleaner.
How to wash a horse blanket without ruining the coating
Step 1: Choose the right machine
Wash one blanket at a time. The blanket should have enough room to move and rinse; do not pack it tightly around other laundry. A front-loading commercial machine is usually the safer option for a large, filled turnout blanket. Avoid a household washer with a central agitator if the care label or machine capacity makes the blanket bind, twist, or catch.
The OTraki XXL mesh washing bag is a practical low-cost containment option for a blanket that genuinely fits the machine.
Check current price on Amazon →Step 2: Use a technical cleaner, not ordinary laundry detergent
Use a cleaner made for waterproof or technical fabrics and follow its label. The Nikwax Rug Wash product information describes a water-based cleaner made for horse blankets and explains that the blanket should be washed according to its care label.
Check current price on Amazon →Avoid fabric softener. Nikwax specifically warns that conventional detergent residues can harm water repellency, and that softener damages breathability, water repellency, and wicking. Do not add bleach, stain remover, fragrance beads, or another cleaner unless the blanket manufacturer explicitly allows it.
Step 3: Keep the cycle cool and gentle
Use the temperature and cycle on the care label. When the label does not provide a number, the conservative equestrian guidance from Emmers is a large, gentle wash at no more than 30 °C (86 °F). Hot water, aggressive agitation, and an overloaded drum can stress coatings, seam tape, buckles, and filled panels.
Step 4: Rinse until no cleaner remains
Run the recommended rinse or an additional rinse if the fabric still feels slick or smells strongly of cleaner. Residue is not proof that the blanket is clean. It is a reason to rinse again. Do not wring a filled blanket by twisting it; support its weight and let the machine extract water according to the care label.
Drying: the step that protects the waterproof finish
For a turnout blanket, air-drying in a dry, shaded, well-ventilated place is the safe default. Emmers advises drying outdoors in the shade and avoiding a dryer because heat can damage the fabric and water-repellent finish. Nikwax also says to follow the item care label for dryer or air-drying instructions.
Hang or drape the blanket so the weight is supported without stretching one strap or seam. Open it fully, turn it once it is partly dry, and do not fold or store it while the fill, lining, or reinforcement panels still feel cool and damp. Avoid direct midday sun for long periods, radiators, heat guns, and improvised high-heat drying.
Before applying any proofing product, the blanket must be clean and at the application state required by the product label. Some wash-in treatments are applied immediately after cleaning; spray-on products generally require a clean, dry surface. When the two instructions differ, follow the product label and the blanket manufacturer rather than guessing.
How to tell whether a blanket needs re-waterproofing
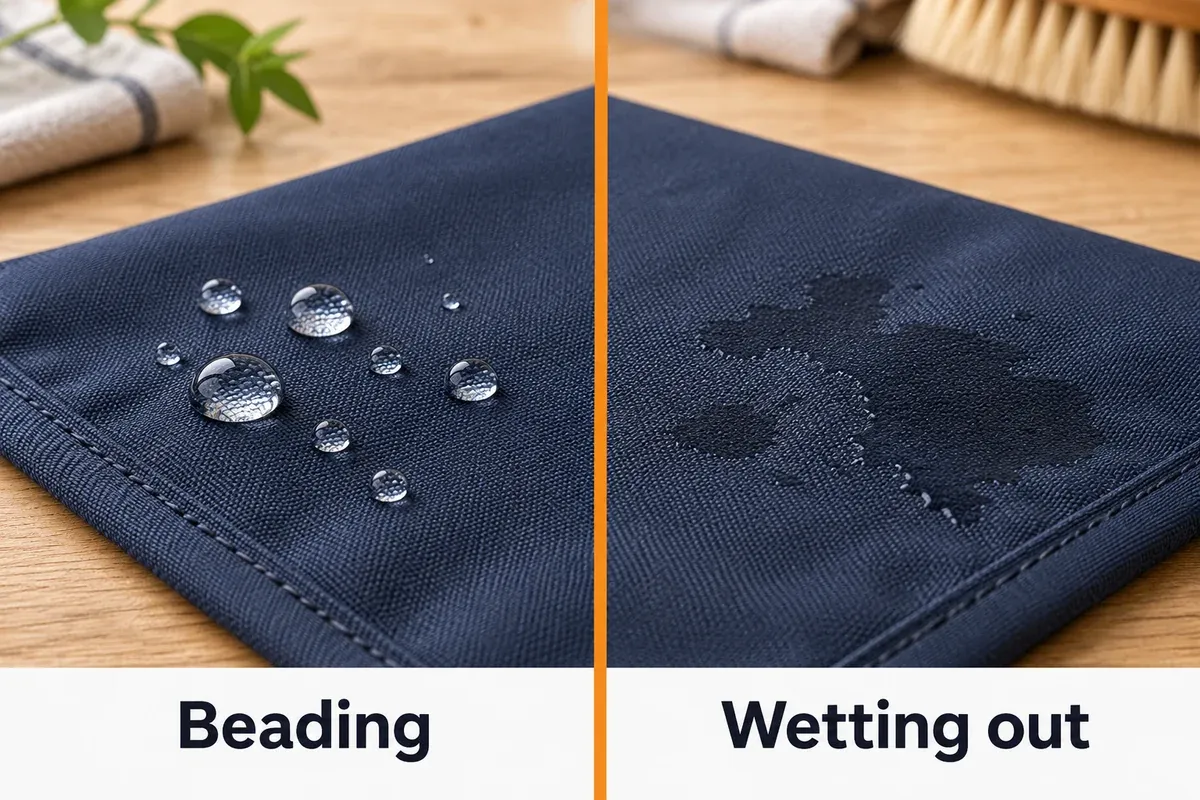
Do the water test only after the blanket is clean and dry. Sprinkle or spray a small amount of clean water onto several high-exposure areas: the shoulders, back, rump, and top of the tail flap. If the water forms beads and rolls away, the outer finish is still doing its job. If the face fabric darkens and absorbs water quickly but the inside stays dry, the water-repellent finish is wearing out.
If water reaches the inside, do not assume proofing will fix it. Check for a hole, open seam, damaged seam tape, a failed closure, or a lining that is holding moisture. A waterproofing treatment cannot seal every structural defect, and it cannot make a compromised blanket safe for turnout.
The Nikwax guide explains that factory water repellency wears over time and recommends restoring it after thorough cleaning while maintaining breathability. Re-proof when the test shows a real loss of repellency—not automatically after every wash.
The comparison shows the outer fabric only. If the lining becomes wet, check for holes, open seams or other damage before assuming that re-proofing will solve it.
Re-waterproofing: wash-in or spray-on?
Wash-in proofing for full-blanket treatment
The Nikwax Rug Proof product page describes a wash-in waterproofer designed for horse blankets and pet beds. It is a good match when the whole clean synthetic blanket needs its water repellency refreshed and the care label permits the treatment.
Check current price on Amazon →Use the amount, cycle, and hand-application method on the product label. Do not combine Rug Proof with another proofing product in the same treatment, and do not improvise a stronger concentration to “make it last longer.” Let the blanket dry completely before judging the result.
Spray-on proofing for an exterior treatment
A spray can make sense when the manufacturer allows an exterior treatment, when you want to work in sections, or when a wash-in cycle is not suitable. Apply it evenly to the clean surface, protect nearby flooring and equipment, and let the blanket dry fully before folding or using it.
Check current price on Amazon →Do not spray a horse, an occupied stall, tack, or feed area. Keep the blanket away from the horse until the treatment is fully dry and free of a strong wet-product odor. Test a small hidden area first if the blanket has a colored finish or a special lining.
Repair small tears before the next turnout
Repairing a blanket is a risk assessment, not just a patching exercise.
Safe candidates for a DIY patch
- A small puncture or short tear in the outer shell with no loose hardware
- A clean area where the fabric is dry, flat, and free of detergent, mud, and oil
- Damage away from a chest closure, belly strap, leg strap, wither seam, or load-bearing anchor
- A repair that can cure fully while the blanket stays off the horse
Clean and dry the area first. Trim only loose threads that could prevent a patch from sitting flat. Round the patch corners if the material allows, leave a generous overlap beyond the damaged edge, press out air pockets, and follow the adhesive or tape curing instructions. After curing, flex the blanket by hand and check for lifting edges before testing it with water.
The Tough-1 Blanket and Sheet Repair Kit is the horse-specific option in this check.
Check current price on Amazon →For a simple synthetic-shell patch, the KING MOUNTAIN nylon repair tape is a low-cost alternative. It is generic outdoor-gear tape, not a horse-blanket safety part, so use it only for a small, low-stress outer-fabric repair.
Check current price on Amazon →When tape is the wrong repair
Do not turn out a horse in a blanket with any of the following:
- A rip that reaches a strap, buckle anchor, chest closure, or leg-strap attachment
- A failed seam, peeling seam tape, or a tear that continues to spread when the fabric is flexed
- Exposed insulation, a wet lining, sharp hardware, or a loose strap that could catch a leg
- A large area of abrasion where the shell has become thin rather than one clean hole
- Adhesive that remains tacky, smells strongly, or lifts after the blanket is flexed
The Stormsure horse-rug repair-kit instructions make the same useful distinction: flexible adhesive can address small cuts and pinholes, while larger damage needs a more substantial patching approach. For a major rip, a professional blanket repair service is usually cheaper than repeated wetting, a lost blanket, or a horse exposed to weather in a repair that fails under movement.
A simple reproofing and repair workflow
Use this order so one step does not hide the evidence from the next:
- Remove and inspect. Take the blanket off the horse, photograph damage, and check the care label.
- Brush and pre-rinse. Remove dry mud, hair, hay, and manure before the blanket enters the washer.
- Wash. Use a technical cleaner, a compatible machine, a cool or label-approved gentle cycle, and no fabric softener.
- Rinse and dry. Remove all cleaner and air-dry fully in the shade unless the label explicitly permits another method.
- Water-test. Check several exposed areas. Beading means the finish may still be adequate; fast absorption means it is time to consider re-proofing.
- Repair if needed. Patch only small, low-stress tears on a clean, dry shell. Escalate structural damage.
- Re-proof. Use one compatible treatment according to its label, then let the blanket dry completely.
- Final safety check. Inspect straps, buckles, seams, lining, smell, cure, and fit before the horse wears it again.
If you are unsure which fill weight the horse needs after the blanket is clean, use the horse blanket temperature chart rather than choosing a heavier layer simply because the shell feels thin. For repeated shoulder or wither marks, the horse blanket rubbing guide is the better next step; reproofing cannot correct a bad cut.
Common mistakes that shorten a blanket’s life
- Washing a muddy blanket on a hot, aggressive cycle: heat and agitation can stress fabric, coatings, and seam tape.
- Using regular detergent or fabric softener: residues can reduce water repellency, breathability, and wicking.
- Putting a blanket into a small washer: a crowded drum prevents cleaning and can damage fasteners and the machine.
- Proofing before cleaning: the treatment cannot perform predictably through mud, hair, sweat, or detergent residue.
- Drying with high heat: follow the label; air-drying in shade is the safer default for coated turnout fabrics.
- Patching over a wet or dirty surface: the tape may lift as soon as the blanket flexes or gets wet.
- Using tape on a strap or chest closure: a turnout blanket moves under load; a decorative patch is not a structural repair.
- Storing the blanket damp: trapped moisture creates odor, mildew risk, and a new reason for the horse to wear a wet layer.
Frequently Asked Questions
Can I wash a horse blanket with normal laundry detergent?
Use the blanket’s care instructions first. For waterproof turnout blankets, a technical cleaner made for the fabric is the safer default. Nikwax warns that conventional detergent residues can harm water repellency and specifically advises against fabric softener because it affects breathability, water repellency, and wicking.
Should I re-waterproof after every wash?
No. Clean the blanket as needed, then use a water-beading test once it is dry. Re-proof when the clean outer fabric absorbs water quickly or the manufacturer’s care schedule calls for it. Over-treating adds cost and does not repair fabric damage.
Can I re-waterproof a blanket without washing it first?
It is a poor shortcut. Dirt, sweat, hair, and detergent residue can block even coverage and trap the problem under the new treatment. Clean first, rinse thoroughly, and follow the proofing product’s application instructions.
Is wash-in or spray-on proofing better?
Neither is universally better. Wash-in proofing is convenient for a clean, intact synthetic blanket that needs whole-blanket treatment and whose label permits it. Spray-on proofing is useful when an exterior treatment is allowed and you want controlled coverage. Choose based on the blanket label, product instructions, and the actual condition of the shell.
Can I put a horse blanket in the dryer?
Only if the blanket manufacturer explicitly permits it. For most coated turnout fabrics, air-drying in a shaded, ventilated place is the conservative choice. Never use high heat just to speed up the process.
How do I know whether a blanket is too damaged to repair?
Stop using it for turnout when the damage involves a strap anchor, closure, load-bearing seam, exposed fill, failed seam tape, or a tear that spreads under light flexing. A patch can keep rain out of a small hole; it cannot make a compromised attachment safe around a moving horse.
Does waterproofing make a blanket warmer?
Not by itself. It can help the shell shed rain so the existing insulation stays dry, but it does not add fill or change the blanket’s temperature rating. Use the horse, forecast, coat, fit, and shelter to choose warmth; the horse blanket temperature chart covers that decision.
Bottom line
The most reliable horse-blanket maintenance routine is simple: brush before washing, use a technical cleaner, protect the hardware, rinse thoroughly, dry without high heat, and test the clean shell before deciding whether it needs proofing. Re-waterproof only when water repellency has actually declined, and repair small tears while the blanket is clean, dry, and off the horse.
Do not use a wash product to solve a fit problem or a strip of tape to solve a structural failure. When the shell, seam, or hardware is no longer trustworthy, professional repair or replacement is the safer and usually more economical choice.
Sources and further reading
- Nikwax: How to Clean and Waterproof Horse Blankets — cleaning, technical cleaners, wash bags, fabric softener, and re-proofing sequence.
- Nikwax: Rug Wash — product purpose and care-label instructions.
- Nikwax: Rug Proof — wash-in proofing for horse blankets and the clean-first requirement.
- Emmers Equestrian Academy: How to Wash and Waterproof Horse Blankets — preparation, 30 °C maximum guidance, shade drying, and reproofing options.
- Stormsure: Horse Rug Repair Kit — small-hole versus larger-tear repair guidance and flexible adhesive/patch materials.