

 Published sources
 Product details checked
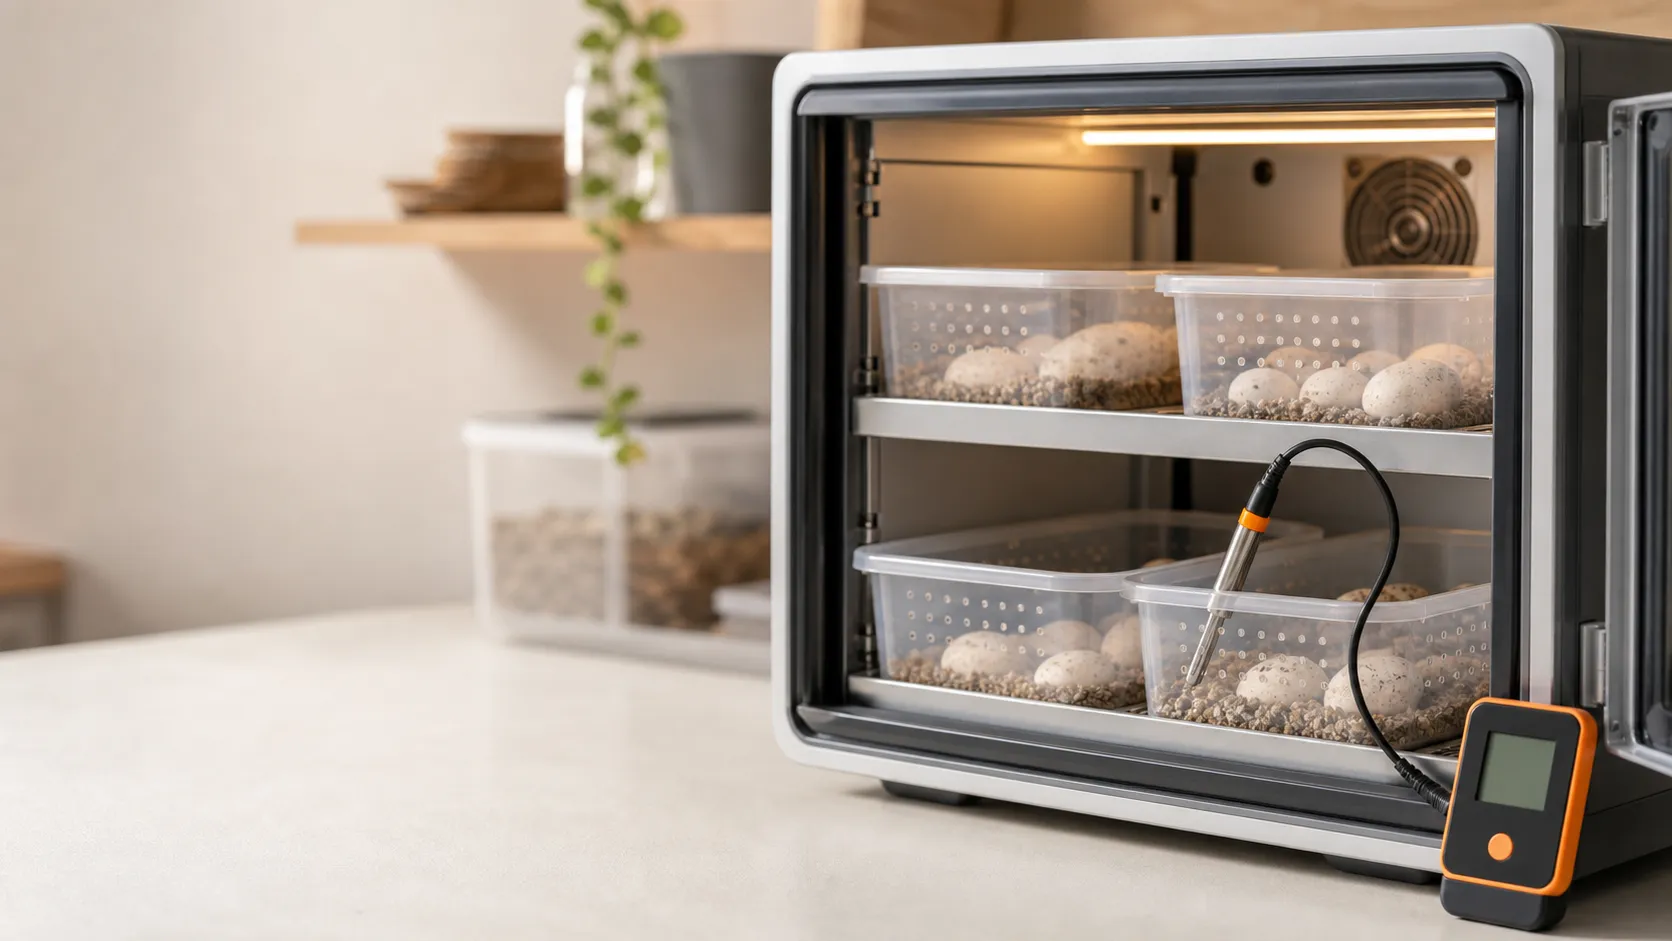
If your reptile incubator display keeps rising and falling, check the temperature at the egg container before changing the setpoint. A cycling air reading can coexist with a steadier temperature in the incubation medium. A stable display can also hide a warmer or cooler container elsewhere in the cabinet.
For eggs already incubating, compare readings without moving the eggs or changing several settings at once. If a suitable sensor is already in the container, use it. Otherwise, place an independent thermometer beside the container at the same height; only put a sensor inside if you can do so without disturbing the clutch or changing the container’s ventilation. If the measured incubation site is outside the documented range for your species, or heat is rising uncontrollably, treat it as an equipment problem now rather than waiting for a full day of data. The Canadian Council on Animal Care’s reptile guidance notes that incubation needs vary widely among species and that excessive heat can quickly harm embryos.
The steps below separate a misleading reading from a real change at the eggs. They do not supply a temperature target for every reptile. Keep your species-specific incubation plan, including its container, medium, moisture, and monitoring method, as the reference point.
First, identify what each thermometer measures
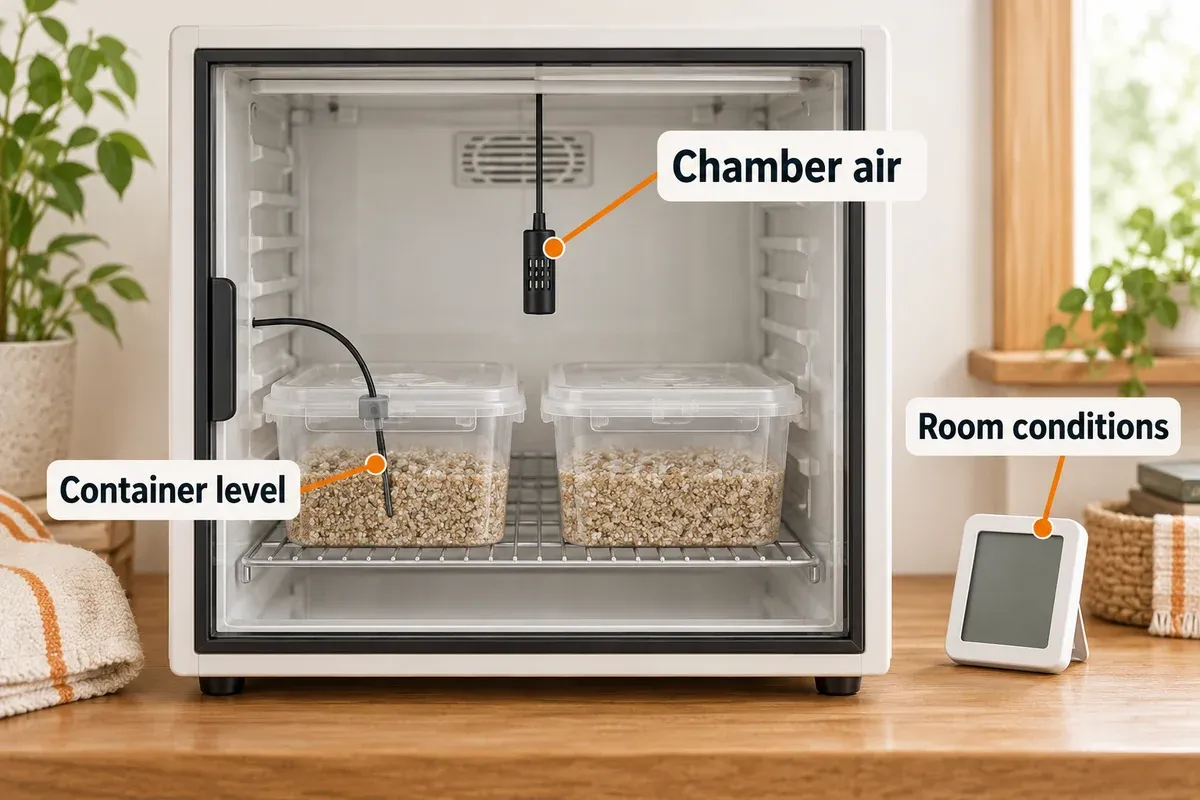
Four readings that all say “incubator temperature” may describe different places:
| Measurement | What it tells you | What it cannot tell you alone |
|---|---|---|
| Controller probe or built-in display | The temperature the controller uses or reports at its sensor | The temperature inside every egg container |
| Cabinet air beside a container | How quickly a shelf responds to the heater, fan, lid, or room | What the moist medium or egg itself experiences |
| Air or medium inside the egg container | Conditions much closer to the clutch; record whether the probe is in the headspace or beside the eggs in the medium | The exact internal temperature of each egg |
| Room air | Whether the incubator is fighting a changing or overheated room | The temperature at the incubation site |
The distinctions matter. In a study of red-eared slider turtle eggs, moist substrate immediately beside the shell tracked internal egg temperature, while surrounding air differed in a moisture-dependent way. That result explains why air alone can mislead. It does not mean that a probe buried anywhere in any species’ container exactly measures every embryo. A suspended egg above water, an egg partly embedded in medium, and a densely packed clutch have different local conditions.
For the Exo Terra Precision Incubator PRO, the North American manual explicitly calls its display a reference reading and instructs users to check temperature inside the egg incubation container. It also warns that top and bottom locations can differ. Do not treat the cabinet setpoint, the displayed actual temperature, and a container measurement as interchangeable numbers.
If eggs are already inside
Start with observations that leave the established setup intact:
- Record the current state. Note the species, incubation method, intended range from your established guidance, incubator model, setpoint, display reading, room reading, container positions, and the time. Photograph the display if it changes too quickly to write down.
- Confirm the independent reading. Use a thermometer suitable for the humidity and temperature where you place it. Position it beside an egg container at the same shelf height, away from a heater, fan outlet, or cabinet wall. If an in-container probe was installed before the clutch, note whether it reads headspace air or medium near the eggs.
- Mark events on the timeline. Record lid openings, water additions, power interruptions, heater indicator changes, sunlight, and room heating or cooling. A dip after opening the cabinet has a different explanation from a rise that continues with the lid closed.
- Check for an immediate fault. A damaged cord, burning smell, water near electrical parts, a sensor-fault message, or heat that stays on while the verified incubation-site temperature keeps climbing calls for prompt action. Disconnect unsafe equipment where you can do so safely, use a previously tested backup plan, and contact the manufacturer or an experienced reptile breeder or reptile veterinarian for the clutch-specific next step.
Avoid lifting or turning eggs to make room for a thermometer. The CCAC reptile guidelines advise against rotating reptile eggs during incubation because embryo-supporting membranes can adhere to the shell. If you have no safe way to measure inside a closed container, measure beside it and state that limitation in your notes. An outside reading is better than an intrusive measurement that changes the conditions you are trying to assess.
Tell a sensor mismatch from a real swing
Look at the size, timing, and location of changes, rather than one number on a display. The following patterns guide the next check; they are clues, not diagnoses.
| Pattern | Likely explanation to investigate | Next safe check |
|---|---|---|
| Display cycles; in-container reading stays steady | The controller is responding to cabinet air while the container changes more slowly | Keep logging at both positions. Check that the in-container sensor is actually beside the eggs or in the relevant headspace. |
| Display is steady; one container changes | Shelf gradient, heater proximity, container placement, moisture, or a local fan path | Compare another container position without moving live eggs. Use a separate sensor at the affected shelf. |
| Display and independent sensor differ by a similar amount over time | Different sensor positions or a stable measurement offset | Let the sensors equilibrate side by side in a stable location; compare their stated accuracy before changing calibration. |
| Both readings climb or fall together | A real change in cabinet conditions | Compare the room log, heater indicator, fan, lid openings, and power events. |
| Display jumps abruptly; independent trace is smooth | Loose or damaged probe, connector, cable, or electronics | Inspect the accessible probe and connections as the manual permits; do not assume the eggs experienced the jump. |
| Every heating cycle overshoots at the incubation site | Control mode, heater output, probe placement, or circulation | Identify the exact controller and heater, then test changes on an egg-free setup. |
A reading of 0.1°C resolution is not a promise of 0.1°C accuracy. Check the sensor’s stated accuracy in the temperature range you use, and allow two sensors time to settle in the same place before judging a small difference. For example, SensorPush specifies a typical ±0.2°C temperature accuracy for its HT.w between 20°C and 60°C, with a larger maximum error. Inkbird’s ITC-308 specification lists ±1°C temperature accuracy. A slight disagreement between such devices is not, by itself, evidence that the incubator needs a new setpoint.
The timing matters too. Cabinet air can change quickly after the lid opens, while a moist container responds more slowly. Synchronize logger clocks or write down the same event time for both devices. Compare full traces or repeated readings over the same period; isolated high/low memories may cover different intervals.
A worked reading example
Suppose the cabinet display repeatedly rises and falls by 1.0°C during heater cycles, while a probe already placed in the medium beside the eggs changes by 0.2°C over the same cycles. Those are hypothetical readings, not a safe fluctuation allowance. They suggest that the display is mainly showing cabinet-air cycling. Before accepting the result, confirm the medium probe is positioned correctly and that its accuracy and sampling interval can resolve the difference.
If both the medium and cabinet readings rise together through the afternoon, look at room heat and sunlight. If only one container changes, look for a local gradient. The correct decision comes from the measured location and your species-specific limits, not from a universal acceptable swing.
Run an egg-free trial before the next clutch
Make substantial adjustments during a trial with no eggs, using the same container style, shelf positions, medium, moisture level, and routine you intend to use for incubation. “Empty” means no eggs, not an incubator with its containers and medium removed: taking away that load changes how quickly the setup heats and cools.
- Set the incubator for the target in your species-specific plan. Put a suitable thermometer at the intended incubation site and another at a different shelf or container position if you will use one.
- Close the unit and let it operate undisturbed for about 24 hours. The Exo Terra PRO instructions call for a roughly 24-hour run with prepared containers and medium before eggs are added, followed by checks at the exact incubation sites.
- Log room temperature at the same time. Include the warmest and coolest part of the room’s normal day, plus normal heating or air-conditioning cycles.
- Review the range and duration at each container. Identify whether a change begins with the heater, room, fan, humidifier, water addition, or opening. Check that every planned egg position stays within the species-specific plan, not merely the shelf nearest the controller probe.
- Change one cause at a time, then repeat the relevant observation. Moving a probe, changing the setpoint, and altering ventilation together prevents you from knowing what worked.
Exo Terra’s fine-tuning procedure is for this pre-egg setup: measure inside the container, adjust the unit if the container differs from the desired species-specific temperature, allow it to settle, and measure again. It is not a blanket instruction to raise a setpoint by the display-to-container difference in the middle of a live incubation. With eggs present, first confirm the measurement and use the existing clutch protocol or qualified guidance for any intervention.
Keep a simple log with columns for time, cabinet display, container position and reading, medium or headspace, room reading, heater or fan state, and event. This makes a repeated cycle distinguishable from a one-time response to opening the lid. It also gives a manufacturer or reptile specialist useful facts if the problem persists.
The egg-free trial below separates cabinet air from the container measurement and the room reading.
Check probe placement, controller type, and heater behavior
The controller can regulate only what its own probe senses. A probe close to the heating element may switch heat off before the containers warm. A probe against a cool wall may keep heat running after the warmer shelf has reached its target. A loose probe that moves when the lid closes can produce inconsistent control even when its electronics work.
On an egg-free setup, follow the incubator manual when checking probe security, cable routing, heater clearance, and fan or vent obstruction. Do not put a probe directly on an egg, in standing water, against a heater, or through a closed lid in a way that changes the seal. A non-contact infrared thermometer can compare accessible surfaces during a dry equipment check; it cannot read through a plastic lid to tell you the medium or internal egg temperature.
On/off, pulse, and dimming control
An on/off controller supplies full heater power, then turns it off when its control threshold is reached. Some cycling is inherent. The size of the resulting swing at the eggs depends on the heater, sensor position, cabinet insulation, circulation, and container mass. Pulse proportional and dimming modes vary delivered power differently; they may produce smoother control with a compatible heater, but a different mode is not a cure for a sensor in the wrong place.
The Exo Terra PRO manual lists pulse proportional, dimming, and on/off modes for its built-in heating system. Its default is pulse proportional. The manufacturer describes pulse and dimming as its more stable modes; that statement applies to this unit’s own controller and heater. Check the actual incubation-site trace before considering a mode change, and trial the change without eggs.
The GQF 1588 Genesis has a digital thermostat and circulating fan. GQF does not describe that control as selectable pulse or dimming in the cited product information, so do not assume it behaves like the Exo Terra. Consult the instructions for your exact 1588 control panel before adjusting it. The GQF instructions library contains separate current-model, preset, and wide-range adjustment documents; procedures for one panel should not be copied blindly to another.
For a separate heater you control yourself, our thermostat control-mode guide explains how output type relates to a compatible heat source. A complete incubator with its own heating circuit still needs its own manual. Do not insert an external thermostat between its plug and the outlet, add a second controller to its built-in heater, or switch its power repeatedly unless the incubator manufacturer confirms that arrangement is compatible. A standalone alarm or independent logger can add information without taking over the unit’s control.
When the pattern points to a fault
If the heater indicator is on continuously while the verified incubation-site temperature keeps rising, or a probe fault appears, stop experimenting with offsets. Check the model’s fault instructions and seek manufacturer support. If the fan stops, power cuts in and out, a cord heats up, or moisture reaches electrical parts, attend to electrical safety first. A controller that has failed closed is not repaired by lowering its setpoint.
After a power interruption, check both the settings and the actual container reading. A restored display only shows that the device has restarted. If you rely on remote alerts or backup power, test their behavior before a clutch depends on them.
Check the room, shelves, and moisture
Put the incubator on a level, stable surface away from direct sun and drafts. Log the room at the same time as the incubation site. An afternoon climb that appears in both traces can point to sunlight or room heat; a short dip immediately after opening the lid points to a different cause.
The Exo Terra PRO manual gives 65–72°F (18–22°C) as its ideal ambient room conditions. That is a room recommendation for this model, not an egg-incubation target. Exo Terra also says its adjustable 50–100°F (10–38°C) range provides no cooling below ambient temperature. Lowering the setpoint cannot make a heat-only incubator cool a room that is already too warm. The GQF 1588 likewise requires a suitably stable room and can reach its stated low reptile setting only if the room is cool enough.
Compare planned shelf positions during the egg-free trial. The Exo Terra manual specifically warns about top-to-bottom variation. Keep containers clear of vents and the heater as directed by the unit’s manual. If only one location runs warm, changing the whole cabinet setpoint can make the other locations too cool.
Water can complicate the trace. Opening a lid, topping up a reservoir, wetting medium, or running a humidifier may briefly change local air and substrate temperature. The turtle-egg measurement study found that moisture affected the difference between air and egg temperature in its experimental setup. Record moisture-related events; do not “correct” a temperature reading taken in the wrong place by changing the clutch’s humidity plan.
Inside a closed, perforated container, humidity may differ substantially from the incubator’s display. The Exo Terra manual recommends checking conditions inside the container for that reason. Preserve the ventilation specified for the species and incubation method. Sealing holes to suppress a display swing can change gas exchange and moisture at the eggs. The CCAC guidance likewise treats ventilation and humidity as linked parts of a species-specific incubation plan.
Which equipment helps with which problem?
Keep a working incubator if the verified egg-container readings stay within your established species-specific plan. Buy or replace equipment only for the gap your measurements reveal: control, a suitable incubator range, or independent monitoring.
Incubators, monitoring, and separate control
-
Exo Terra Precision Incubator PRO for Reptile Terrariums
Exo Terra
Reptile egg incubator with digital set and actual temperature/humidity readings, selectable proportional heating, insulated sidewalls, and a USB humidifier.
- 50-100°F (10-38°C) temperature range according to Exo Terra
- Selectable pulse proportional, dimming, and on/off heating modes
- 55W radiant heat element and hygrostat-controlled USB humidifier
- Best for
- Reptile-specific incubation with proportional heat control and a humidity circuit
- Role
- Reptile-specific incubator
- Key specification
- 50-100°F / 10-38°C; 55W heat
-
GQF 1588 Genesis Hova-Bator Incubator
GQF
General egg incubator platform with a digital thermostat and circulating fan; reptile keepers must build and verify the species-specific egg-container and humidity setup around it.
- Digital thermostat and forced-air circulation are described in GQF documentation
- GQF specifies reptile settings down to 80°F when room temperature permits
- Established breeder-platform format provides a different option from a reptile-branded cabinet
- Best for
- A breeder-style forced-air platform that can be adapted around reptile egg containers
- Role
- Forced-air breeder platform
- Key specification
- Forced air; reptile setting down to 80°F
-
SensorPush HT.w Wireless Temperature and Humidity Sensor
SensorPush
Water-resistant wireless temperature and humidity sensor for independent trend logging; the optional G1 Gateway adds remote access and internet alerts.
- SensorPush records frequent history and supports data export through its app
- The HT.w is the water-resistant model in SensorPush's range
- Bluetooth is enough for local synchronization; a G1 Gateway is needed for remote internet alerts
- Best for
- Independent trend logging and alerts near an egg container
- Role
- Independent data logger
- Key specification
- Temperature + relative humidity history
-
Inkbird ITC-308 Digital Temperature Controller
Inkbird
Plug-in on/off temperature controller with separate heating and cooling outlets, alarms, and calibration; use it only with a compatible, separately planned heater circuit.
- Inkbird lists separate heating and cooling outlets with high/low alarms
- Inkbird lists a 10A combined limit; check the exact US unit's wattage label
- Calibration and sensor-fault features help separate a real drift from a bad reading
- Best for
- An independent alarm and control layer for a compatible backup heater
- Role
- Separate heater controller
- Key specification
- On/off heating and cooling; 10A combined limit
Choose an incubator by the required species-specific range and container setup. A monitor records conditions; an external controller needs a manufacturer-approved use and a compatible separate heater.
Exo Terra Precision Incubator PRO: built-in reptile incubation controls
The PT2444 North American manual specifies a 55 W overhead heat element, selectable pulse, dimming, and on/off control, a USB humidifier, and a 50–100°F (10–38°C) adjustable range. This is the direct option when your planned species-specific temperature falls within its usable range and the room stays cool enough for a heat-only unit. Its display is not an egg-container reading; include a separate suitable thermometer in the setup. Check that the container and medium you plan to use fit the cabinet and can be monitored without disturbing the eggs.
GQF 1588 Genesis Hova-Bator: a bird-origin platform with a documented reptile setting
The current GQF 1588 product description says the thermostat can be set for reptile eggs down to 80°F (about 26.7°C), provided the room is cool enough. It is factory-oriented toward bird eggs; its poultry preset must not be treated as a reptile target. GQF’s wide-range adjustment sheet describes an 80–100°F procedure for a switch-based 1588 thermostat. Current units and older switch-based units have different controls. Identify your panel and use the matching manufacturer instructions before you buy or adjust one.
The forced-air design and digital thermostat give you a cabinet, not a species-specific reptile container, moisture, or ventilation plan. If your clutch requires a temperature below the documented 80°F floor, or the room cannot support the lower setting, choose a different incubator. If the required range fits, validate every egg-container position during an egg-free trial.
SensorPush HT.w: temperature history without changing the heater
The HT.w product specifications describe a water-resistant temperature and humidity logger that stores readings and syncs locally over Bluetooth. The SensorPush setup guide says a G1 Gateway is needed for remote internet monitoring and alerts; the sensor can still log while your phone is away. It does not switch off a heater.
Place it where it can measure a useful shelf or container condition without touching wet medium or eggs. Water-resistant means protected from splashes, not submersible. SensorPush also warns that prolonged humidity above 80% RH can shift its humidity reading, so a saturated egg container may call for a different probe or placement. Match the sensor’s physical and moisture limits to the exact location you intend to monitor.
Inkbird ITC-308: control for a separately planned heater
The ITC-308 product specification lists heating and cooling outlets, high/low alarms, calibration, and an external probe for the plug-in controller. It is an on/off controller for compatible equipment, not a proportional replacement for an incubator’s built-in electronics. The cooling outlet does nothing without a compatible cooling device.
Use it only where you have a separate heater and a documented, electrically suitable control plan. Confirm the exact regional voltage, plug, combined load, probe environment, and failure behavior from the model supplied to you. Do not assume that plugging an Exo Terra or GQF cabinet into it creates an independent safety layer; ask the incubator manufacturer whether external power cycling is permitted. An independent thermometer or logger remains necessary even with a second controller.
Decide what to change
- Different readings at different locations: First determine which location matches the egg environment. Check the container design and the controller probe’s intended position; do not “fix” a location difference by blindly calibrating the display.
- A stable offset between co-located sensors: Check accuracy specifications and calibration instructions. Calibrate only against a known suitable reference and the manufacturer’s procedure. Calibration cannot remove a real shelf gradient.
- Repeated verified overshoot: On a future egg-free trial, check heater output, probe location, fan circulation, and the controller’s supported mode. If the hardware cannot keep the required incubation site within its species-specific plan, seek manufacturer help or replace it.
- A room-driven rise: Remove sun or draft exposure, stabilize the room, and test again. A heat-only incubator cannot solve a room that is too warm.
- A fault, damaged equipment, or confirmed unsafe temperature during a live clutch: Follow the prepared backup and contact qualified reptile or manufacturer support promptly. Keep egg orientation and the established moisture and ventilation plan intact unless that specialist directs a change.
Do not use a universal “safe fluctuation” number. The CCAC reptile guidelines describe species-dependent incubation needs, and research on the jacky dragon shows that temperature fluctuation can matter alongside the mean for a species with temperature-dependent sex determination. Those findings support measuring the actual incubation site and following the species’ evidence, not importing another reptile’s setpoint or tolerance.
Frequently asked questions
Should the thermometer be inside the egg container?
For the Exo Terra PRO, the manufacturer instructs users to measure there. A suitable probe near the eggs or in the relevant medium gives more useful information than a cabinet display, but its placement must preserve the egg orientation, moisture, and ventilation plan. If inserting a probe would disturb an active clutch, measure beside the container and record that it is an outside reading. Plan in-container measurement during the next egg-free trial.
Why does the display swing while the container probe stays steady?
The display may follow quickly changing cabinet air or a probe closer to the heater. Moist medium and a closed container can respond differently. Confirm that both devices cover the same time period and that the container probe is located and rated correctly before concluding that the eggs are unaffected.
Can I use a GQF 1588 for reptile eggs?
GQF explicitly describes reptile use down to 80°F when the room permits it. Match that documented lower limit to your species-specific requirement. Identify the thermostat version before following adjustment instructions, leave bird-egg presets and turning routines out of the reptile plan, and validate the actual container temperature across the cabinet.
Will a second thermostat stop the fluctuations?
Only if it controls a compatible, separately planned heating or cooling circuit and solves the measured cause. It will not correct a sensor in the wrong place or make a heat-only cabinet cool below room temperature. Obtain the incubator manufacturer’s approval before an external controller switches the incubator’s own power.
How long should I wait before changing a setting?
For commissioning without eggs, Exo Terra specifies about 24 hours with prepared containers before judging the incubation sites. With eggs already inside, start non-invasive verification immediately and respond promptly to confirmed dangerous readings or an equipment fault. The 24-hour trial is not a waiting period for an active overheating problem.