

 Published sources
 Product details checked
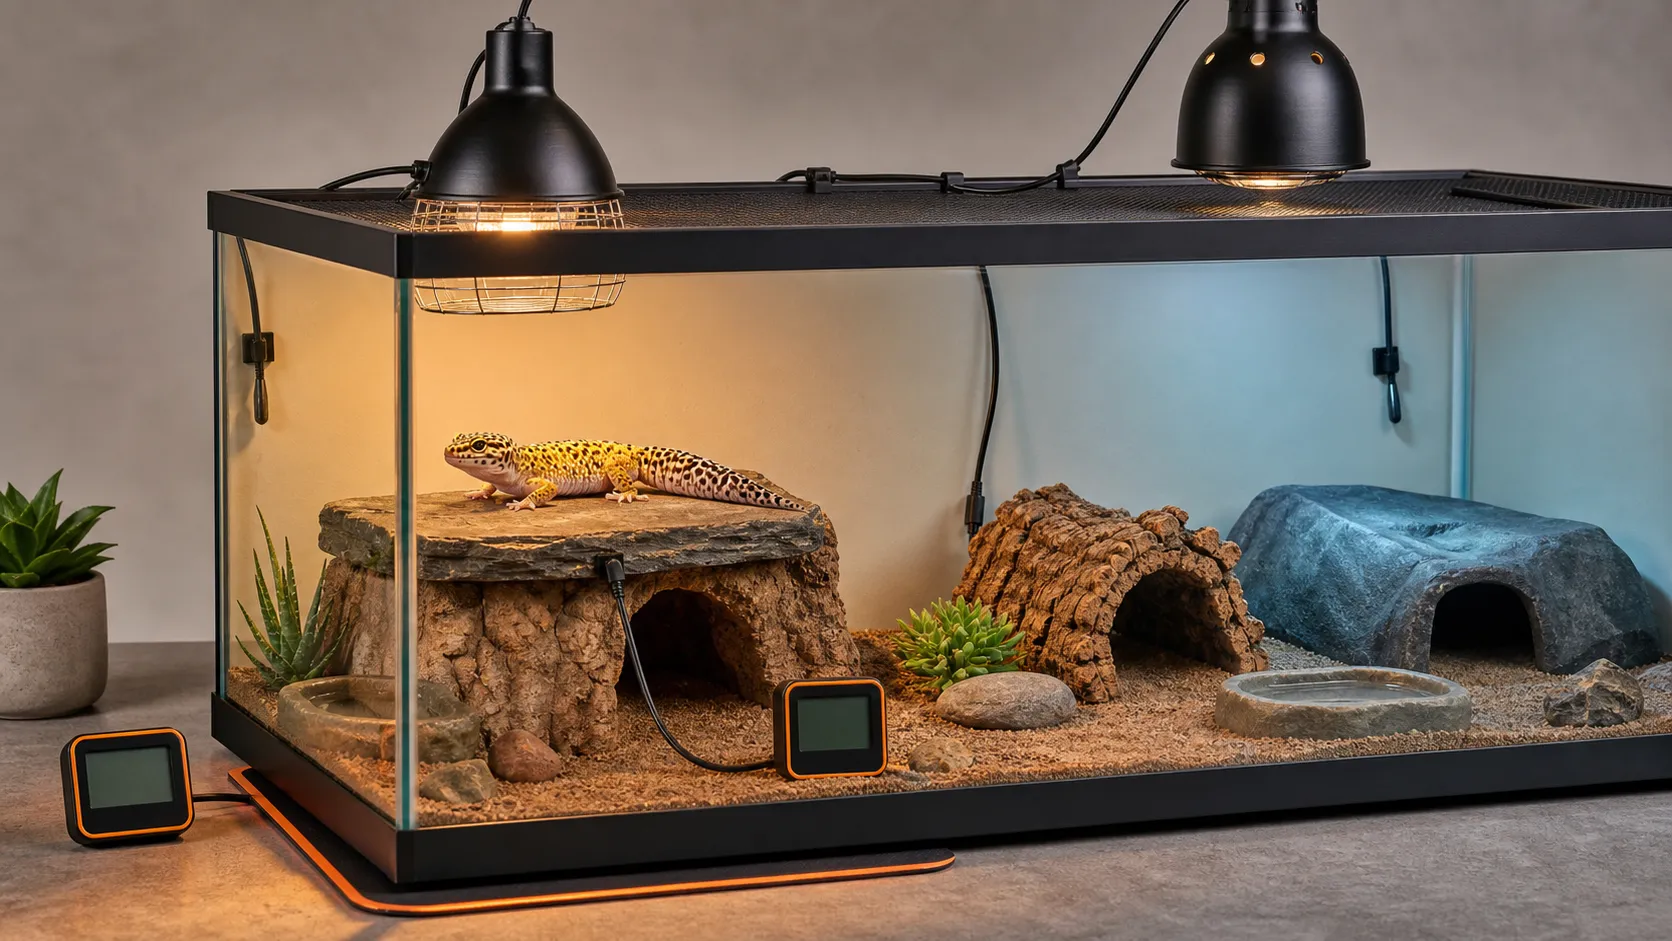
The thermostat can be working perfectly and still allow an unsafe enclosure if its probe is sensing the wrong place. A probe on the outside of the glass, hanging far from an overhead heater, or buried where the reptile never rests is controlling a number—not the temperature your animal actually experiences.
Quick answer: For a heat mat, place the probe inside the enclosure at the warm-hide surface or animal level, following the thermostat and mat instructions. For an overhead lamp, ceramic heat emitter (CHE), or deep heat projector (DHP), place the probe where that controller says its set point should be measured: many systems use the basking surface, while some overhead-lamp controllers specify a suspended air probe beside the lamp. In every case, secure the probe, leave a genuine cool retreat, and verify the finished setup with independent thermometers and an infrared surface reading.
This is a placement guide, not a species temperature chart. Set the target from a current species-specific care guide or an exotics veterinarian. The MSD Veterinary Manual’s reptile husbandry guidance supports thermostat-controlled, screened heat sources positioned toward one end of the enclosure so the animal can thermoregulate across a gradient.
In this guide, you’ll learn:
- Where the thermostat probe belongs for a heat mat, visible basking lamp, CHE, and DHP
- Why two reputable thermostat manuals can give different overhead probe instructions
- How to secure a probe without creating a new burn, chew, or false-reading risk
- How to test the warm surface, warm air, and cool side before the reptile moves in
- Which controllers and measuring tools fit each part of the job
The short version: probe placement by heat source
The correct location is the point your thermostat is designed to regulate. That is not always the same point you use to check the animal’s basking temperature. Use the table as a starting map, then follow the exact manual for your controller and heater.
| Heat source | First placement to check | Independent verification | Main mistake to avoid |
|---|---|---|---|
| Heat mat | Inside the enclosure, at the warm-hide surface or on top of the substrate at animal level | Probe thermometer in the warm hide plus an infrared surface check | Putting the probe on the outside of the glass or directly on the mat when the animal rests above it |
| Visible basking lamp | The controller’s specified basking control point; this may be the basking surface or a suspended air probe near the shade | Infrared reading of the basking surface and a separate air thermometer | Using an on/off controller that makes the bulb flash or repeatedly go dark |
| Ceramic heat emitter | At the warmed cave, branch, or surface if the controller regulates the heated object; some controllers instead use an air probe near the emitter | Surface and air readings after the ceramic element has stabilized | Treating a lightless heater as automatically safe without a guard and thermostat |
| Deep heat projector | The control point specified for the dimming thermostat, normally tied to the usable basking zone | Infrared reading of the basking surface plus warm- and cool-side air probes | Copying a DHP probe position from a different controller without checking its manual |
The rule that prevents most mistakes
The thermostat probe is the control sensor. Your other thermometers are the audit.
If the probe is attached to a cold wall, the thermostat can keep heating while the warm hide overheats. If it sits in the hottest radiant beam when the controller expects air temperature, the thermostat can reduce output before the animal’s basking surface reaches its intended range. The reading is only meaningful when the location and the controller’s instructions agree.
Probe-placement diagram
The diagram shows the usual warm-zone logic and the two valid overhead-control patterns you may encounter. The surface-control example follows the placement language in the Exo Terra 300W operating instructions. The air-probe example follows the separate Spyder Robotics guidance for Herpstat overhead lamps. Do not combine those instructions just because both controllers have a probe.
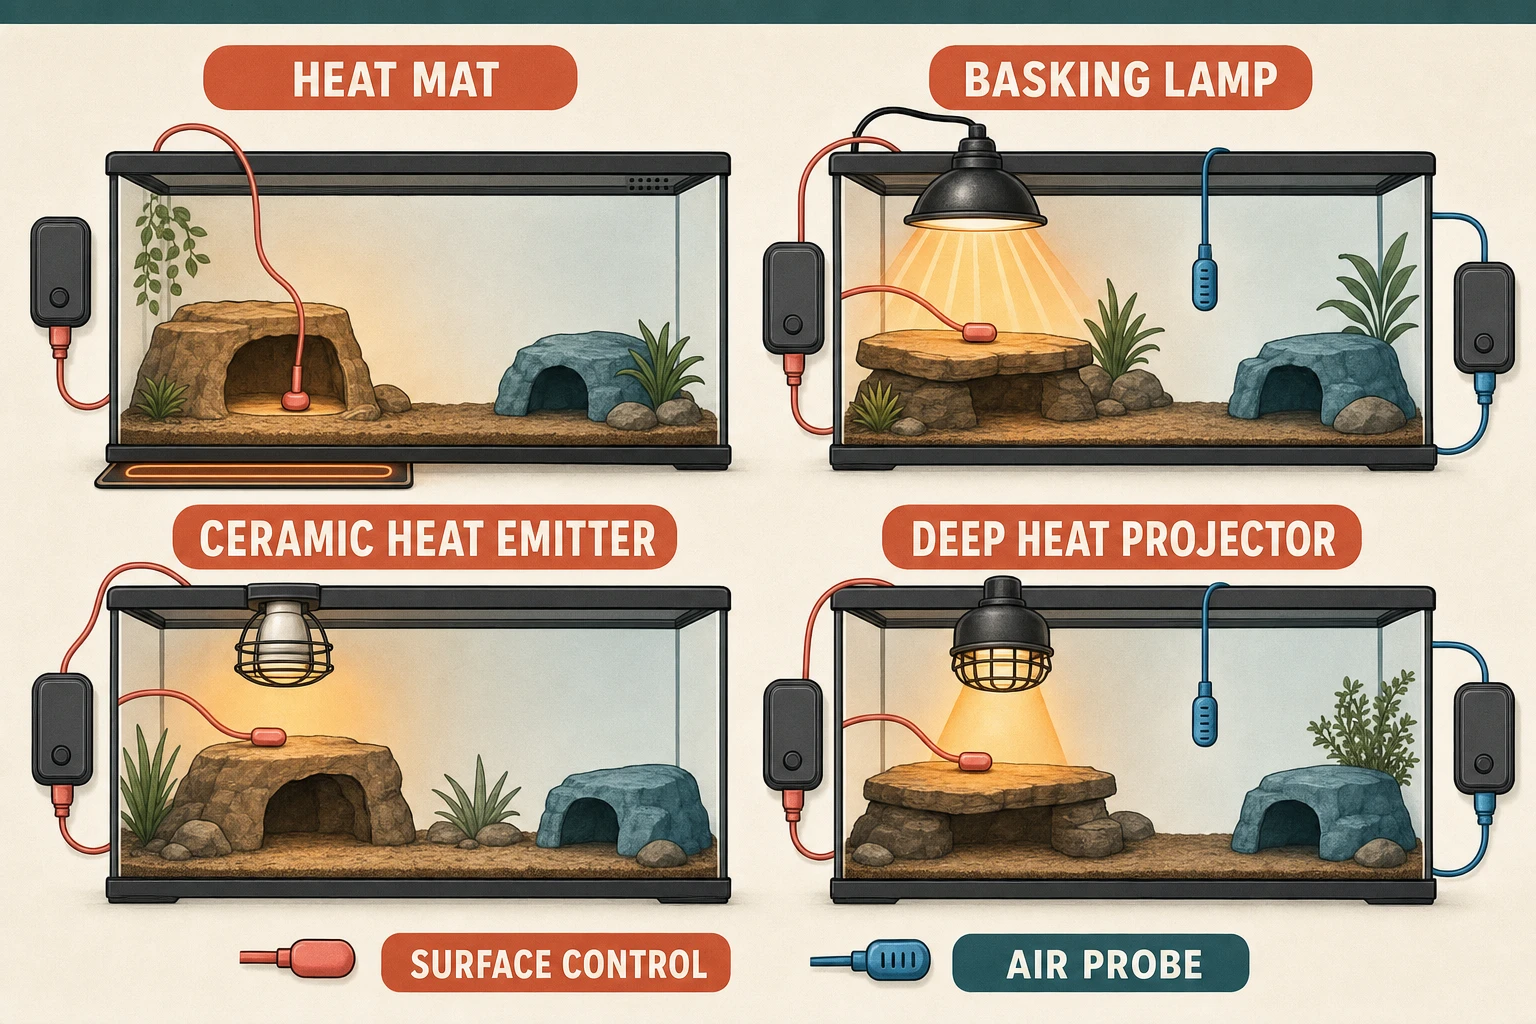
Read the controller manual before copying a probe position. The warm side should remain one part of a gradient, not the whole enclosure.
What the probe is actually controlling
A thermostat does not make the whole enclosure one temperature. It measures one location and changes the connected heater’s output around that location’s set point. The rest of the enclosure responds to wattage, distance, ventilation, substrate, decor, room temperature, and the animal’s access to shade.
That is why the MSD Veterinary Manual’s housing guidance recommends at least two thermometers—one near the warm end and one at the cool end. The same guidance says an under-tank heater should cover no more than about 30% of the available cage space so the reptile can move away from the heat.
The probe therefore has two jobs:
- Stop the controlled heater from overshooting its intended control point.
- Give you a repeatable reference when you adjust the setup.
It does not replace a warm-side thermometer, a cool-side thermometer, an infrared check of heated surfaces, or a guard around an accessible heater.
Heat mats: place the probe where the reptile rests
A heat mat warms from below. The number that matters is not the temperature of the adhesive pad or the outside of the tank; it is the temperature at the warm hide or surface the reptile can actually touch.
For a typical glass terrarium, start with the probe inside the enclosure, on top of the substrate or at the warm-hide floor, at the same level where the reptile’s body will rest. The Exo Terra operating instructions use the same principle: with a heat mat or heat cable, the sensor can be placed on top of the substrate at the location where the set temperature is wanted. The mat itself remains outside the enclosure.
Zoo Med’s ReptiTherm U.T.H. instructions also specify that the heater belongs on the outside of a glass tank. When it is mounted underneath, the tank needs an air gap or the manufacturer’s feet so heat is not trapped against the furniture. That installation detail is separate from probe placement, but both affect the reading.
A safe heat-mat layout
- Put the mat under one end or one defined warm zone, never across the entire floor by default.
- Put a warm hide above the heated area and a separate cool hide on the opposite side.
- Place the probe at the warm hide’s usable level, not dangling outside the tank.
- Secure the probe so the reptile cannot pull it into a different location.
- Keep the mat, cable, and adhesive inaccessible to the animal.
- Check the warm-hide surface with an infrared thermometer after the enclosure has stabilized.
Avoid burying the probe under a deep layer of substrate unless the thermostat and heater instructions specifically call for that arrangement. A probe buried below the animal’s resting surface may read cooler than the place being heated. A probe on the glass immediately above the mat may read hotter than the top of a thick hide.
The reptile heat mat guide goes deeper into mat sizing, exterior mounting, warm hides, and the difference between a manual power knob and a thermostat.
Visible basking lamps: use dimming and respect the controller’s design
A visible halogen or incandescent lamp should normally be paired with a compatible dimming thermostat. The Exo Terra explanation of on/off, dimming, and pulse proportional control notes that on/off control can create larger temperature fluctuations and shorten bulb life, while dimming changes output more gradually.
The exact probe location is where the advice becomes controller-specific:
- The Exo Terra 300W instructions say the sensor can be placed on a branch, cave, or pile of stones when a ceramic heater or heat bulb is heating a particular basking area.
- Spyder Robotics gives different instructions for Herpstat overhead-lamp control: the probe should pass through the ceiling beside the lamp shade and hang in the air roughly 3–4 inches below the bulb, without touching anything. It then tells the keeper to use a separate thermometer for the floor temperature.
Those are not interchangeable “opinions.” They are two different control strategies. If your controller expects the temperature of the basking surface, attach the probe in a protected location at that surface. If your controller manual specifies an air probe beside the lamp, follow that instruction and use a separate surface thermometer to set the real basking result.
For a visible lamp, also control the schedule
The thermostat controls heat; it does not automatically create a healthy photoperiod unless the controller has a properly configured day/night function. A visible bulb should be off at night. The Exo Terra manual explicitly instructs users to switch a visible-light heat bulb off at sunset, manually or with a timer, so it does not disturb the animal’s normal cycle.
If heat is still needed after the visible lamp goes out, use a species-appropriate lightless source such as a DHP or CHE with its own compatible control plan. Do not leave a colored “night bulb” glowing as a substitute for darkness.
Deep heat projectors: dimming, surface checks, and no universal shortcut
A DHP produces virtually no visible light, but it is still an overhead, focused heat source. Arcadia’s Deep Heat Projector guidance says the lamp should be thermostat-controlled, recommends a dimming thermostat for accurate control of the thermal gradient, and calls for a quality non-contact laser thermometer to check temperatures.
For a DHP, place the probe according to the thermostat’s overhead-heater instructions and anchor it to the control point the reptile can use. With a surface-control thermostat, that normally means the heated basking surface or the top of a basking ledge at animal level. With a controller that specifies an air probe beside the lamp, keep the probe suspended and verify the ledge separately.
Do not put a surface probe in a position where the reptile can sit on it, move it, or wrap around the cable. Do not place it directly against the DHP bulb or inside the fixture. A DHP can heat rocks and ledges strongly even when the air reading looks modest, so check the surface and the cool retreat after the enclosure reaches equilibrium.
Because a DHP is lightless, it can be used through the night when the species needs supplemental nighttime heat. That does not make a DHP a universal replacement for daylight or UVB. Keep the heat source, light plan, and thermostat mode as separate decisions.
Ceramic heat emitters: lightless does not mean low risk
A CHE emits heat without visible light, so it can provide supplemental heat without creating a bright nighttime enclosure. It still needs a ceramic-rated fixture, a guard, the correct clearance, and a thermostat.
Pulse proportional control is often a sensible match for a lightless resistive heater because the power pulses are not visible. On/off control can also be appropriate when the enclosure’s natural temperature swing is acceptable and the thermostat is rated for the emitter. The Exo Terra 600W thermostat page lists heat mats, ceramic heaters, and heat bulbs as compatible device categories, but compatibility is still model-specific.
For the probe, follow the same split described above:
- If the controller regulates the heated object, secure the probe at the warmed cave, branch, or surface the animal uses.
- If the controller’s manual specifies an air probe near an overhead emitter, suspend it where instructed and verify the cave or basking surface independently.
Never assume that the CHE’s wattage is harmless because the bulb emits no light. Ceramic emitters become extremely hot, and a probe that has fallen away from the control point can leave the heater running.
The controller manual wins when instructions conflict
Most probe-placement arguments become clear when you ask one question: Is this controller regulating the animal-level surface, the air beside the heater, or the heater itself?
Here are the two common patterns:
| Control pattern | Probe position | What you must measure separately |
|---|---|---|
| Animal-level surface control | On the warm-hide floor, basking ledge, branch, or stone the reptile uses | Warm-side air, cool-side air, and the hottest accessible surface |
| Overhead air control | Suspended beside the lamp or emitter at the height specified by the controller | The actual basking surface and the lower enclosure air temperature |
The surface may be the right control point for one thermostat and the wrong point for another. For example, the Spyder Robotics probe guide warns that a probe sitting directly on an overhead heat source can cause overshoot and gives separate instructions for top-heated enclosures. The Exo Terra manual gives its own location examples for heat mats, heat cables, ceramic heaters, and heat bulbs.
Write the model number of your thermostat on your setup checklist. A replacement controller is not a drop-in reason to keep the old probe position.
How to secure the probe safely
The probe should be fixed, readable, and replaceable without dismantling the enclosure. Use a method that matches the material and the manufacturer’s instructions.
- Route the cable through an intended cable port. Protect sharp screen edges and do not pinch the wire under a sliding door.
- Keep the probe out of reach. The reptile should not be able to move, chew, coil around, or sit on it unless the controller’s instructions explicitly account for that use.
- Avoid direct contact with the heater. Never place the probe against a bulb, inside a lamp holder, or on an exposed mat unless that exact heater/controller combination instructs you to.
- Keep the sensor away from water and misting spray. A waterproof probe is not the same as a waterproof controller, plug, or power strip.
- Do not create a false reading with insulation. Thick tape, buried cable, or a probe trapped under decor can delay the thermostat’s response.
- Leave the cool side usable. A correctly placed probe does not excuse blocking the animal’s retreat from heat.
- Inspect after every enclosure change. Moving a branch, hide, substrate, or lamp changes the temperature map.
If a probe cannot be secured where the controller requires it, change the mounting method or the equipment. Do not “solve” a loose probe by lowering the thermostat set point until one reading happens to look correct.
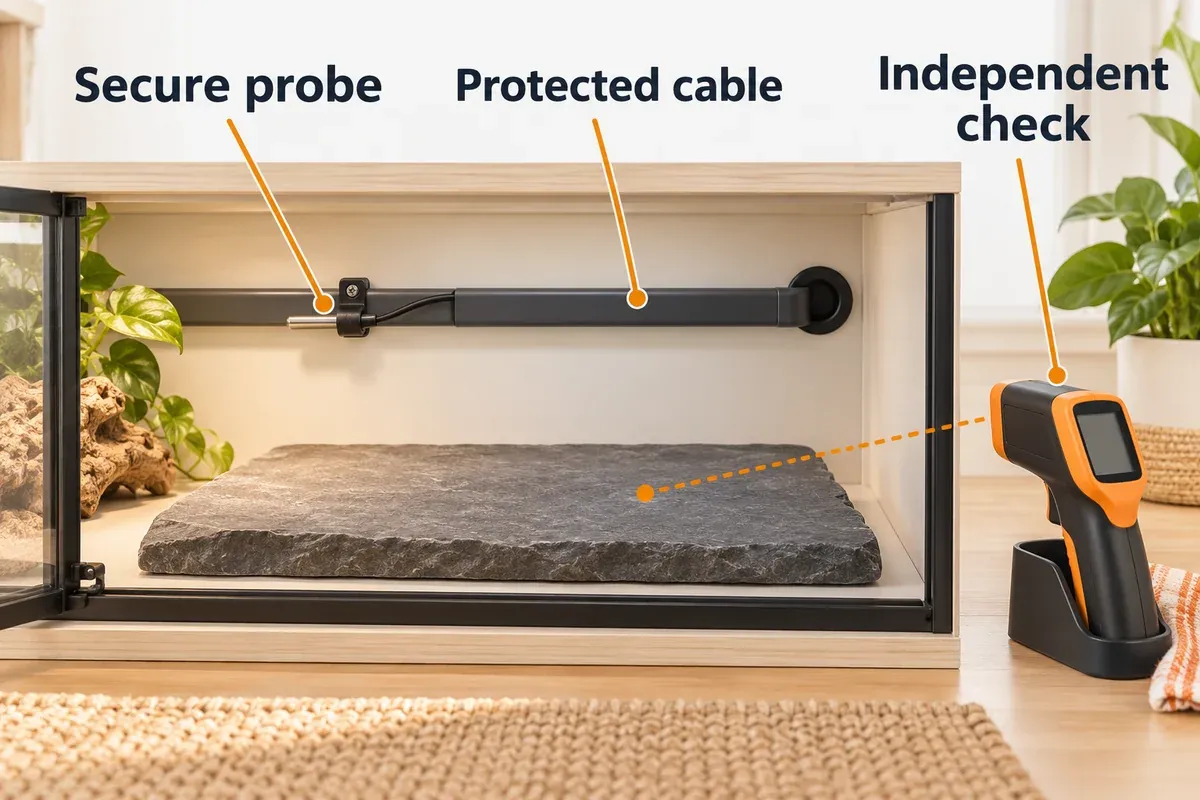
Once the manual’s control point is chosen, check the attachment and cable route. The independent thermometer checks the usable surface without changing the thermostat’s sensing position.
A 24-hour commissioning test
Run the enclosure empty before introducing the reptile. The goal is to learn how the complete system behaves, not to make the controller display a preferred number.
- Set the target from the species plan. Record the intended warm surface, warm-air, cool-air, and nighttime ranges.
- Install the heat source and guard. Check the fixture, wattage, clearance, ventilation, and enclosure material.
- Place the thermostat probe according to the controller manual. Mark the location with a photo so you can restore it after cleaning.
- Add the real substrate and decor. A bare-glass test is not enough when the reptile will use a hide, branch, ledge, or deep substrate.
- Run a full day/night cycle. Allow the enclosure to heat and cool long enough for the walls, hides, and basking surface to stabilize.
- Measure at least four points. Check the thermostat probe location, the warm-side air, the cool-side air, and the hottest accessible surface. Use an infrared thermometer for surfaces and probe thermometers for air.
- Check the reading from more than one direction. Scan the whole basking ledge rather than assuming its center is its hottest point. Do not aim an infrared laser through glass and treat that as a surface measurement.
- Change one variable at a time. Adjust lamp height, wattage, basking material, ventilation, or thermostat settings separately, then let the enclosure settle again.
- Repeat after maintenance and season changes. Room temperature, humidity, substrate depth, bulb age, and decor height all affect the result.
If the thermostat says the set point has been reached but the animal-level surface is too cool, first check probe location and heater distance. If the surface is too hot, turn the heater off while you diagnose the setup; do not rely on a single display or immediately bury the probe deeper.
Equipment for a measured setup
These are different tools for different jobs.
Controllers and thermometers matched to probe placement
-
BN-LINK Reptile Thermostat Temperature Controller, 1000W
BN-LINK
A compact digital heating controller with a 40-108°F range, 1000W described heating capacity, probe sensor, and ETL-described marketplace description.
- 40-108°F temperature range intended for heating applications
- Long probe and three-button programming keep the setup simple
- Best fit
- Budget heat-mat setups that need simple on/off control
-
Zoo Med ReptiTemp Digital Thermostat RT-600
Zoo Med
A digital on/off thermostat with a 50-122°F control range, six-foot remote sensor, memory after power loss, and a high/low temperature alarm.
- Controls up to 600W of heating devices according to Zoo Med
- Six-foot remote sensor cable and LCD display
- Built-in memory resumes settings after a power interruption
- Best fit
- An established-brand on/off thermostat for mats or ceramic emitters
-
REPTIZOO TC02 Dimming Thermostat
REPTIZOO
PID-style dimming thermostat with a digital display, memory function, and probe for controlling light-emitting reptile heat sources.
- Dimming output is better suited to overhead lamps than a simple on/off switch
- Digital display makes the set point easy to check
- Memory function helps preserve settings after a power interruption
- Best fit
- Dimming control for an overhead halogen or deep-heat projector
-
Exo Terra PT2461 300W Dimming & Pulse Proportional Thermostat
Exo Terra
A North American 300W dimming and pulse proportional thermostat with a waterproof remote probe for a single carefully matched reptile heat source.
- Selectable dimming and pulse proportional modes
- Waterproof remote temperature probe
- Supports heat mats, heat cables, ceramic heaters, and incandescent bulbs according to the product documentation
- Best fit
- One compatible lamp, DHP, CHE, or mat when selectable proportional modes are useful
-
Veanic 2-Pack Mini Digital Thermometer/Hygrometer with Probe
Veanic
Two compact digital thermometer/hygrometer displays with external probes for comparing separate enclosure zones without using the thermostat display as the only reading.
- Two displays make warm-side and cool-side placement practical
- External probe reports temperature and humidity at the chosen location
- the product documentation specifies a -58°F to 158°F temperature range
- Best fit
- Independent warm- and cool-side ambient checks on a small budget
-
Etekcity Lasergrip 774 Infrared Thermometer
Etekcity
Non-contact infrared thermometer with laser targeting, adjustable emissivity, and a 12:1 distance-to-spot ratio.
- Reads surface temperature quickly without moving hides or touching the reptile
- 12:1 distance-to-spot ratio is practical for a terrarium
- Adjustable emissivity improves readings across slate, glass, and other surfaces
- Best fit
- Calibrating basking and cool-side surface temperatures
Review the linked product page before purchasing.
For a simple heat-mat setup: BN-LINK
Check current price on Amazon →Choose it for a defined warm hide, not because the 1,000W label is impressive. It has no dimming or pulse mode, so it is not the normal choice for a visible basking bulb.
For an established on/off controller: Zoo Med RT-600
Check current price on Amazon →It remains an on/off controller. Use it for a heat mat or a compatible lightless heater when that switching pattern suits the enclosure. It is not the right upgrade for a visible lamp simply because its temperature range is convenient.
For one overhead lamp or DHP: REPTIZOO TC02
Check current price on Amazon →Use a dimming thermostat with a visible basking lamp or a DHP only when the controller and heater are compatible. The probe position is not universal: follow the TC02 instructions, secure the sensor, then verify the basking surface with an infrared thermometer.
For selectable dimming and pulse: Exo Terra PT2461
The Exo Terra PT2461 300W Dimming & Pulse Proportional Thermostat is the flexible choice when you genuinely need selectable control modes for one heat source. The described temperature range was 64–100°F, with dimming and pulse modes, a waterproof remote probe, and support for heat mats, ceramic heaters, and incandescent bulbs.
Check current price on Amazon →The trade-off is cost and availability. If you only need an on/off thermostat for a small heat mat, its extra modes add complexity rather than value. If you need one controller that can be configured for a compatible lamp or lightless heater, its manual gives more useful guidance than a generic plug controller.
For warm- and cool-side air checks: Veanic two-pack
The Veanic two-pack probe thermometer/hygrometer is a practical way to put one display near the warm zone and one near the cool zone. the product documentation specifies a temperature accuracy of ±2°F and says the external probe is not water-resistant.
Check current price on Amazon →Use it as an independent trend check, not as a laboratory calibration instrument or a replacement for the thermostat probe. Keep the display and probe away from direct misting, and remember that the humidity value describes the sensor’s location—not the entire enclosure.
For basking surfaces: Etekcity Lasergrip 774
The Etekcity Lasergrip 774 is the quickest tool in this group for scanning a warm hide, rock, basking ledge, or cool-side surface.
Check current price on Amazon →An infrared thermometer measures surfaces, not air. Do not measure through glass and do not aim the laser at the animal’s eyes. Use it alongside probe thermometers rather than treating it as the only temperature instrument.
Common probe-placement mistakes
Putting a heat-mat probe outside the tank
The outside of the glass is not the warm-hide temperature. It can be hotter or cooler than the animal-level surface depending on glass thickness, substrate, hide shape, and airflow. Put the probe where the thermostat’s target is meant to exist.
Copying a rack-system position into a glass terrarium
Some rack thermostats intentionally control the heat source or a fixed panel. A glass terrarium with a basking branch, hide, and thermal gradient behaves differently. Use the enclosure and controller instructions together.
Letting the animal move the probe
A moved probe can make the thermostat believe the warm zone is cooler than it is, or turn heating down while the animal’s usable surface is still cold. Secure the sensor and check it after every cleaning.
Measuring only the air
Overhead infrared heat can make a basking surface much hotter than the nearby air. A CHE can warm air without producing the same surface pattern as a halogen or DHP. Measure the surface and the air separately.
Using one controller for two unrelated zones
One probe cannot independently regulate a heat mat on one end and a basking lamp in another. Separate enclosures, separate species, or separate thermal zones generally need separate control channels unless the thermostat manufacturer explicitly supports the combination.
Ignoring the photoperiod
A visible lamp that is controlled for temperature but left on overnight can disturb the animal’s normal dark period. Use a timer or a properly configured day/night controller, and use a lightless heater only when the species plan calls for nighttime heat.
Frequently Asked Questions
Should a heat-mat probe go under the tank or inside the warm hide?
For a typical glass terrarium, start inside the enclosure at the warm-hide surface or on top of the substrate at animal level, following the controller and mat instructions. Do not assume that the outside of the glass or the surface of the mat represents the temperature the reptile experiences.
Should the probe touch the basking rock?
Only when the thermostat is designed to regulate the basking surface and its instructions allow that placement. Other controllers, including the overhead-lamp guidance from Spyder Robotics, specify a suspended air probe beside the lamp. The controller manual determines which pattern is safe and accurate.
Where does a DHP thermostat probe go?
Use the DHP-compatible dimming thermostat’s prescribed control point. With a surface-control design, that is commonly the usable basking surface at animal level; with an overhead-air design, it is the specified suspended position near the lamp. In both cases, independently check the basking surface and cool side.
Can a CHE use an on/off thermostat?
It can be appropriate when the CHE and thermostat are compatible and the enclosure’s temperature swing is acceptable. Pulse proportional control may provide tighter regulation for a lightless resistive heater. Follow the controller’s mode instructions rather than choosing by wattage alone.
Does a thermostat replace a thermometer?
No. The thermostat probe controls one location. Use at least one independent warm-side and one cool-side thermometer, plus an infrared thermometer when the setup includes a heated surface or basking ledge.
How often should I recheck the probe?
Check it whenever you clean, change substrate, move decor, replace a bulb, change the enclosure height, or notice a temperature change. A quick visual check before feeding or misting is also useful because a loose probe can change the control point immediately.
Sources and further reading
- MSD Veterinary Manual: Management and Husbandry of Reptiles
- MSD Veterinary Manual: Providing a Home for a Reptile
- Exo Terra: On/Off, Dimming or Pulse Proportional?
- Exo Terra: PT2461 North American operating instructions
- Exo Terra: 600W Dimming & Pulse Proportional Thermostat
- Arcadia Reptile: Deep Heat Projector
- Zoo Med: ReptiTherm Under Tank Heater
- Spyder Robotics: Where should I mount my thermostat’s probe?
- Spyder Robotics: Can the Herpstat be used with overhead basking lights?
Related reptile guides
- Dimming vs Pulse vs On/Off Reptile Thermostats
- Reptile Heat Mats Guide: Safe Sizing, Thermostats & Setup
- Leopard Gecko Tank Setup: A Practical 36 x 18 x 18 Guide
- Ball Python Humidity Too High or Too Low? Diagnose the Enclosure
- Does UVB Pass Through Mesh or Glass? Reptile Lighting Placement Guide
Final takeaway
Put the thermostat probe where the controller is meant to regulate, then prove that the rest of the enclosure is safe with independent readings. For a heat mat, that usually means the warm-hide surface inside the tank. For lamps, CHEs, and DHPs, the correct position depends on whether the thermostat uses surface control or a specified overhead air probe.
The reliable workflow is simple: follow the model-specific manual, secure the probe, protect the heater, preserve a cool retreat, and test the complete enclosure for a full day/night cycle before the reptile arrives.