

 Published sources
 Product details checked
There is no single “best” reptile thermostat for every heater. The right controller depends first on how the heat source should be regulated: a visible halogen bulb needs a different output pattern than a heat mat, a deep heat projector (DHP), or a ceramic heat emitter (CHE).
Quick answer: Choose a dimming thermostat for a visible halogen or incandescent basking bulb and usually for a DHP. Choose a simple on/off thermostat for a heat mat when wider temperature cycling is acceptable. A pulse proportional thermostat is a useful match for a lightless CHE or another compatible resistive heater. A selectable dimming-and-pulse model only earns its higher price when you genuinely need both modes.
A thermostat is still only one part of a safe setup: the heater needs a guard, the probe must be secured, and the enclosure must retain a real warm-to-cool gradient. The MSD Veterinary Manual’s reptile husbandry guidance recommends thermostat-controlled, screened heaters positioned toward one end of the enclosure.
In this guide, you’ll learn:
- Which thermostat mode fits halogen, DHP, CHE, and heat-mat setups
- Which options make sense for a budget, single-lamp, or multi-mode enclosure
- Why a high wattage number does not make an unsuitable controller safer
- Where to put the probe and how to verify the finished thermal gradient
- Which warning signs mean you should stop using a controller until the setup is corrected
Thermostat options at a glance
The table is a starting point, not a popularity ranking. The load figures are the described controller limits; they are not a recommendation to connect that many watts to one enclosure.
Five sensible US thermostat paths
-
REPTIZOO TC02 Dimming Thermostat
REPTIZOO
PID-style dimming thermostat with a digital display, memory function, and probe for controlling light-emitting reptile heat sources.
- Dimming output is better suited to overhead lamps than a simple on/off switch
- Digital display makes the set point easy to check
- Memory function helps preserve settings after a power interruption
- Control mode
- Dimming / proportional control
- described load
- 300W
-
BN-LINK Reptile Thermostat Temperature Controller, 1000W
BN-LINK
A compact digital heating controller with a 40-108°F range, 1000W described heating capacity, probe sensor, and ETL-described marketplace description.
- 40-108°F temperature range intended for heating applications
- Long probe and three-button programming keep the setup simple
- Control mode
- Digital on/off thermostat
- described load
- 1000W heating
-
Zoo Med ReptiTemp Digital Thermostat RT-600
Zoo Med
A digital on/off thermostat with a 50-122°F control range, six-foot remote sensor, memory after power loss, and a high/low temperature alarm.
- Controls up to 600W of heating devices according to Zoo Med
- Six-foot remote sensor cable and LCD display
- Built-in memory resumes settings after a power interruption
- Control mode
- Digital on/off thermostat
- described load
- 600W heating / 150W cooling
-
Exo Terra PT2461 300W Dimming & Pulse Proportional Thermostat
Exo Terra
A North American 300W dimming and pulse proportional thermostat with a waterproof remote probe for a single carefully matched reptile heat source.
- Selectable dimming and pulse proportional modes
- Waterproof remote temperature probe
- Supports heat mats, heat cables, ceramic heaters, and incandescent bulbs according to the product documentation
- Control mode
- Dimming + pulse proportional
- described load
- 300W total
-
Exo Terra PT2459 600W Dimming & Pulse Proportional Thermostat
Exo Terra
A 600W day/night thermostat with separate temperature settings, LCD readout, waterproof probe, and selectable dimming/pulse proportional control.
- Dimming and pulse proportional modes in one controller
- Separate daytime and nighttime temperature settings
- 600W described capacity for heat mats, ceramic heaters, and heat bulbs
- Control mode
- Dimming + pulse proportional, day/night
- described load
- 600W total
Review the linked product page before purchasing.
My practical picks
- Best value for one overhead lamp: REPTIZOO TC02, if 300W is enough and the heater is compatible with dimming.
- Best budget choice for a heat mat: BN-LINK 1000W, when straightforward on/off control is all you need.
- Best established on/off controller: Zoo Med ReptiTemp RT-600, for the alarm, memory, and reptile-specific documentation.
- Best flexible single-source controller: Exo Terra PT2461, when you need selectable dimming and pulse modes and can accept a higher price.
Match the Control Mode to the Heater
The manufacturer Exo Terra’s explanation of on/off, dimming, and pulse proportional control is a useful technical primer. The mode changes how power reaches the heater, so the heat source—not the controller’s biggest wattage label—should drive the decision.
If the temperature display on an egg incubator is cycling, compare the incubator and egg-container readings before choosing another controller. A steadier cabinet-air display does not establish what the eggs experience, and a built-in incubator heater may not be compatible with external power switching.
| Heat source | Best starting mode | Why | What to avoid |
|---|---|---|---|
| Visible halogen or incandescent bulb | Dimming | Output is reduced gradually as the target is approached, keeping the lamp visibly on during the photoperiod. Arcadia recommends a suitable dimming thermostat for its halogen lamps. | Repeated on/off or pulse switching as the normal control method; it can create visible flicker and stress a filament. |
| Deep heat projector (DHP) | Dimming | A DHP is an overhead lamp-style heater. Arcadia says to use it with a thermostat and that dimming gives precise thermal-gradient control. | Assuming “no visible light” means every controller mode is interchangeable. Check the DHP and thermostat instructions together. |
| Ceramic heat emitter (CHE) | Pulse proportional when supported; on/off can work | A CHE is lightless, so controlled power pulses are not visible. On/off is acceptable when the enclosure’s swing and the controller’s instructions fit the species. | Household dimmers, unguarded fixtures, or a controller not rated for the ceramic heater. |
| Heat mat | On/off as the simple baseline; pulse if explicitly compatible | A mat is a localized, lightless resistive heater. Straightforward cycling is often sufficient when the warm hide is measured correctly. | Covering the whole floor or treating a manual heat-mat dial as a thermostat. |
Why “1000W” is not a quality score
A controller rated for 1,000W may still be the wrong choice for a 75W visible basking lamp if it only switches fully on and fully off. Conversely, a 300W dimming controller can be the better tool for one 50W DHP or one 75W halogen bulb. Load capacity matters for electrical safety, but it does not tell you whether the output pattern suits the heater.
For North American equipment, also confirm 120V/60Hz compatibility. A 230V controller is not interchangeable with a US model simply because the plug looks similar; use the manufacturer’s electrical specifications.
The Best Reptile Thermostats by Use Case
1. REPTIZOO TC02 — Best Value Dimming Thermostat
Best for: One compatible halogen, incandescent bulb, or DHP up to the controller’s 300W limit
Check current price on Amazon →Why it fits
The TC02 is the most accessible dimming option in this comparison. Product documentation describes a PID-style dimming controller, digital display, memory function, Fahrenheit/Celsius selection, a 300W maximum load, and a control range of 41–140°F. That combination makes it a sensible value match for a single overhead heat source when the lamp and fixture are explicitly compatible.
It is especially useful for a visible halogen bulb because the thermostat can reduce output without repeatedly extinguishing the lamp. It is also a logical DHP pairing, but “dimming” alone does not prove compatibility with every DHP. Use the heater manufacturer’s instructions and verify the basking surface with an infrared thermometer.
Pros:
- Lowest-cost dimming option in this comparison
- Clear digital display, memory function, and adjustable unit selection
- 300W is ample for many single-lamp reptile enclosures
Cons:
- No selectable pulse mode or built-in day/night timer
- the product documentation says not to use it with a sunlamp; do not treat mercury-vapor or UV-producing bulbs like ordinary dimmable basking lamps
- the product documentation instructs users to keep the probe away from the heat source, so placement must follow its manual rather than a generic diagram
Bottom line: This is the best value when you need dimming for one compatible overhead heater and are comfortable doing the final temperature verification yourself.
2. BN-LINK 1000W — Best Budget Heat-Mat Thermostat
Best for: A defined warm hide or heat-mat setup that needs simple digital on/off control
Check current price on Amazon →Why it fits
The BN-LINK is the straightforward budget route for a mat-only setup. Product documentation describes a 40–108°F range, a 1,000W maximum heating load, a remote probe, three-button programming, a 120VAC/60Hz rating, and ETL certification.
The 1,000W figure is not the reason to buy it. Most reptile heat mats use a small fraction of that capacity. The reason to choose this model is the low price and simple probe-based on/off control. It is not a dimming or pulse proportional thermostat, so it is not the normal choice for a visible basking bulb.
Pros:
- Simple programming and a long remote probe
- Easy fit for a single heat mat when the expected temperature swing is acceptable
Cons:
- Full-power cycling can create wider swings than proportional control
- No dimming, pulse mode, day/night schedule, or high/low alarm
- the product documentation covers several heating applications, so confirm the thermostat model and the live load details
Bottom line: Choose it for an uncomplicated heat mat, not as a universal controller for every heater in the terrarium.
3. Zoo Med ReptiTemp RT-600 — Best Established On/Off Controller
Best for: Keepers who want an established reptile brand, an alarm, and memory after a power interruption
Check current price on Amazon →Why it fits
Zoo Med’s official RT-600 product page lists a 50–122°F control range, a six-foot remote sensor, up to 600W of heating devices, memory after power failure, and an alarm when the temperature reaches an extreme high or low. That makes it more feature-complete than a bare plug controller.
The RT-600 is still an on/off thermostat. It is a good fit for a heat mat or a compatible lightless heater when the enclosure’s cycling pattern works for the species. It is not a dimming controller for a visible basking bulb, and its established brand name does not change that electrical behavior.
Pros:
- Clear manufacturer documentation and a reptile-specific product line
- Six-foot sensor cable, memory, and high/low temperature alarm
- 600W heating capacity is enough for many single-source setups
Cons:
- No dimming or pulse proportional mode
- No built-in day/night light timer
- More expensive than the BN-LINK despite using the same basic on/off control pattern
Bottom line: Pay for the clearer reptile-specific feature set and alarm—not for a control mode it does not have.
4. Exo Terra PT2461 300W — Best Flexible Single-Source Controller
Best for: One carefully matched heat mat, CHE, DHP, or incandescent bulb when you genuinely need selectable dimming and pulse modes
Check current price on Amazon →Why it fits
The PT2461 is the most flexible single-output controller here. Product documentation describes selectable dimming, pulse proportional, and on/off modes, a waterproof remote probe, a recessed dial, a 64–100°F setting range, and support for heat mats, heat cables, ceramic heaters, and incandescent bulbs up to 300W. The North American operating instructions spell out that dimming is the preferred setting for incandescent or infrared heat bulbs and provide the model-specific probe examples.
That flexibility is useful only if you know why you need it. A small heat-mat enclosure does not automatically benefit from a more complicated controller. For a keeper who may move between a lightless CHE and a compatible overhead lamp, however, the mode selector is a real advantage.
Pros:
- Dimming, pulse, and on/off modes in one controller
- Waterproof probe and recessed control to reduce accidental changes
- 300W limit suits many single-lamp or single-emitter setups
Cons:
-
High price for one heat mat
-
The controller still cannot make an incompatible bulb or fixture safe
Bottom line: This is the best technical fit when you want one 300W controller that can be configured for different compatible heat-source types over time.
5. Exo Terra PT2459 600W — Best High-Capacity Multi-Mode Option
Best for: A larger or more demanding setup where the 600W class and separate day/night settings are genuinely useful
Check current price on Amazon →Why it fits
The PT2459 gives you selectable dimming and pulse proportional control, separate day and night temperature settings, an LCD readout, a waterproof probe, a light sensor, and a described 600W capacity. Exo Terra’s 600W product page describes the model family as suitable for heat mats, ceramic heaters, and heat bulbs.
That does not make the PT2459 a bad controller, but it does make it a poor default recommendation for a small enclosure.
Pros:
- Dimming and pulse proportional modes in one controller
- Separate day/night temperature settings and light sensor
- 600W capacity for setups that truly need it
- Waterproof probe and a clear LCD readout
Cons:
-
Highest price in the comparison
-
More capacity adds no husbandry benefit if your heater is only 50–100W
Bottom line: Buy it for a specific high-capacity or multi-mode requirement, not because “600W” sounds more professional.
What to Buy for Each Heater
For a halogen basking bulb
Start with the REPTIZOO TC02 for a budget single-lamp setup, or the Exo Terra PT2461 when selectable modes and a waterproof probe justify the higher price. A visible halogen lamp should normally stay continuously lit during the daytime photoperiod while the thermostat trims its output. Arcadia’s halogen guidance specifically recommends a suitable dimming thermostat.
Do not use the BN-LINK or Zoo Med RT-600 simply because their load rating is higher. Their on/off relays do not provide the same control pattern as a dimming controller. Use a timer or properly configured day/night function to turn visible light off at night.
For a deep heat projector
Pair a DHP with a compatible dimming thermostat. The TC02 is the value path for one source; the PT2461 or PT2459 makes sense when you need selectable modes or separate day/night settings. Arcadia’s DHP guidance says the lamp needs a thermostat, recommends dimming for precise thermal-gradient control, and calls for a non-contact infrared temperature check.
The thermostat cannot tell you whether the basking surface, branch, or hide is actually at the species-appropriate temperature unless the probe is installed exactly as the controller expects. Measure the usable surface separately.
For a ceramic heat emitter
A CHE is lightless and often used for supplemental or nighttime heat. The Exo Terra PT2461 or PT2459 can be configured for pulse proportional control when the emitter and controller instructions allow it. The Zoo Med RT-600 is a simpler on/off option. Zoo Med describes its ReptiCare Ceramic Infrared Heat Emitter as a 24-hour, non-light-emitting heat source and specifies a ceramic-socket fixture.
The CHE and its fixture become extremely hot. Use a ceramic-rated socket, an appropriate guard, correct clearance from plastic and decor, and a secured probe. “No visible light” does not mean “safe to leave unguarded.”
For a heat mat
Choose the BN-LINK for the lowest-cost simple controller or the Zoo Med RT-600 if the alarm, memory, and reptile-specific documentation are worth the extra cost. The PT2461 is technically capable, but its extra modes may be unnecessary for a single mat.
Mount the mat only as its manufacturer instructs, usually outside a glass enclosure, and control a defined warm area rather than the whole floor. The MSD Veterinary Manual’s housing guidance says under-tank heaters should cover no more than about 30% of the available enclosure space so the reptile can move away from the heat.
Probe Placement and Verification
The controller display is not a complete temperature audit. It reports the temperature at its own probe, while an infrared thermometer reads a surface and a separate digital gauge reads air at a different point.
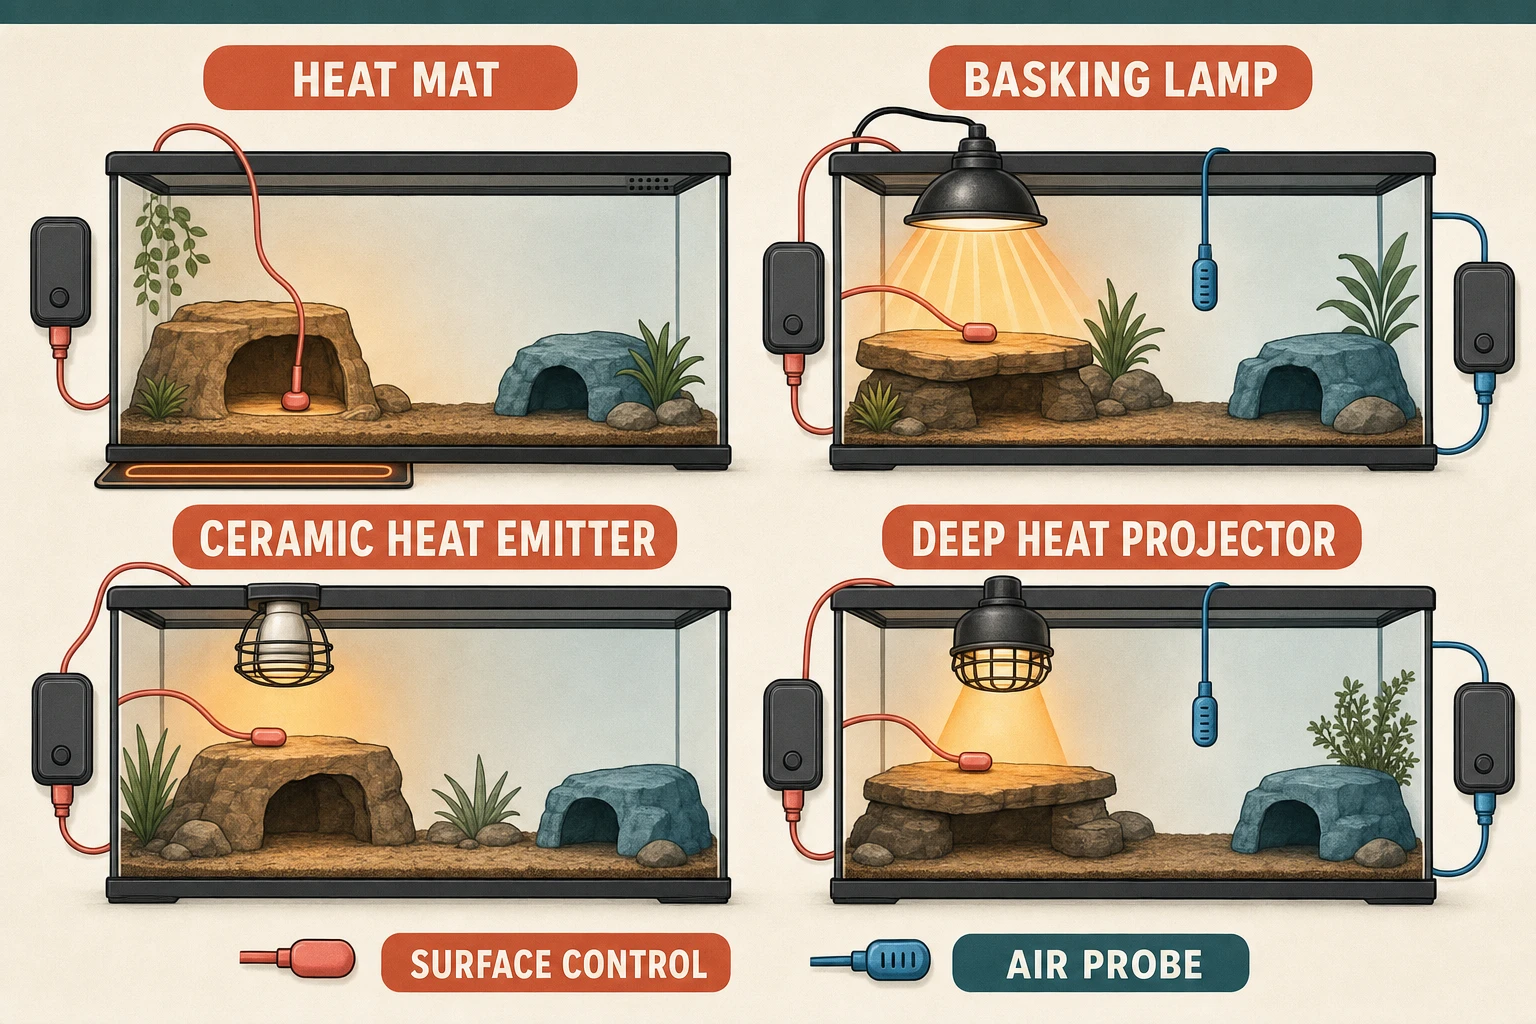
The correct probe point is controller-specific. The probe should be secured where the manual says the set point is measured, and the actual basking surface and cool side should still be checked independently.
Use this commissioning sequence before the reptile enters the enclosure:
- Choose the heater and controller mode together. Write down the exact heater model, wattage, voltage, and the thermostat mode you intend to use.
- Install the guard and fixture first. The animal must not be able to touch a halogen bulb, DHP, CHE, hot reflector, or exposed cable.
- Place the probe according to the manual. For a heat mat, that may be the warm-hide surface. For an overhead source, the controller may specify a basking surface or suspended air beside the lamp. Do not copy a position from a different model.
- Secure the probe against movement and chewing. Check it after cleaning, rearranging decor, or changing substrate.
- Run the enclosure empty for at least a full day. Measure the basking surface with an infrared thermometer and use independent probes at the warm and cool ends. The MSD guidance recommends at least two thermometers for the gradient.
- Adjust one variable at a time. Change the thermostat set point, lamp height, wattage, or ventilation separately, then wait for the enclosure to stabilize before taking another reading.
If the thermostat number looks safe but the basking surface is too hot, inspect the probe position, controller mode, and heat-source compatibility before simply lowering the set point. For model-specific examples, see our reptile thermostat probe-placement guide.
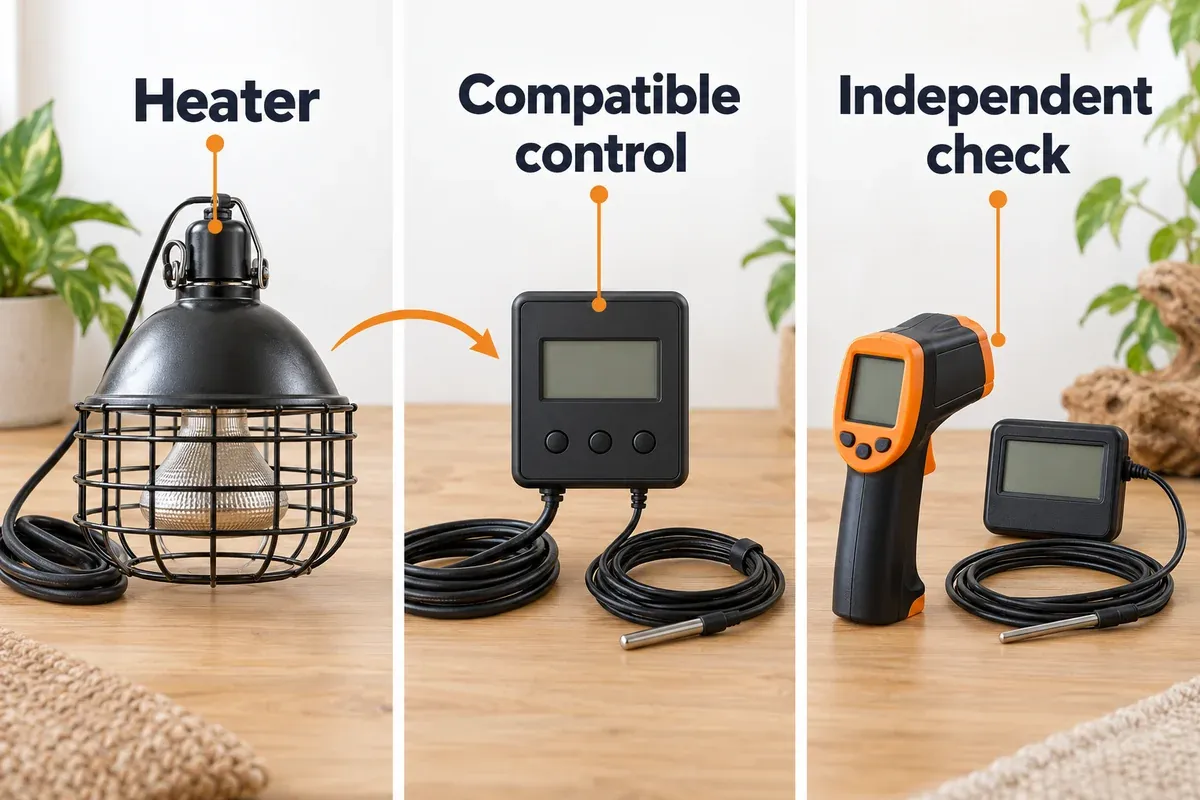
The three equipment groups below work together: the heater supplies heat, the compatible controller regulates it, and separate instruments check the result.
Common Buying and Setup Mistakes
Buying by wattage alone
The controller’s maximum wattage is an electrical limit, not a temperature-quality rating. A 1,000W on/off controller is not a better halogen controller than a 300W dimming model.
Using a household dimmer
A wall dimmer changes electrical output but does not read enclosure temperature, provide a safe probe, or shut the heater down at the target. It is not a reptile thermostat.
Controlling two unrelated zones with one probe
One probe cannot independently regulate a heat mat under one hide and an overhead lamp over another zone. A single controller may power only the exact compatible heater plan it is designed to control; separate thermal zones generally need separate control channels.
Leaving a visible bulb on overnight
A thermostat controls heat, not automatically a healthy photoperiod. Turn visible lamps off at night with a timer or day/night controller. If the species needs nighttime heat, use a suitable lightless source instead of a glowing “night bulb.”
Measuring only air or only the basking surface
Overhead radiant heat can make a slate, branch, or hide surface much hotter than the nearby air. A heat mat can warm the hide floor without producing the same air temperature as a CHE. Measure both the surface and the air at the points the reptile uses.
Ignoring the US voltage version
The same model family may exist in 110–120V and 220–240V versions. Confirm the North American model on Amazon.com and in the manufacturer’s manual before connecting a heater.
Frequently Asked Questions
What is the best reptile thermostat for a halogen bulb?
A compatible dimming thermostat is the best starting point. The REPTIZOO TC02 is the value option for one lamp under 300W; the Exo Terra PT2461 adds selectable modes and a waterproof probe. Confirm that the exact bulb, fixture, controller, and North American voltage are compatible.
What is the best thermostat for a DHP?
Use a compatible dimming thermostat and verify the basking surface with an infrared thermometer. The REPTIZOO TC02 is the budget path for one source; the Exo Terra PT2461 or PT2459 is more flexible when the additional modes and day/night settings solve a real need.
Can I use an on/off thermostat with a ceramic heat emitter?
Often, yes, if the CHE and controller are compatible and the enclosure’s temperature swing is acceptable. Pulse proportional control can provide steadier regulation for a lightless resistive heater. Follow the controller’s instructions and use a ceramic-rated fixture and guard.
Can I use a dimming thermostat with a heat mat?
Only when the controller explicitly supports that heater and mode. A heat mat does not need a dimming thermostat by default; a properly rated on/off thermostat is often simpler to understand and verify. Never choose a mode solely because it sounds more advanced.
Where should the thermostat probe go?
Follow the exact controller manual. A heat-mat controller may regulate the warm-hide surface, while an overhead-lamp controller may specify a basking surface or suspended air. Secure the probe and measure the real basking and cool-side temperatures separately. The existing probe-placement guide shows the distinction in detail.
Do I need a thermostat if my heat source has a built-in temperature control?
For reptile enclosures, do not assume that a manual dial or a heater’s generic “temperature control” provides the same protection as a probe-based thermostat. The enclosure, substrate, airflow, and decor change the result. Use a properly matched thermostat and verify the temperatures where the animal actually rests.
Final Recommendation
Start with the heater, not the product badge. For a visible halogen or DHP, choose compatible dimming control. For a heat mat, choose a simple on/off thermostat unless you have a reason to use pulse control. For a CHE, pulse proportional control can be a useful upgrade because the heater is lightless.
For most single-source US setups, the REPTIZOO TC02 is the best value for dimming and the BN-LINK is the best budget route for a heat mat. Choose the Zoo Med RT-600 when its alarm and established documentation matter more than price. Move to the Exo Terra PT2461 or PT2459 only when selectable modes, day/night settings, waterproof probing, or the higher load class solve a specific problem.
Sources and Further Reading
- MSD Veterinary Manual: Management and Husbandry of Reptiles
- MSD Veterinary Manual: Providing a Home for a Reptile
- Exo Terra: On/Off, Dimming or Pulse Proportional?
- Exo Terra: PT2461 North American operating instructions
- Exo Terra: 600W Dimming & Pulse Proportional Thermostat
- Zoo Med: ReptiTemp Digital Thermostat
- Zoo Med: ReptiCare Ceramic Infrared Heat Emitter
- Arcadia Reptile: Halogen Infrared Heater
- Arcadia Reptile: Deep Heat Projector