

 Published sources
 Product details checked
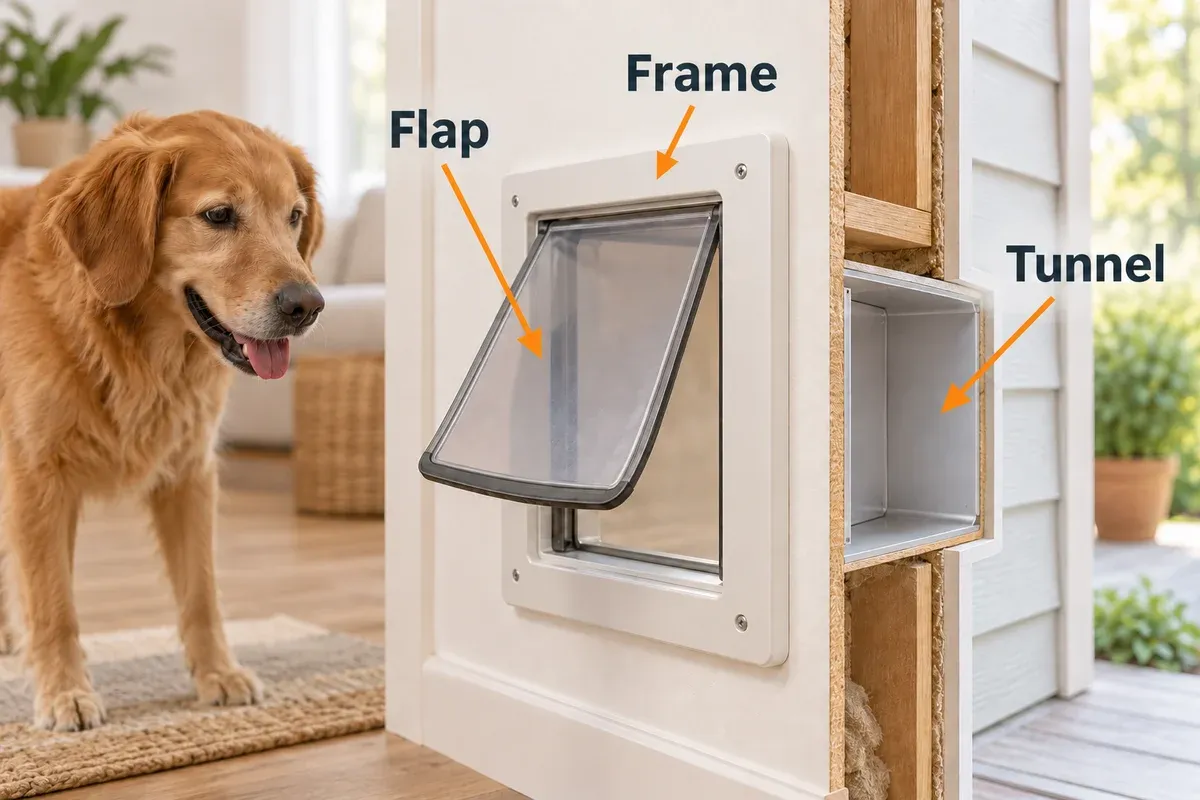
A dog door can let in a surprising amount of cold air even when its flap appears closed. The leak may be at the bottom magnet, around the fixed frame, through a wall tunnel, or at a warped cutout. Those are four different repairs, and a new flap will not fix a gap in the wall.
Quick answer: Run a tissue test around the closed door before buying anything. If the air enters at the moving flap, clean and adjust the magnet or replace the flap with the exact model and size. If the air enters around the fixed frame, use measured weatherstripping or caulk there. If the cold line runs through a wall, correct the tunnel depth and seal the stationary rough opening. Automatic and microchip doors need model-specific parts so a repair does not interfere with the lock or sensor.
This guide is for a dog door you already installed. It connects manufacturer instructions from PetSafe, Ideal Pet Products, and the [U.S. For a full comparison before replacing the entire system, see our guide to automatic dog doors.
You will learn how to:
- locate the exact draft path instead of guessing;
- distinguish a moving-flap seal from a fixed-frame or wall-tunnel gap;
- measure a replacement flap before ordering;
- choose between OEM, aftermarket, and generic sealing products; and
- recognize when an electronic door needs a manufacturer-specific repair.
Parts matched to the leak path
-
PetSafe Original Replacement Pet Door Flap, Large
PetSafe
A soft tinted replacement flap with a bottom magnetic closure and five top mounting holes for compatible PetSafe doors.
- Large flap opening described as 10 1/8 x 16 7/8 inches
- Magnetic closure and adjustable top mounting holes
- Fits described PetSafe Extreme Weather, Wall Entry, Freedom, patio-panel, and plastic doors
- Best for
- OEM replacement for compatible large PetSafe doors
- Key feature
- See product page
-
MIAOTONG Weather-Resistant Replacement Flap for PetSafe PAC11-11039
MIAOTONG
An aftermarket large flap marketed for the PetSafe Freedom/PAC11-11039 opening, with flexible weather-resistant material and a magnetic closure.
- described size is 10 1/8 x 16 7/8 inches
- Aftermarket alternative to the PetSafe-branded flap
- Best for
- Lower-cost replacement when the exact PetSafe-compatible dimensions are confirmed
- Key feature
- Budget aftermarket flap for a measured large opening
-
Ideal Pet Products Clear Vinyl Original Replacement Flap, Extra Large
Ideal Pet Products
A model-specific clear-vinyl replacement for the Ideal extra-large original flap; it is not a universal dog-door insert.
- described flap size is 10.25 x 15 inches
- Clear vinyl preserves light through the flap
- Ideal publishes replacement sizing guidance for measuring the existing flap
- Best for
- Existing Ideal doors that use the extra-large clear-vinyl original flap
- Key feature
- See product page
-
VITAM AMO Weather Stripping Seal Strip, 18 Feet
VITAM AMO
A self-adhesive foam seal for fixed gaps around a frame or tunnel trim—not a replacement for the moving flap or its magnet.
- 18-foot roll that can be cut to the measured sections
- described gap range is 5/16 to 15/32 inch
- Low-cost way to test a stationary frame-gap hypothesis
- Best for
- Stationary frame or tunnel-trim gaps after measuring a 5/16- to 15/32-inch gap
- Key feature
- See product page
-
PetSafe Wall Entry Pet Door Extension Tunnel, Medium
PetSafe
A model-specific aluminum extension tunnel that bridges a wall depth and can be cut shorter within the described range.
- Designed for compatible PetSafe Wall Entry doors
- Medium tunnel can be cut for 7.25- to 8.25-inch walls as documented
- Addresses an incomplete or too-short wall tunnel rather than a bad flap
- Best for
- A compatible PetSafe Wall Entry door installed through a medium-thickness wall
- Key feature
- Model-specific wall-depth extension
-
3-Panel Airseal Pet Door Replacement Flap, Extra Large
3-Panel Airseal
An aftermarket three-panel replacement marketed for a specific Ideal extra-large opening, with spare rubber strips for a draft-focused repair.
- Three-panel design creates more than one closing layer
- Marketed for an Ideal 10.25 x 15.75-inch extra-large opening
- Includes four replacement rubber strips as documented
- Best for
- An exact-fit Ideal 10.25 x 15.75-inch opening where a multi-panel replacement is appropriate
- Key feature
- Exact-fit aftermarket multi-panel draft upgrade
Review the linked product page before purchasing.
Start With a Two-Minute Draft Test
Do not begin by sticking foam around every edge. First find the path the air is taking. Close the flap as it normally sits, turn off nearby fans, and hold a narrow strip of tissue or toilet paper near the suspected joint. Movement shows airflow without the fire risk of a candle or lighter.
Test these places separately:
- The bottom edge: Check whether the flap magnet meets the threshold magnet all the way across.
- The side edges: Look for a curled flap, a torn corner, or a flap that is not hanging square.
- The fixed frame: Move the tissue around the trim, screw heads, and the joint between the pet door and the human door or wall.
- The tunnel: On a wall installation, check both ends of the tunnel and the area where the rough opening meets the wall finish.
- The lock and sensor path: On an electronic door, confirm that the flap fully closes and that no added material touches the latch, hinge, antenna, or sensor.
Mark the leaking section with painter’s tape. A cold draft is much easier to repair when you can say “the lower left frame corner” or “the empty two inches at the end of the wall tunnel” rather than “the dog door feels cold.”
| What you notice | Most likely source | First repair direction |
|---|---|---|
| Air enters below a flap that otherwise hangs square | Magnet contact, seasonal shrinkage, dirt, or a worn flap | Clean and adjust the flap; replace it if it is curled, cracked, or hardened |
| Air enters along one side of the flap | Wrong size, warped flap, or misaligned mounting holes | Recheck the model and hole pattern; install a compatible replacement |
| Air enters around the outside of the frame | Fixed gasket, screw, trim, or rough-opening gap | Tighten and realign the frame; seal only the stationary joint |
| The tunnel feels like a cold tube | Wall depth, missing extension, or unsealed rough opening | Fit the correct tunnel extension and seal around the fixed opening |
| The flap closes but an automatic door still leaks or will not lock | Hinge, latch, sensor, power, or model-specific flap assembly | Follow the manufacturer’s service instructions; do not add a random magnet or strip |
The cutaway below separates the moving flap, fixed frame and tunnel so you can match the leak to the right part.
1. Fix the Moving Flap First
The flap is the part that must move freely and then close against a controlled seal. That makes it a poor place for generic adhesive weatherstripping. A strip that seems to block air can add drag, stop the flap from reaching its magnet, or interfere with an electronic lock.
Clean, square, and adjust the original flap
Remove hair, dust, ice, and sticky residue from the flap and threshold. Check that the flap is not rubbing the side frame. If it has an adjustable mounting track, loosen the screws just enough to realign it, then confirm that the lower magnet meets the threshold magnet evenly. The PetSafe flap-adjustment guide specifically calls out seasonal temperature changes, magnet contact, vertical and horizontal adjustment, and the need to eliminate side gaps.
Open and release the flap several times. It should swing without catching and settle into the same position each time. If it closes only when pushed by hand, the problem is not solved by adding another magnet: the flap may be distorted, the frame may be bowed, or the door may be out of square.
Replace a flap that cannot hold its shape
Replacement is sensible when the vinyl is split, permanently curled, brittle, stretched around the screw holes, or no longer seals after careful adjustment. Before ordering, record all of the following:
- the door brand and exact model;
- the visible flap width and height;
- the opening size the dog actually passes through;
- the number and spacing of top mounting holes;
- the flap thickness and whether it has one, two, or three panels; and
- the position of magnets, hinge pins, or a proprietary latch.
The Ideal replacement-flap guide is a good example of why “Large” is not enough. Ideal lists multiple flap dimensions and tells owners to measure the existing flap. PetSafe also publishes model-specific replacement part numbers in its Extreme Weather installation guide.
PetSafe Original Replacement Flap — strongest default for a compatible large PetSafe door
The PetSafe Original Replacement Flap, Large is the safest first check when the installed door is a compatible PetSafe model and the old flap matches the described 10 1/8 x 16 7/8-inch opening.
Use this when the flap itself is the failure. Skip it if the tissue test shows air at the fixed frame, the frame is bowed, or the opening and screw pattern do not match.
Check current price on Amazon →MIAOTONG Replacement Flap — budget aftermarket option for a measured PAC11-11039 opening
The MIAOTONG replacement flap is marketed as compatible with the PetSafe Freedom/PAC11-11039 size. That makes it a reasonable lower-cost experiment when the dimensions and holes match exactly.
It is an aftermarket part, so compare the old flap side by side before removing it. Skip it if you need a guaranteed OEM fit, if the magnet position differs, or if your door is an automatic model with a proprietary locking assembly.
Check current price on Amazon →Ideal clear-vinyl flap — for the matching Ideal door family
Measure your installed flap and match the original panel design before ordering.
This is a good choice when an existing Ideal door is structurally sound and its clear vinyl has become hard or wavy. Skip it if your door uses a three-panel weather system, a different Ideal family, or a sensor-controlled flap that requires an assembly rather than a loose insert.
Check current price on Amazon →Three-panel replacement — only for an exact compatible opening
The 3-Panel Airseal replacement is marketed for an Ideal 10.25 x 15.75-inch extra-large opening and includes spare rubber strips. Multiple closing layers can help in a windy location, but only if the frame and opening are designed for them.
Do not treat this as a universal “add a second flap” kit. Skip it if the extra panel would narrow the passage, drag on the existing flap, or block a lock or sensor. A three-panel system is a replacement design, not loose material to hang in front of any door.
Check current price on Amazon →2. Seal the Fixed Frame, Not the Flap
The Department of Energy makes a useful distinction: weatherstripping is for moving components such as doors and operable windows, while caulk is for cracks and openings between stationary components. Apply that logic to a dog door. A removable foam strip may suit a fixed trim edge; it does not automatically belong on the flap that your dog pushes through.
Use a measured strip on a stationary gap
It is marketed for gaps from 5/16 to 15/32 inch. That makes it useful for a test on a fixed frame-to-trim or tunnel-to-trim gap after you measure the gap with the door closed.
Cut separate pieces for the top and sides rather than wrapping one long strip over a corner. Clean and dry the stationary surface, apply the strip without stretching it, and close the flap slowly. If the moving part rubs, remove it. Do not install it on the flap, threshold, hinge, latch, or sensor path.
Check current price on Amazon →When caulk or a new gasket is the better repair
If the draft comes from a stable perimeter joint, a compatible exterior/interior sealant or a manufacturer-approved gasket is usually more durable than exposed foam. Remove loose old material, keep the dog-door frame aligned, and seal the joint between stationary pieces only. Do not bury adjustment screws or create a bead that the flap must scrape across.
For PetSafe panel inserts, the manufacturer support page describes pre-beaded butyl sealant around the outer frame and adjustable flap magnets. That is a useful model for the repair: the frame seal stays fixed, while the flap must remain free to swing and adjust.
If tightening the screws changes the gap from one side to the other, stop and inspect the opening. The PetSafe troubleshooting guidance for a stuck or closing flap warns that an opening that is too small can bow the frame and stop the flap from moving freely. More sealant will not straighten a distorted frame.
3. Repair a Cold Wall Tunnel
A wall-mounted dog door has another cold-air path: the tunnel itself. If the draft feels like a cold stream through the center of the opening, check whether the tunnel reaches the exterior trim, whether its joints overlap, and whether the rough opening is sealed around the outside of the tunnel.
Add depth only with the correct model-specific extension
The PetSafe Wall Entry Extension Tunnel, Medium is an aluminum extension for compatible PetSafe Wall Entry doors. Its described medium-wall range is 7.25 to 8.25 inches, and it can be cut shorter within that design.
This is useful when the installed tunnel is too short for the wall and leaves an exposed cavity or trim gap. It is not a universal sleeve. Skip it unless the door family, size, wall depth, and screw or slide connection all match.
Check current price on Amazon →Seal around the rough opening without blocking the passage
Once the tunnel is correctly supported, seal the stationary gap between the tunnel or frame and the wall finish. A backer rod, a compatible caulk, or a low-expansion product intended for the surrounding construction can be appropriate depending on the wall materials. Keep every sealant, insulation fiber, and loose offcut outside the dog’s passage.
Do not pack fluffy insulation into the tunnel where claws can pull it loose. Do not spray expanding foam against a moving flap, hinge, latch, or removable tunnel joint. The goal is an airtight building envelope around the pet door, not a narrower or sticky pet passage.
4. Automatic and Microchip Doors Need a Separate Rule
An electronic dog door can look like it has a draft problem when the real issue is that its flap never completes the lock cycle. Check batteries or power, sensor alignment, hinge pins, the frame, and the manufacturer’s error indicators before adding any material.
For the PetSafe SmartDoor Connected Pet Door, the official replacement instructions describe replacing the flap assembly and keeping the weatherstripping between the flap halves. The instructions also tell owners to check that a locked flap cannot move and that the weatherstripping makes a good seal. That is very different from sticking a generic strip onto the outside of a moving flap.
Use the exact replacement assembly when the door has a proprietary hinge, latch, magnet, or microchip reader. If the door closes fully but the frame leaks, repair the stationary frame. If it does not close, unlock, or recognize the pet, repair the door’s closing system first. If your current unit is fundamentally too exposed to wind or lacks the access control you need, compare complete systems in our automatic dog-door guide rather than trying to retrofit a random flap.
Choose the Repair by the Failure Point
The shortest useful decision tree is:
| Draft path | Buy or repair | Do not buy first |
|---|---|---|
| Moving bottom or side of flap | Exact OEM or measured compatible replacement flap | Generic foam strip or extra magnets |
| Fixed frame-to-trim joint | Measured weatherstrip, gasket, or compatible caulk | A new flap with different holes |
| Wall depth or exposed tunnel end | Exact tunnel extension plus stationary rough-opening seal | Loose insulation stuffed inside the tunnel |
| Automatic door fails to latch | Model-specific flap assembly, hinge, sensor, or power repair | A strong magnet, tape, or material over the lock path |
| Cold air during long periods when the dog door can stay closed | Manufacturer closing panel or a properly designed secondary barrier | Blocking the door while the dog still needs access |
If the threshold is high or your dog is older, make sure the repair does not create a sharp lip. A dog that slips or hesitates at the entrance may need a safer transition; our large-dog ramp guide and ramp refusal diagnosis cover traction and height separately.
What Not to Do
- Do not put weatherstripping on a moving flap by default. Test for rubbing and lock interference before adding anything near the moving part.
- Do not choose by “Small,” “Medium,” or “Large” alone. Door brands use different opening sizes, hole patterns, and panel systems.
- Do not overpower a magnetic closure. A stronger magnet can keep an automatic flap from opening or distort the seal.
- Do not fill the pet passage with spray foam, loose insulation, towels, or hanging plastic. These materials can break loose, trap moisture, or make a dog reluctant to pass.
- Do not seal over adjustment screws, drainage paths, hinges, sensors, or latches. A draft repair should not turn routine maintenance into a full replacement.
- Do not ignore a bowed frame. If the flap sticks, the door opening may need correction before any seal is applied.
Frequently Asked Questions
Why is my dog door still drafty after I replaced the flap?
The leak may be around the fixed frame or through the wall tunnel rather than through the new flap. Repeat the tissue test at the bottom, sides, frame perimeter, and tunnel ends. Also check that the new flap is the correct size and that its magnet actually meets the threshold.
Can I put weatherstripping on the dog door flap?
Usually no. Weatherstripping is best used on a fixed frame or trim gap where it cannot interfere with movement. A moving flap needs its intended flexible material, magnet, hinge, and clearance. For an automatic or microchip door, follow the manufacturer’s replacement instructions instead of modifying the lock path.
How do I know whether I need a new flap or a whole new dog door?
Replace only the flap when the frame is square, the lock works, the opening is correct, and the draft follows the worn panel. Consider the whole door when the frame is bowed or cracked, the tunnel cannot be sealed, the model has no supported replacement part, or the door no longer provides the security and access control you need.
Does a tunnel extension insulate a wall-mounted dog door?
It can close a wall-depth mismatch and reduce an exposed gap, but it is not insulation by itself. The stationary rough opening still needs a suitable seal around the outside, and the tunnel must remain stable and unobstructed.
Why does cold weather make the flap leak?
Vinyl can change shape with temperature. PetSafe’s Extreme Weather manual notes that vinyl flaps can shrink in cold conditions and expand when warm. Recheck magnet contact and adjustment after a temperature change; replace the panel if it has taken a permanent curl or no longer seals.
Should I add a second flap for a windy location?
Only if the door is designed for a multi-panel system or the manufacturer provides a compatible closing panel. PetSafe’s Extreme Weather support page describes its own three-flap system and closing panel; that does not make a random second flap safe for another door. Any added layer must leave enough clearance for the dog and, on an automatic door, the lock and sensor.
When should I replace the complete automatic dog door?
Replace or service the complete unit when it will not latch, the frame is cracked or permanently bowed, the sensor or motor fails, replacement assemblies are unavailable, or the door cannot provide the security you need. A product comparison is more useful at that point than layering aftermarket material onto a failing mechanism; start with our automatic dog-door comparison.
Sources and Manufacturer Guides
- U.S. Department of Energy: Energy-Efficient Home Improvement Credit — distinguishes weatherstripping for moving parts from caulk for stationary cracks and openings.
- PetSafe: How to Adjust the Flap — adjustment, magnet contact, and seasonal fit checks.
- PetSafe: Extreme Weather Pet Door Installation Guide — model-specific flap and closing-panel parts.
- PetSafe: SmartDoor Connected Replacement Flap — replacement assembly and automatic-door weatherstripping checks.
- PetSafe: Extreme Weather Troubleshooting — frame bowing, tunnel, magnet, and flap movement checks.
- Ideal Pet Products: Replacement Flap Sizing — measure the existing flap and match the correct size and door family.