

 Published sources
 Product details checked
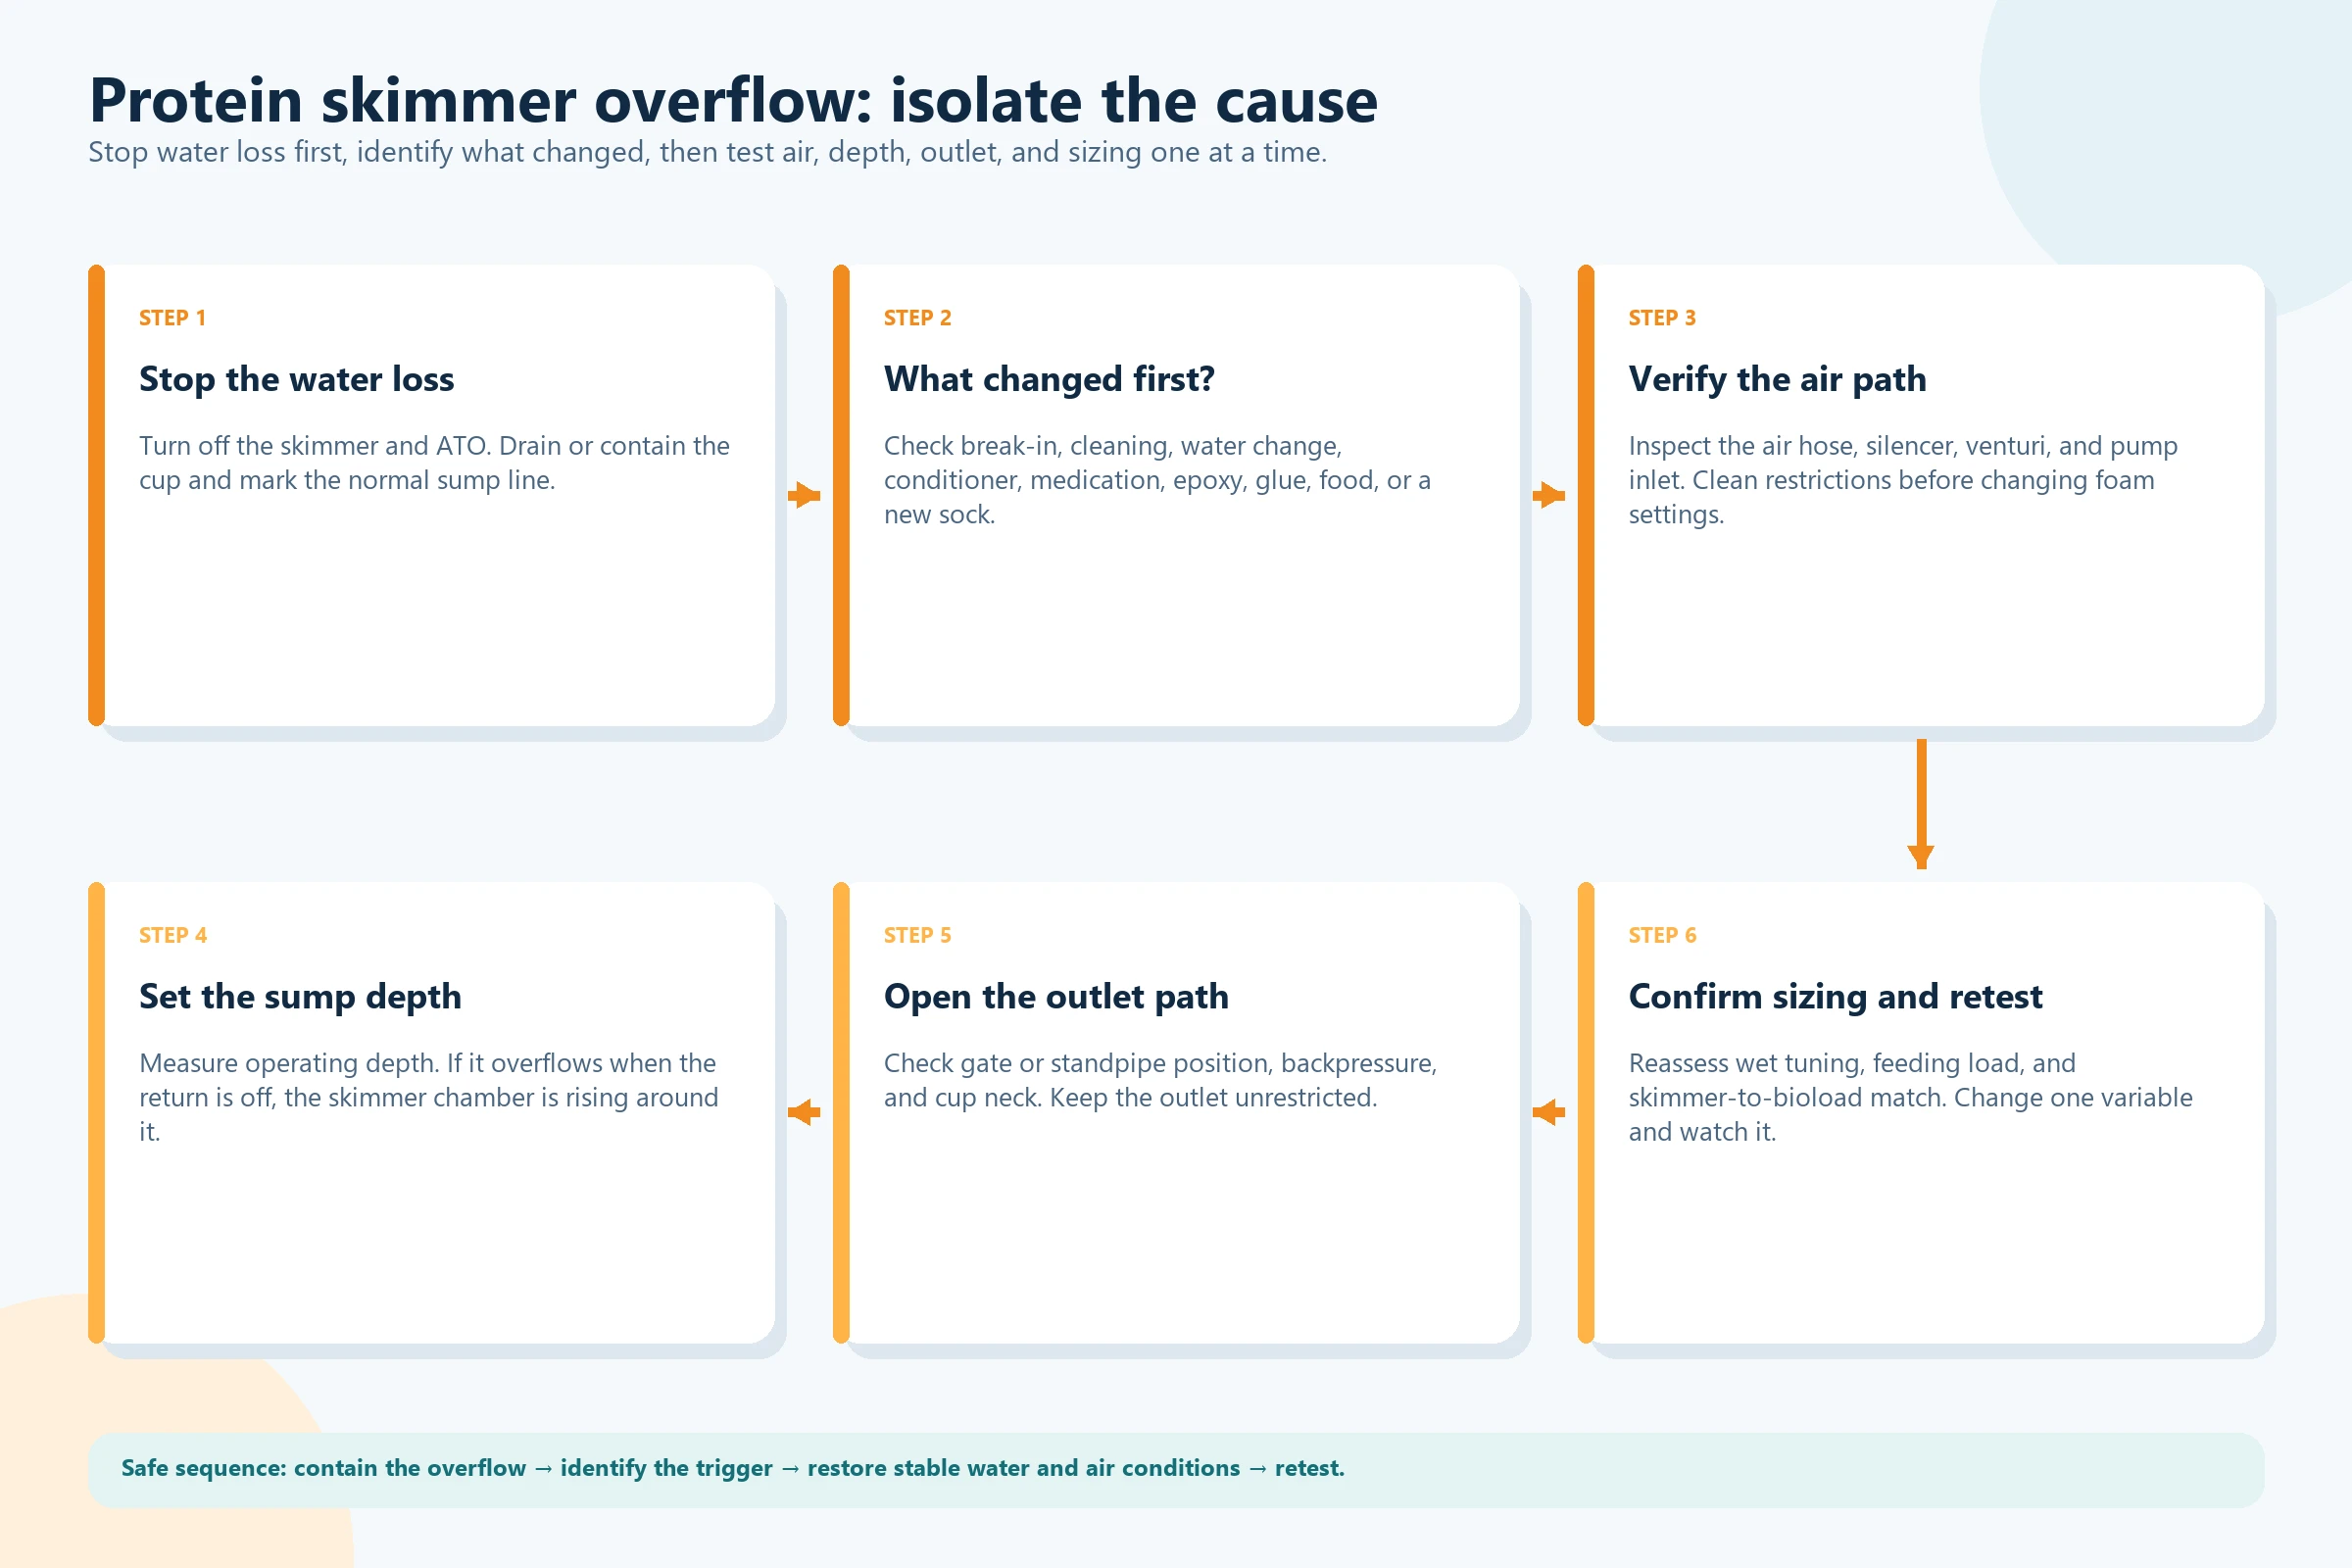
Switch off the skimmer pump if the collection cup is filling uncontrollably. If saltwater is leaving the aquarium through the cup or drain, also pause the automatic top-off (ATO). Empty the cup with the pump stopped, then check the external water depth, outlet and air intake before attempting a supervised restart.
The most useful distinction is whether water is rising too high inside the skimmer or foam is surging upward while the surrounding sump level stays normal. Excessive sump depth and a restricted outlet belong to the first branch. Break-in residues, some additives and disturbed water chemistry belong to the second. A blocked air intake can also change the amount of water the pump moves.
Think back to the last time the skimmer worked normally. Did you stop the return pump, move the skimmer, clean its pump, change water, install a filter sock or add food, medication or coral adhesive? That sequence is more useful than repeatedly turning every adjustment.
This guide focuses on saltwater aquariums with in-sump needle-wheel or pinwheel skimmers. Hang-on and external skimmers need their own installation instructions; the sump-depth examples below apply only to in-sump models.
First: contain the overflow and protect the aquarium
An overflowing cup can send collected waste back into the sump. An open drain leading outside the aquarium can remove saltwater continuously. If an ATO replaces that lost volume with freshwater, the waterline may look normal even while salinity falls.
- Stop the skimmer pump. Use a dry, safely accessible control or power connection. If spilled water has reached a power strip, plug or controller, isolate the affected circuit from a dry location before touching the equipment.
- Pause the ATO during uncontrolled saltwater loss. Leave it disabled while draining aquarium water for troubleshooting. Check the return chamber so that its pump stays safely submerged.
- Empty the cup into a waste container. Clean out accumulated sludge and secure the cup again before running the skimmer. Removing a cup from a running skimmer is not a general overflow remedy.
- Inspect the cabinet and drain route. Find any loose hose, wet connector or leak before restarting. A larger bucket only postpones an overflow if the skimmer is still pumping water into it.
- Maintain circulation and surface movement. Keep the return pump and other circulation running when water levels and electrical equipment are safe. If fish are breathing rapidly or gathering at the surface, restore aeration and seek qualified aquarium or aquatic veterinary help promptly.
Do not leave a freshwater top-off disabled indefinitely without watching the waterline. Once the fault is contained, reconcile water volume and salinity and verify that the ATO can resume safely.
How to use a cup drain safely
The Red Sea REEFER 300/600/900 manual, collection-cup assembly and maintenance sections, describes a valved waste hose for periodic collection and regular emptying of accumulated skimmate. It also calls for a secure cup seal. That arrangement gives you a controlled way to empty the cup; it does not make an open drain safe to leave unattended.
For that type of valved drain, stop the pump, place the hose in a stable waste container, open the valve to empty the cup, then close it and check the hose connection. If your model uses a drain plug instead, follow its removal and refitting instructions. Keep the waste outlet closed during ordinary operation unless you have the manufacturer’s approved external collection arrangement.
A drain used during a supervised foam-removal session needs a secured hose, visible spare container capacity and a way to stop the skimmer immediately. Stay beside it. Stop if the cup rises faster than the drain can empty it, the container approaches its safe limit, the sump level falls or water reaches the cabinet.
Should the collected water go back into the sump?
During fault-finding, discard the collected liquid. This includes watery or almost clear skimmate after a chemical addition. Its appearance does not tell you which dissolved substances it contains. Simplicity’s overflow guidance specifically recommends discarding the collected water when skimming out an unwanted compound.
Returning liquid to the sump also returns whatever the skimmer has collected. Do not pour a cup containing old sludge back into the aquarium or use recirculation to deal with suspected contamination. A model-specific break-in procedure needs to be followed within its stated conditions; it is not permission to recycle waste during every overflow.
Measure the volume removed. When water has been skimmed out or spilled, replace that loss with appropriately mixed saltwater, checked for salinity and temperature. Freshwater replaces evaporation. If the ATO has already added freshwater after a spill, measure the aquarium’s current salinity before making a correction; replacing the missing volume alone may no longer restore the original conditions.
Quick diagnosis: match the symptom to the next check
| What you observe | What it points toward | First useful action |
|---|---|---|
| The skimmer floods as soon as the return pump stops | Higher surrounding sump water | Keep the skimmer off until the return pump restores the normal operating level |
| The skimmer has always been difficult to tune in that chamber | Incorrect external depth or outlet backpressure | Measure from the skimmer’s support surface to the waterline; compare with its exact manual |
| Overflow follows a new installation or major cleaning | Break-in, residue or an assembly change | Check assembly and water depth, then use the model’s starting settings |
| The sump level is unchanged but foam surges after epoxy, food, treatment or a new filter sock | Changed surface chemistry | Check the product instructions and recent additions before retuning |
| Bubbles become weak, coarse or unusually different | Restricted air path, wet silencer or pump problem | Inspect the hose, silencer and venturi with the pump disconnected |
| Water rises despite opening the outlet control | Water cannot leave freely, or the pump’s operating balance has changed | Check the outlet, surrounding depth and air intake before another restart |
| The cup fills slowly with pale liquid without spilling | Wet skimming, light waste production or changing water chemistry | Assess the collection rate and foam setting; colour alone does not prove a size problem |
| There is little consistent foam after the other checks pass | Bioload, sizing or hardware needs further assessment | Compare actual stocking and feeding with the manufacturer’s sizing guidance |
A symptom narrows the search; it does not establish the cause by itself. A water change can alter both sump depth and surface chemistry. A freshly cleaned pump can have a disconnected airline. Check the observable conditions before deciding that the timing explains everything.
Jump to water-depth checks, air-intake checks, additive-related foam, or the restart procedure.
Record the conditions before changing settings
Take a photograph of the control positions and normal sump waterline. A short record prevents you from losing a previously useful setting while working through a temporary foam event.
| Record | Why it matters |
|---|---|
| Exact model, pump and controller | Similar model names can have different depth limits and controls |
| External skimmer-chamber depth with the return pump running | Separates installation depth from the internal foam setting |
| Return-pump state when the overflow starts | Reveals a feed-mode or shutdown-related rise in sump water |
| Outlet position, pump speed and any adjustable air setting | Lets you change one control and return to the baseline |
| Starting cup level, elapsed time and liquid collected | Shows whether collection is slowing or remaining uncontrolled |
| Recent additions, their doses and maintenance work | Helps identify a chemical or assembly-related trigger |
| Salinity and water volume lost | Helps prevent a top-off or replacement-water mistake |
You do not need a universal “safe cups per hour” figure. Cup sizes, aquarium volumes and intended wetness differ. For an observation, begin with an empty cup and record the volume collected over a measured interval while staying beside the equipment. End the observation immediately if the cup or waste container approaches its limit. Never keep it running to complete a timed measurement.
Cause 1: break-in or a change after cleaning
A new skimmer needs time to settle into its operating conditions. Manufacturing films and the development of a biofilm on its internal surfaces affect bubble behaviour. Simplicity explains both parts of the break-in process; repeated deep cleaning can also disturb the surfaces you are trying to let settle.
Break-in time is model-specific. The OCTO Regal-INT manual, assembly step 4, allows around one to two weeks and instructs users to monitor the water level during that period. A break-in allowance does not make continuous water loss acceptable.
Check assembly before waiting
With the pump disconnected, confirm that the venturi is installed correctly, the airline is connected, the outlet is unobstructed and the cup seal is seated. After maintenance, check for a hose pinched under the body, a silencer that has filled with rinse water or an outlet control returned to a different position.
Rinse the body and cup with clean water as the manual permits. Avoid household soap and cleaners as a general cleaning method. For mineral deposits on pump parts, use only a cleaning treatment that the manufacturer allows, then rinse thoroughly. Instructions for soaking an impeller are not automatically suitable for every acrylic part, seal or controller.
Put the skimmer at its specified external depth before choosing a starting setting. On the Regal-INT, the manual starts with the outlet valve fully open. Other designs use a different control or starting position.
What acceptable progress looks like
The skimmer should stay contained while its foam production changes. It may initially collect little waste, or collect pale liquid more quickly than usual. The useful signs are a controllable internal level, a foam head that can develop without flooding and a collection rate you can manage.
Do not close the outlet aggressively to force a new, lightly stocked aquarium to produce dark waste. If there is little organic material to collect, raising the internal level can mainly send more aquarium water into the cup.
Stop waiting and continue the diagnosis if the pump immediately pushes water into the cup, the external depth is outside the manual’s range, an air connection is wrong or you cannot keep the overflow contained. If the unit still cannot be controlled after its stated run-in period with the other checks complete, contact the manufacturer with your measurements.
Cause 2: the sump depth is wrong or keeps changing
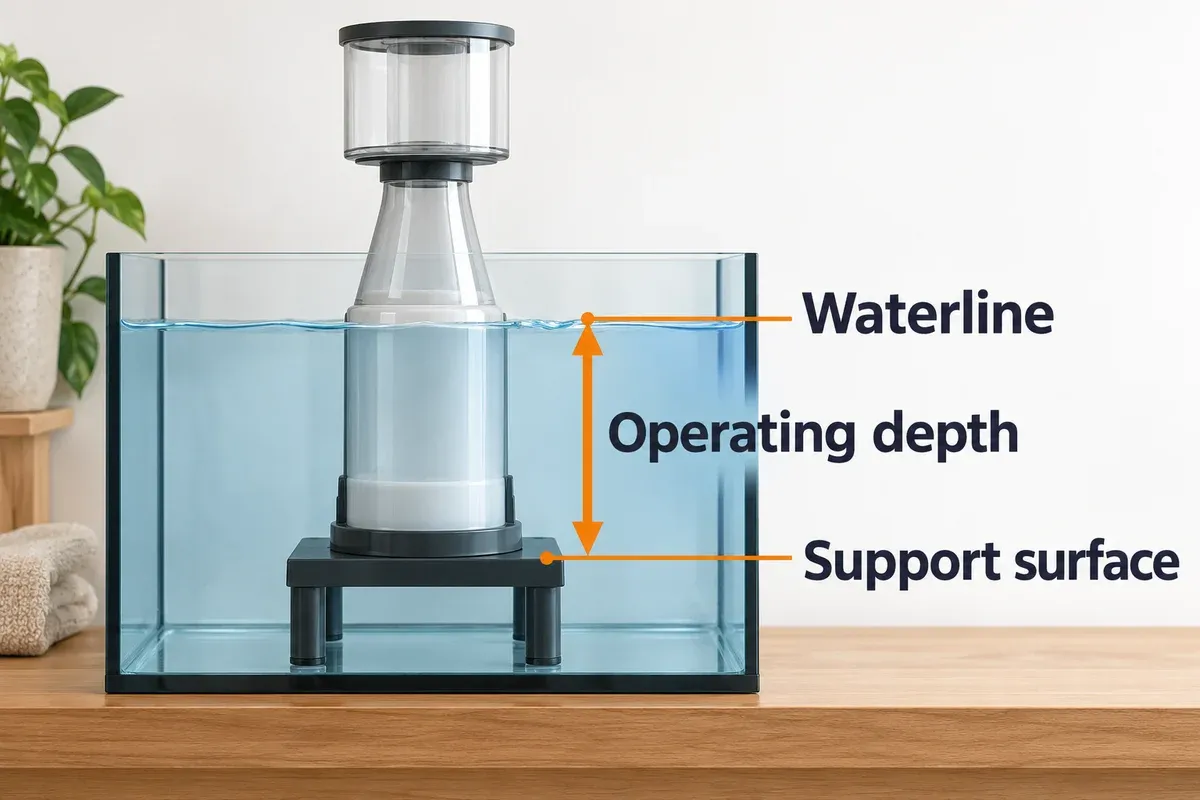
For an in-sump skimmer, external depth means the distance from the surface supporting the skimmer to the surrounding water surface. It is different from the bubble or water level inside the body.
Excessive surrounding depth can leave too little adjustment range at the outlet. CoralVue’s overflow guidance treats sump water level and internal water level as separate checks. Do not assume that deeper water universally increases air draw; the response depends on the pump and skimmer design.
Measure the operating depth correctly
- Run the return pump in its normal operating mode, provided the system is safe. Keep the skimmer off while making the initial measurement.
- Measure vertically from the sump floor to the water surface if the skimmer stands directly on the floor.
- If it stands on a platform, measure from the top of that platform to the water surface. The platform reduces the effective depth.
- Compare the result with the exact model’s instructions. Measure in the skimmer chamber, not only in the return-pump chamber.
- Check whether the waterline changes during ordinary operation, ATO filling, feeding or a filter-sock blockage.
Use the aquarium’s running waterline for tuning. The higher level that may appear after the return pump stops is a separate condition to manage.
The measurement below starts at the top of the support, even when the sump floor sits farther down.
Water-depth examples for specific models
These examples show why a depth suitable for one skimmer cannot be transferred automatically to another.
| In-sump model | Specified surrounding water depth | Source |
|---|---|---|
| Reef Octopus Classic 150INT | 6–8 in, approximately 15.2–20.3 cm | CoralVue Classic 150INT specifications |
| Reef Octopus Regal 150-INT | 18–22 cm, approximately 7.1–8.7 in | OCTO Regal-INT manual, specification table |
| Simplicity 240DC | 6–8 in, approximately 15.2–20.3 cm | Simplicity 240DC specifications |
| Simplicity 320DC | 7–9 in, approximately 17.8–22.9 cm | Simplicity model-specific depth guidance |
Check the manual supplied with your unit if its pump, generation or regional specification differs. If the instructions conflict, ask the manufacturer which applies before changing the installation.
If the chamber is too deep, a stable aquarium-safe stand can raise the skimmer into its operating range. Support the entire base, keep the body level and leave the intake and outlet clear. Confirm that you still have room to remove the collection cup. An unstable container or loose rubble is a poor support for a vibrating pump.
If the chamber is too shallow, raising the skimmer makes the problem worse. Correct the installation or ask about a compatible model. Keep the pump submerged as its instructions require.
When the ATO or return pump changes the level
In many baffled sumps, evaporation mainly lowers the return chamber while the skimmer chamber stays at the baffle height. An ATO maintains the system water volume; it does not necessarily control the depth around the skimmer directly. Check how your particular chambers behave.
If excess top-off water raises the skimmer chamber, use the ATO overfilling guide to check the sensor, pump command and possible siphon. Restore the normal operating level and measure salinity before retuning the skimmer. Adjusting the outlet around an abnormal sump level hides the water-level fault.
When the return pump stops, water draining from the display can raise the sump level around the skimmer. Stop the skimmer before stopping the return pump. On restart, run the return first and wait until the measured operating waterline has returned and remains steady, then start the skimmer.
A controller delay or coordinated feed mode can help, but its duration must suit the actual system. Watch a normal shutdown and restart with enough sump capacity available; do not assume a preset timer guarantees that the waterline has settled.
If you change the return pump during a sump rebuild, size the return flow for the actual operating head and recheck the skimmer’s running waterline afterward.
Cause 3: the outlet or internal level is causing flooding
The outlet lets water leave the skimmer body. On a typical gate-valve design, opening it lowers the internal level and closing it raises that level. A wedge pipe or other regulator performs a similar job, but the direction and starting position depend on the model.
The CoralVue tuning guide describes the relationship between outlet position and wet or dry collection. Small adjustments matter once the surrounding sump level is correct.
With the pump disconnected, inspect the water outlet for:
- Debris, deposits or an animal blocking the opening.
- A kink, added hose or fitting that restricts flow.
- A sump wall, filter material or other equipment pressed against the outlet.
- An extension that traps air or submerges a vent that should remain open.
- A control assembled incorrectly or left too far closed after cleaning.
An underwater outlet is not automatically wrong. Some skimmers are designed to discharge underwater; others need an unobstructed vented outlet. CoralVue specifically warns about submerging an outlet without proper venting. Follow the design rather than applying a blanket “keep every outlet above water” rule.
For a restart, select the manual’s open-outlet or lowest-foam starting position. If water still races into the cup, stop and recheck the surrounding depth and air intake. Closing the outlet further generally raises the internal level on these designs.
A cup drain and the skimmer’s main water outlet are different paths. Opening the cup drain empties what has already reached the cup; it does not remove a restriction in the main outlet.
Cause 4: the air hose, silencer or venturi is restricted
The venturi is the fitting that draws air into the pump’s incoming water. The pump breaks that air into bubbles. Salt deposits, dust, a kinked hose or water in the silencer can change this mixture.
The resulting symptom depends on the skimmer. You may see fewer bubbles, larger bubbles, poor foam or a higher internal water level. CoralVue identifies restricted air intake as one cause of overflow, because reduced airflow can increase the water drawn through some pumps. Weak bubbles alone do not prove a pump failure.
Inspect the whole air path
Disconnect the pump before opening or cleaning wet components. Trace the hose from its air inlet through the silencer to the venturi. Check for bends, salt crust, pooled water, loose fittings and a hose trapped behind the skimmer.
If you use an added air filter, CO₂ scrubber or extended airline, inspect that section too. Any accessory in the air path needs to remain within the skimmer manufacturer’s permitted setup. Do not compensate for a restriction by permanently raising the internal water level.
Clean the accessible hose and silencer as the manual permits. Inspect the narrow venturi opening and remove deposits without enlarging it. Do not drill the fitting or modify the pump impeller to obtain more air.
If deposits return around a dosing outlet, inspect the tip and its position as well as cleaning the venturi. Measure the dosing pump’s actual output and check for flow after it stops before increasing the supplement schedule. Cleaning a deposit does not establish whether the pump delivers the intended amount.
If a silencer has a designated water drain, use its instructions. The cup’s waste hose and the silencer’s drain have different jobs. Refit any silencer drain plug that the design requires before operation.
Check the impeller and pump chamber if the air path is clear but the bubble pattern remains abnormal. Rinse after any approved descaling treatment. A cracked impeller, damaged shaft or persistent controller error needs service or a compatible replacement part.
Recheck the level after cleaning
Restored airflow changes the operating conditions again. Refit all connections, use the low starting setting and watch the cup during restart. A skimmer tuned around a dirty venturi may need adjustment once that restriction is gone.
If the cleaning restores a controllable level and normal bubble formation, record the result before touching another setting. If the same fault returns, note how quickly deposits or water reappear and ask the manufacturer about the installation and maintenance interval.
Cause 5: additives or tank work changed the foam
A skimmer separates waste at the surfaces of air bubbles. Substances that change how those surfaces behave can suppress foam, make it much wetter or cause a sudden surge. The same food or treatment category does not produce the same response in every aquarium.
CoralVue lists epoxy, frag glue, some conditioners, bacterial additions, fresh filter socks and newly mixed salt among possible triggers. Check the timing and the exact products used, while separately confirming that the water change or maintenance did not raise the sump level.
Review changes since the last stable run. Record the name, dose and time of any addition; include rinsing or cleaning products used on equipment. A sequence of several additions makes it harder to identify one trigger, so avoid adding another product simply to quiet the skimmer.
Water conditioners and replacement water
Check the formula rather than blaming every dechlorinator. Seachem states that Prime will not over-activate skimmers. That is a claim for Prime, not a guarantee for other conditioners, doses or combinations of products.
After a water change, verify the replacement water’s salinity and temperature and confirm that it was mixed as the salt manufacturer instructs. Also measure the current skimmer-chamber depth. A chemical foam response and excess water added during the change require different corrections.
Do not test a suspected conditioner by dosing the aquarium again. Do not leave chlorine or chloramine untreated to avoid a possible skimmer response. Use suitable aquarium source water and the water-treatment product’s instructions.
Epoxy, coral glue and new filter socks
If the overflow starts during coral mounting, pause further adhesive work and check the adhesive’s aquarium instructions. Remove loose material only when you can do so without damaging the coral or disturbing livestock. Keep the skimmer contained or off while deciding whether the product needs time, a water change or removal through controlled skimming.
For a fresh filter sock or other cleaned item, check how it was prepared and whether cleaning residue could remain. Remove the suspect item while you check it. Do not assume a new item is clean simply because it has not been used before.
A temporary event does not justify permanent tuning around altered water. Start the skimmer again at a conservative setting and watch the response. Return toward its previous setting only when the foam becomes controllable.
Feeding, supplements and medication
The Red Sea REEFER manual’s feeding section recommends pausing before surface-active additions and restarting when normal foaming returns. Its stated 30-minute pause is conditional on recovery, not a deadline to restart an overflowing skimmer.
Medication and treatment instructions take priority over ordinary skimmer tuning. Check whether the product requires the skimmer to remain off, additional aeration or removal of chemical filter media. Do not skim out an active treatment simply because it affects foam.
Activated carbon or a water change may be appropriate for an unwanted substance after its intended use. Choose that response from the product’s instructions and the aquarium’s condition. Carbon is not a universal antidote, and using it during medication can interfere with the treatment.
If you suspect household cleaner or another unknown contaminant entered the aquarium, treat that as a contamination problem. Stop further exposure, maintain aeration and obtain qualified guidance promptly. Waiting for a normal-looking foam head does not establish that the water is safe.
Restart and tune without waiting through an overflow
Before switching the skimmer back on, confirm that the cup is empty and seated, the drain is secure, the external depth is correct and the outlet and air path are clear. The return pump should already be running at the stable operating waterline.
- Use the manual’s lowest-foam or open-outlet starting setting. Select pump speed and adjustable air settings according to that model’s instructions.
- Start the skimmer while staying beside it. Watch the internal level, cup and surrounding waterline.
- If the level remains controllable, change one adjustment by a small amount and observe its effect.
- Record the setting and collection rate. Compare later observations under the same operating conditions.
- Allow longer settling time only while the skimmer remains contained and the aquarium’s water volume and salinity remain controlled.
There are two different observation periods. A restart tells you whether the equipment is flooding immediately. Final tuning takes longer because a foam head must develop.
CoralVue’s tuning guidance allows several hours between small tuning changes, with a longer initial settling period. Simplicity’s tuning procedure uses shorter checks while setting the bubble level, followed by observation over one to two hours. Use the procedure for your model. Neither approach requires watching saltwater pour away until a timer expires.
Stop the run immediately if any of these occurs
- The cup approaches its safe fill limit or the drain cannot keep up.
- The waste container approaches its marked limit, tips or leaks.
- Water reaches the cabinet, electrical equipment or a connection that should stay dry.
- The sump falls toward the return pump’s minimum operating level.
- The measured salinity moves away from the intended aquarium conditions.
- The pump runs dry, makes a new grinding noise or repeatedly reports a fault.
- Fish show respiratory distress or other sudden abnormal behaviour.
For the first four conditions, stop the skimmer and contain the water before resuming the diagnosis. For pump damage or a persistent fault, disconnect the unit and obtain service guidance. For livestock distress, address circulation, aeration and water conditions promptly.
Keep wet skimming deliberate. A manageable collection rate with planned saltwater replacement can serve a particular maintenance purpose. An unexpectedly fast cup fill is a reason to investigate, even when the liquid looks clear.
Is the skimmer too large for the aquarium?
Sizing matters for consistent waste collection, but a high tank-capacity label does not establish the cause of an acute overflow. A skimmer that worked normally before a water-level change or chemical addition still needs those checks first.
CoralVue’s selection guidance matches skimmers to bioload and system conditions, including feeding, air draw and neck size. A lightly stocked aquarium may not sustain the same foam production as a heavily fed system of similar water volume.
Reassess sizing after the external depth, outlet, air path, break-in and recent additions have been addressed. Discuss the actual aquarium volume, livestock and feeding routine with the manufacturer. Useful clues are persistently inconsistent foam in otherwise stable conditions and a unit chosen for a substantially different stocking level.
Do not diagnose oversizing from a pale cup alone. Do not increase feeding to make an unsuitable skimmer collect more waste. And do not repeatedly close the outlet until aquarium water spills over the neck. If the installation is correct but normal collection remains poor, ask whether pump settings, another model or a different maintenance approach fits the system.
Repair, replace or ask for help?
| Confirmed finding | First action | When to seek service or replacement |
|---|---|---|
| Excessive or changing sump depth | Restore the normal level or use a stable stand within the model’s range | The required depth or cup clearance cannot fit the sump |
| Obstructed outlet or venturi | Remove the restriction and repeat a supervised restart | A damaged part cannot be cleared or sealed correctly |
| Watery foam after a known addition | Follow the product instructions and contain any collection | The response persists despite the appropriate removal or recovery steps |
| Damaged impeller, shaft, cable or pump | Disconnect the equipment | Use manufacturer service or the exact compatible part |
| Cup sensor or waste-container shutdown does not stop the pump | Stop unattended operation and test according to the manual | The documented shutdown cannot be restored |
| Persistent poor collection with stable, verified conditions | Review bioload and settings with the manufacturer | The model does not suit the actual system |
Before contacting support, provide the exact model and pump, measured external depth, control positions, photographs of the outlet and airline, and the sequence leading to the overflow. Include the elapsed time and collected volume from any safely completed observation. These details help distinguish a setup fault from a failed part.
Replacement options when the existing unit cannot fit or be repaired
Replacing a skimmer does not remove a chemical trigger or fix an overfilling ATO. Consider the following models only after confirming that a replacement is needed. Measure footprint, cup-removal clearance and working depth before choosing.
The Reef Octopus Classic 150INT has a fixed-speed Aquatrance 2000s pump and an adjustable outlet valve. It suits an in-sump installation where those controls are sufficient and the 6–8 in working depth is available. Its roughly 12.4 × 8.7 in footprint and 22 in height require room beside the pump and above the cup.
Check current price on Amazon →The Reef Octopus Regal 150-INT adds a VarioS-2S pump with five output settings and a safety float-switch connection. It offers more pump control, but still needs a compatible installation: the OCTO manual specifies 18–22 cm of surrounding water. Check that the shutdown arrangement protects the actual cup or waste container you use; a controllable pump does not make a loose drain safe.
Check current price on Amazon →The Simplicity 240DC combines adjustable pump speed, air intake and a wedge-pipe water-level control. Its footprint is approximately 8.3 × 7.9 in and its height 19.5 in, with a 6–8 in working depth. Use its bioload guidance: the 240-gallon maximum is for light loading, while the heavy-bioload rating is up to 120 gallons.
Check current price on Amazon →For broader installation and model choices, see the protein skimmer comparison.
Prevent the same overflow from returning
Keep the normal running waterline marked and inspect the collection cup routinely. Empty it before it becomes full, even if you also use an external waste container. Check that its hose remains attached and that any approved high-level shutdown works as the manufacturer describes.
After cleaning, reconnect the airline and restore the documented starting settings before restarting. Keep a note of when the venturi, silencer and pump were last inspected. Deposits that recur quickly deserve attention before they change the bubble pattern again.
Coordinate the skimmer with return-pump maintenance and feed modes. Restore the return flow and normal sump level before bringing the skimmer back online. Check the actual waterline after changes to sump equipment, filter media or ATO position.
Before adding food, adhesives, supplements or treatments known to affect your unit, follow their skimmer and aeration instructions. Avoid retuning during a temporary response. Once the aquarium is stable, compare the skimmer’s behaviour with your recorded baseline.
Frequently asked questions
Why does my protein skimmer overflow straight after a water change?
Check both branches. Too much replacement water or a change in return-pump operation can raise the sump level. Newly mixed salt, a treatment or a new filter item can also affect foam. Measure the external skimmer depth first, then review the water preparation and additions. Timing alone does not distinguish them.
Can I leave the skimmer running without its collection cup?
Do not use cup removal as a general way to manage an overflow. Stop the pump before emptying or removing the cup. Only operate without it when the exact manufacturer’s procedure explicitly permits that arrangement and all water remains safely contained.
Is clear skimmate safe to return to the aquarium?
Clear liquid can still contain the substance driving excessive foam. During troubleshooting or removal of an unwanted additive, discard it and account for the saltwater volume removed. Do not return accumulated sludge or suspected contamination to the sump.
How long should I wait after lowering the foam level?
Use your model’s tuning procedure, but first verify that the restart stays contained. Allow settling time only while the cup, waste container and sump remain within their safe limits. If liquid continues to rise uncontrollably, stop immediately instead of waiting for the scheduled check.
Can a blocked airline make a skimmer overflow?
Yes, on some designs reduced airflow allows the pump to move more water and raises the internal level. Others mainly lose foam production. Check the hose, silencer and venturi when the bubble pattern changes, then reassess the setting after cleaning.
Does an oversized skimmer cause sudden overflow?
Its rating alone is insufficient evidence. Check the surrounding depth, outlet, air intake and recent chemical additions first. Sizing becomes a later question when stable, correctly installed equipment still cannot collect waste consistently.
Will a larger collection cup or waste bucket solve it?
Extra capacity gives you more time before a spill, but the skimmer may still export aquarium water continuously. Correct the cause and use the manufacturer’s approved collection and shutdown arrangement. Never rely on container size as permission to leave an uncontrolled drain running.
Sources and manufacturer references
- OCTO Regal-INT instruction manual: model depth, starting valve position, run-in and maintenance.
- Red Sea REEFER 300/600/900 manual: valved waste hose, cup maintenance and feeding-related foam changes.
- CoralVue: skimmer overflowing: water level, outlet venting, chemical triggers and restricted air intake.
- CoralVue: tuning a protein skimmer: outlet adjustment and settling time.
- CoralVue: choosing a protein skimmer: system and bioload matching.
- Simplicity: stopping and preventing overflow: surface-active compounds and discarding collected liquid.
- Simplicity: break-in and tuning: surface films, biofilm and adjustment sequence.
- Seachem Prime product information: the manufacturer’s specific statement about skimmer activation.